🌸 Transform your walls, transform your life!
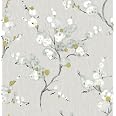
The NuWallpaper NU2679 Mirei Peel & Stick Wallpaper is a modern floral design that combines style and functionality. Made from durable vinyl, this self-adhesive wallpaper is easy to apply and remove, making it perfect for renters and DIY enthusiasts alike. With a generous coverage of 30.75 square feet, it allows for seamless decorating without the mess of traditional wallpaper. Enjoy a fresh, elegant look in any room with this versatile and repositionable wallpaper.


| Material | Vinyl |
| Color | Taupe |
| Brand | NuWallpaper |
| Style | Kitchen & Bath |
| Product Dimensions | 216"L x 20.5"W |
| Coverage | About 30.75 square feet |
| Pattern match | Straight Match |
| Theme | Leaves,Floral,Modern |
| Is Stain Resistant | No |
| Pattern | Wallpaper |
| Manufacturer | NuWallpaper |
| Special Feature | washable, removable |
| UPC | 091212285279 |
| Number of Items | 1 |
| Installation Type | Self-Adhesive |
| Global Trade Identification Number | 00091212285279 |
| Part Number | NU2679 |
| Item Weight | 1.94 pounds |
| Country of Origin | United Kingdom |
| Item model number | NU2679 |
| Size | 20.5" x 216" |
| Item Package Quantity | 1 |
| Number Of Pieces | 1 |
| Special Features | washable, removable |
| Usage | Inside; Amateur |
| Included Components | NuWallpaper NU2679: Mirei Peel & Stick Wallpaper |
| Batteries Required? | No |
O**H
Classy and modern - tips in review regarding sticking issues and how to overcome this please read
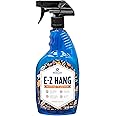
Gives hope to a hideous bathroom.Do yourself a favor, buy EZ hang for peel and stick paper by Romano. It's an absolute must.The reason this sticks well for some but not for others is due to the paint you have on your wall. I found it sticks nicely over Sherwin Williams flat paint. I tested it on a cheaper eggshell that was from the previous owner and it was not sticking good at all. So it's the paint.How to solve this? EZ Hang by Romano. Why? It's got a little additive in it to help slide into place on the wall but most importantly has some added adhesive that will sold any sticking issue. Best part? It's not permanent to the wall you can still easily remove it. I paid $15 for a bottle of EZ Hang - it was worth every penny and I am cheap. So go for it!
C**Y
Nice wallpaper
Made an accent wallpaper for the powder room
K**Y
Finally got around to using this and reviewing it.
Bought a roll of this when we had just started building our house. Intended to use within the cabinets on top in my kitchen - they have openings for seeded glass.Have not gotten around to that, but I did pull it out for a pantry we've made from repurposed oak, builder grade kitchen cabinets.See the picture... there will be a butcher block top installed soon.This is JUST sticky enough to stay up in a dry area. Our walls are very lightly textured and it's just barely hanging on, but that's good enough for what it is being used for. I don't know that it would stick very well in a humid area, like a bathroom.I would suggest a light dusting of a spray adhesive, such as 3 m if going up anywhere it could be stressed by moisture or even a normal wall texturing. I've done that in my horse trailer in the past, and while you better have it lined up right the first time, the adhesive isn't terribly forgiving like old school wallpaper paste, it is effective.I'm very pleased with how this looks with the paint color and gives me that touch of 'old fashioned kitchen' I was going for in that room with those cabinets.I do have enough leftover I think I can do the backs of the glass faced cabinets and will be doing that this winter.
L**.
Just what i was hoping for...
Its very pretty, and it lined up well. However, its not very sticky and i question how well it's going to stay on the wall. I will update review if it starts to come down.
A**R
You’ll need plenty of patience
I need to start by saying I grew up in the 80’s when wallpaper was the RAGE so I’m no novice to hanging it. Peel and stick is new to me and there is a learning curve so if you’re like me, be prepared to summon all of your inner tranquility when working with this stuff. To start with the positives…the seams lined up really well (you can see from the pictures) and after working (and I mean WORKING! I ended up using a 9” plastic cutting board to smooth it! It was amazing!!!) to get all the bubbles and wrinkles out, the paper laid very smooth and the adhesion seems to be really good. There was a normal amount of waste and the end result is great. Now…the not so positives…it’s super sticky. This is a positive in the end but it makes it HORRIBLE to work with! Prepasted paper can be moved around, picked up, and reapplied. This stuff is a one and done. You may possibly be able to maneuver it once it’s down, but there’s a serious risk of it ripping. The worst is when you’re slowly peeling the backing off, moving it down the wall, and the backer paper rips.🤦♀️ Having to dig the little pieces up while the paper is sticking to itself….UGH!!!!😩 I still have PTSD!!!! Also, don’t even try to wrap your corners. Just….don’t! The pictures can’t do it justice! By the second corner, I just cut it straight down and slightly overlapped the pieces. If you look closely, it shows but the bubbles and wrinkles are way worse!All in all, I love the finished product. Time will tell if it shrinks or starts to peel. It’s been three weeks and no issues yet. Knowing what I know now, I would definitely do it again but I would maybe do things a little differently.
E**.
Really beautiful and relatively forgiving seams
This paper works great in my small bathroom space. It bubbles slightly when the shower is running (to be expected from the steam) but settles back down to a basically smooth finish when the room cools. The paper is a very nice quality and it’s not too difficult to align the patterns and largely hide the seams!
M**N
Looks great, mess-free install
I bought this wallpaper to use for an accent wall in my master bedroom closet. I have 8' ceilings and it took two rolls to cover one wall that was about 9' wide (but 14" of that wasn't covered because a closet fixture covers that part of the wall). I started at one side and worked my way over to the other side of the wall. Some really important things to know to make sure your install is successful:1. Let your wallpaper acclimate (sit in the same room you'll be installing it) for 24-48 hours before putting up on the wall.2. Clean your wall with a damp rag and let it dry completely. Do not use cleaner.3. Make sure your first pass is completely straight or it will be really hard to perfectly align the seams on your next pass.4. Buy the wallpaper tool. Use it. Smooth the crap out of that wallpaper, every centimeter. Go over it more than once.5. See #46. Make sure the edges and seams are completely flat and stuck to the wall.7. Smooth out from the top to the bottom and if there's a bubble you can't smooth out, pull the paper back a little and try again (your fingernails will also help to flatten out any stubborn bubbles).8. Make sure you have a SHARP blade to cut the paper. If you don't, go buy one - it will save you so much anguish.9. When you cut the paper, have a straight edge to press up to the paper as a guide.This stuff is essentially a giant sticker and if you're like me and always misaligned the stickers on your toys as a kid, then this might be tricky to install. But be patient, you'll get there. I had to pull back a couple times by a foot or more just to make sure I could get everything even and smooth, but it didn't affect the stickiness of the paper one bit.It's been up for a few days now and looks amazing and shows no signs of coming off the wall at all. I couldn't be happier!
Trustpilot
2 months ago
2 days ago