๐ ๏ธ Seal the cracks, secure your space โ donโt let damage sneak in!
The Simpson Strong-Tie CPFH09KT Crack-Pac Flex-H2O is a professional-grade polyurethane injection kit featuring two 9 oz. cartridges designed for durable, water-resistant crack sealing in concrete and masonry. Engineered for easy application and long-lasting flexibility, itโs the go-to solution for maintaining structural integrity and preventing moisture damage.
Material | Polyurethane |
Brand | Simpson Strong-Tie |
Item Weight | 4.4 Pounds |
Compatible Material | Concrete, Masonry |
Water Resistance Level | Water Resistant |
Item Form | Liquid, Gel |
UPC | 707392538806 |
Unit Count | 1.0 Count |
Surface Recommendation | Concrete, Masonry |
Manufacturer | Simpson Strong-Tie |
Part Number | CPFH09KT |
Item Weight | 4.4 pounds |
Package Dimensions | 11.3 x 8.2 x 4.6 inches |
Country of Origin | USA |
Item model number | CPFH09KT |
Is Discontinued By Manufacturer | No |
Item Package Quantity | 1 |
Included Components | Sealent |
Batteries Included? | No |
Batteries Required? | No |
F**H
Worked Perfectly
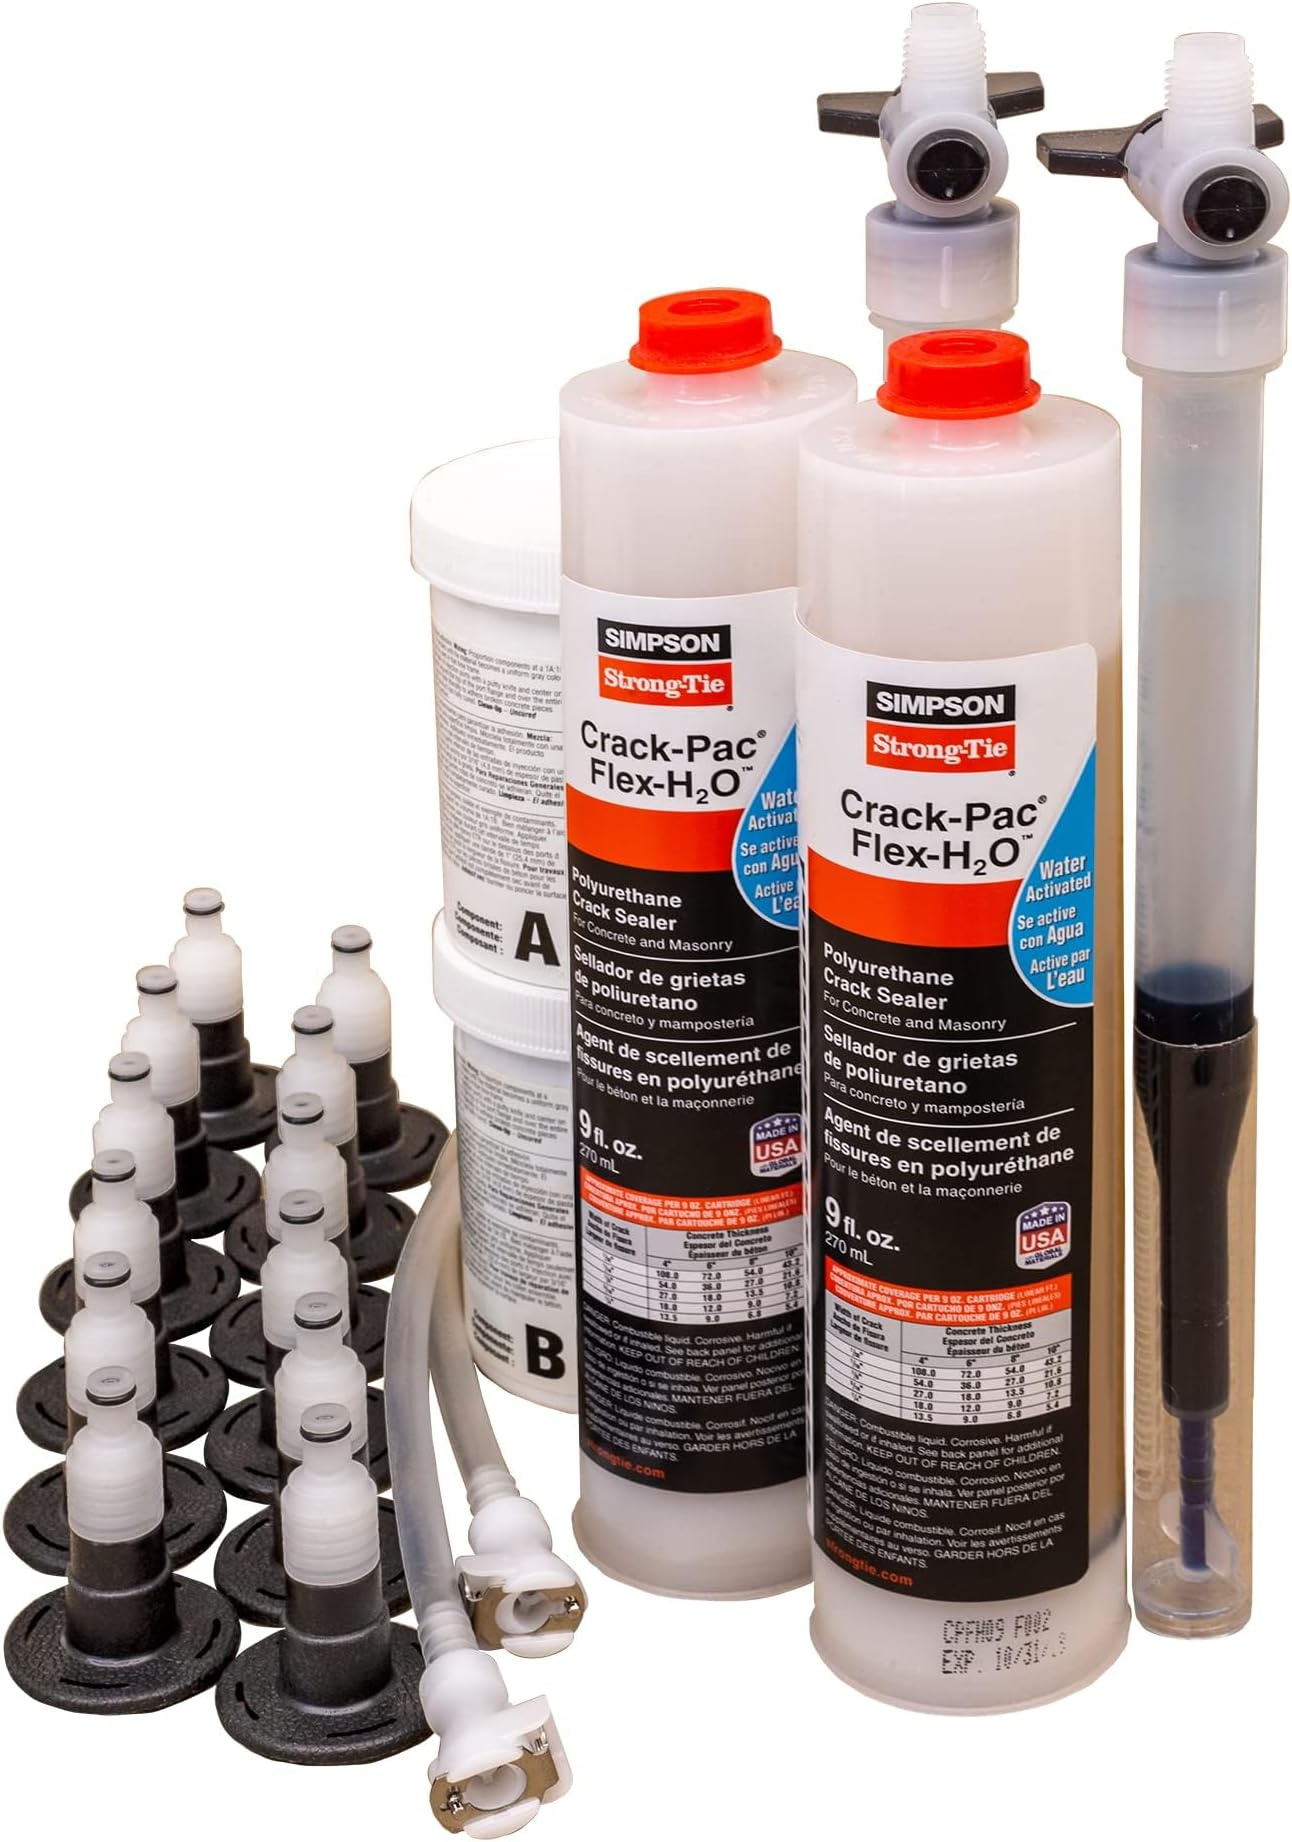
My leaky foundation crack started the top right corner and bottom left corner of the basement window well all the way down to the floor. I got a couple of estimates and both companies were asking $900.00. So I went to Google to see what I could find and here I am. This was so easy to do. Total time, prep to clean up was 3.5 hours on a cold Saturday morning.The lower crack cut through the bumpy seams of the concrete forms. I cold chiseled the seam as smooth as I could get, but it was not ideal. I wire brushed the crack area, which created lots of concrete dust. Wear a mask when you do this.One section of the crack was so bumpy, I had to trim the base of the injection port so it would seat more flush. I epoxied each of the ports in place. Careful not to put the port to close to floor, you need some room to work with the epoxy. Mix a small amount of epoxy but it will take longer, as the stuff does harden in about 5 minutes to the point you cannot spread it very well. Tip, Get a box of disposable gloves so you change out the gloves quickly when you get to much on the gloves, you'll go through them quickly. After the ports were epoxied in, I started to seal the crack. I radiated out from the port and stayed on a 2-3 inch line to the next port. I was mixing just enough epoxy for each run between the ports. At the window frame corners, I spread the epoxy over the metal frame. I used roughly 70% of the epoxy in the containers. I started the water filling of the ports. This is where the kit needs some improvement because it does not provide a good method to fill the ports. I took a turkey baster and piece of rubber tubing and combined it with the kits tubing. My crack initially took a lot of water before coming out the port above. As expected, I had a water leak coming out at the frame, so I added more epoxy to that area. Amazingly, the concrete seam that I straddled with the injectors were functioning properly.I was ready to start injecting the polyurethane at this point. Works exactly as everyone in this blog states. I didn't think any was going in because the caulk gun trigger was hard to pull. The viscosity of the stuff is deceiving. Next thing I know is the foam is coming out of the port above and quickly moved to the next port. TIP: Hold the port in with while you are injecting because the back pressure of a small crack will push the port in the closed position. After all the ports were filled, Green foam was visible through the edge of the window frame. Small holes in the concrete also oozzed the blue/green foam. It was awesome. The visible foam is a good indicator that the urethane is expanding and sealing. It continues to expand slowly for another 5 minutes.Here's were I deviated from the instructions. I left the injection ports in.You won't be disappointed in the product, and yes, you can do it yourself. There's even a couple of YouTube videos to increase your confidence and save yourself a lot of money.
Y**R
Great product that works.
I have a basement crack that stayed dry for years and only started leaking slightly a few months ago. I knew this product from a friend long time back and when it happened I decided to give it a try. Before the purchase when comparing between the epoxy version and this one, I received a few advices from people around and the conclusion is simple : if it isn't a structural problem (which it wasn't for me, fortunately) and you don't want to or can't seal the other side of the wall, use the foam. Thus I bought this.I live in greater Boston area and I ordered it in Jan when everything was frozen after a big rain (yes, a rain in January before the historical snowfalls were recorded later the same year). So the ground temperature was probably below or close to freezing. I called the customer service and they suggested if the temperature inside is above 40 it is good. Although I didn't take the chance and waited until late March instead, when the snow was almost gone and outside temperature was around 50. Basement temperature was always about 55 to 60 so there wasn't any problem there.Anyway I agree with most of other reviewers that this thing does work. Plus I have a few additional things/tips to share here.1. Pay extra care when you attach those ports, I only figured out that most of my leaking holes happen around the ports during the foam injection. Seal the port's base completely before moving to next one.2. Only mix a small portion of the epoxy. You will have at least 5 mins to use them so don't hurry yourself. Also don't worry about the epoxy may run out -- it probably wont. My wall is 8 feet tall and now I still have about 1/5 to a quarter left in jars after the job was done.3. Do inject water through ports first. Put aside the needed moisture, water could be an indication that the foam is moving up -- before the poly, you will see water coming out of the port above the one that is accepting your injection.4. When injecting the last port (the highest one), be careful about overflow as there won't be any indication of "enough". I made a little mess there when the fluid flew over out of the top of the wall even if I sealed the crack there too.Overall it is a great product and relatively easy to apply, as long as you follow instructions and tips posted here and by other reviewers. After another few rainfalls and snow melting, my crack is still dry, more importantly the concrete around the crack is dry too -- my moisture detector shows right after a big rain the place where the water was seeping through (the dark area you can seein my photo) was only about 8% to 9%. By comparisons it was above 15% when it leaked. Only hoping it can last long as well.Good luck.Update 04/21/2015 : I wanted to remove the paste-over. So after it was completely dry -- about two weeks later, I used a steal putty knife and a hammer to chop off most of the paste-overs, then sanded the surface a bit. It cost me about another hour. But the result looks good (picture 3) . When the paste-over is off I can see the fillings in the crack. Yesterday it was a big rain storm in Boston area, and it had no leak whatsoever. So I guess I did my job well.Update 04/14/2016 : After one year, it stays sealed. More importantly the crack stays dry all year long. It really sealed the gap. No water has found its way in to my basement. Therefore I am very happy about the product.
Trustpilot
2 days ago
1 day ago