💡 Light up your life on your terms — never miss a moment!
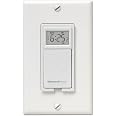
The Honeywell Home RPLS730B1000/U is a 7-day programmable light switch timer designed for professional-grade home automation. It supports up to 7 customizable on/off schedules per week, compatible with all major bulb types and motor-operated devices up to 2400W. Featuring a built-in rechargeable battery, it safeguards your programming during power outages. Its sleek design and large backlit LCD ensure easy use and seamless integration into any modern home.


| Color | White |
| Brand | Honeywell Home |
| Material | Plastic |
| Product Dimensions | 1.5"D x 1.8"W x 2.7"H |
| Item Weight | 4 ounces |
| Number of settings | 7 |
| UPC | 085267560726 |
| Global Trade Identification Number | 00085267560726 |
| Screen Size | 4.1 Inches |
| Manufacturer | Honeywell Home |
| Part Number | RPLS730B1000 |
| Item model number | RPLS730B1000/U |
| Batteries | 1 Lithium Ion batteries required. |
| Is Discontinued By Manufacturer | No |
| Size | Filter |
| Style | Timer |
| Shape | Rectangle |
| Wattage | 1 |
| Item Package Quantity | 1 |
| Mounting Type | Wall |
| Certification | cUL |
| Special Features | Rechargeable |
| Included Components | Built-In Rechargeable Battery, Honeywell 7-Day Programmable Timer |
| Batteries Included? | No |
| Batteries Required? | No |
| Battery Cell Type | Lithium Ion |
| Warranty Description | 1 year limited warranty. |
M**M
Well made hard wired timer. Easy to install and program. Great value.
When I purchased my home I needed to have a radon fan installed as the radon level was just slightly above the advised limit. The fan, like any fan, makes some noise/vibration and the vent pipe goes right by my bedroom on the outside of the house. As a light sleeper this drove me nuts. All last winter I went to the basement and shut off the breaker to the fan each night. It wasn't an issue during the summer thanks to open windows, crickets, tree frogs and other night time noise makers. Then it was winter again...I started shopping for a hard wired timer looking at several variations. I kept coming back to the Honeywell and finally pulled the trigger on it. It arrived quickly thanks to Amazon Prime and I soon went to work. $6 in parts from the big box store bought me a place to mount it in the basement. I shut off the breaker and cut the electrical wire to the radon fan. New box installed and when I went to mount the Honeywell I found it wouldn't fit in the metal faceplate. I needed to trim the mounting tabs on the timer to make it fit. This would have happened to any brand and is not the fault of Honeywell. Once the tabs were trimmed the timer mounted beautifully. Electrical connections were simple.Programming the Honeywell could not have been easier. Set the time, set the day, set when you want it to come on and off. My program was simple and repeated each day. Off at 11p, on at 6a. It works wonderfully and there is now silence when I sleep (except when my kids wake up)I highly recommend this timer and my only complaint is a lack of a backlight on the display. Certainly not a show stopper but it would make the timer even better.As stated above, my radon level was just at the threshold for a mitigation system and I am comfortable shutting it off. Consult a radon professional before shutting off your mitigation system.
M**O
Excellent Timer for Outdoor Lighting
This product solved the problem of turning my porch lights on at night and off during the day while still keeping the switch functional. For the price, I can't image anything better (granted I can't control these lights with my Amazon Echo, but I don't think I need to anyways). The installation was pretty straight forward.(1) turn off power at the breaker(2) remove old switch(3) connect wires to the Honeywell(4) turn breaker on, test, and program with included instructions.(Note you may need to purchase a new wall plate based on your configuration. These are sold on Amazon as well.)I was actually not sure if I had the wires correct because I have two porch lights and I felt like I had an extra wire, but with some luck, I got it on the first try. Programming was pretty easy and there are WAY more memory settings that I will ever need. I believe there are 7 memory banks, but each memory bank holds a full 7-day cycle. So you can program your lights to turn on and off 7 different times independently each day for 7 days (so day 1 does not have to be like day 2). I am only using 1 memory slot and have my lights turning on at dusk and off at dawn everyday.We just went through daylights saving and I was very easily able to update the timing of my lights. Truly a piece of cake.No, I can't tell Alexa to turn these lights on and off as this switch is not Wifi enabled, nor can I turn these lights on and off with an app on my phone, but honestly, all I wanted was to have my porch lights turn on and off every night and mission accomplishd.
J**N
Does what it says
This thing is really cool. I wanted something that I could use to put my porch light on a timer with a CFL bulb, and this works perfectly.Some other available products (light sensors and other timers, including a Honeywell timer similar to this one) only work with incandescent bulbs, which defeats the purpose of putting lights on a timer to save energy. I could leave my 26-watt CFL (100w equivalent) on all day and still use less electricity than a 100-watt incandescent on an 8-hour timer.With this model, you can program either a single on/off cycle to repeat every day, or up to 7 separate on/off cycles for each individual day of the week. I think you can also set an every-day cycle and combine it with 6 additional day-specific cycles if you choose. The cover for the programming buttons also functions as the manual on/off button, and using it does not interfere with your programs.There is another model that works with CFLs -and- can be set to vary its on/off times to match your local daylight calendar (Honeywell Econoswitch RPLS740B 7-Day Solar Time Table Programmable Switch) but for the extra cost, I didn't need that feature.I had some trouble figuring out that you have to slide a toggle under the button cover to "ON" before the switch itself will work AT ALL. I thought that was a bit confusing in the instructions, so now you'll know. Programming is not very difficult but it took me a few tries to figure it out. When you are finished programming, just close the cover and press it once (as if you're turning the light on) to exit programming mode.To use this timer, you need to have a light switch where the power enters at the switch rather than at the light fixture. That's because the timer itself needs to have electricity constantly, in order to operate while the light is turned off. If your power enters at the light fixture instead, shutting off the light would also kill the power to the timer. Most houses are wired the correct way, which typically means at least 1 pair of black/white wires entering the switch box. If instead there is no white wire (i.e. neutral) at the switch, only two black wires or a black and a red, you won't be able to use this timer. (Note: There is no safety concern if your switch box doesn't contain a white neutral wire - it's just an antiquated wiring practice).As a side note, this switch has some sort of capacitor inside that saves your programs during power outages. It isn't a battery, so you would never need to replace it. It has worked fine through a couple of brief outages so far.Edit: Lost power for over a week from some nasty storms this summer (July 2012), but the timer remembered all of my programs and the clock was still correct. Awesome!
Trustpilot
3 weeks ago
2 months ago