🧺 Elevate your laundry experience—dry smarter, not harder!
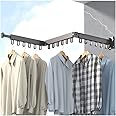
The Foxydry Wall Mounted Clothes Drying Rack is a versatile and stylish solution for drying laundry. With a height-adjustable design of up to 130cm, it features eight drying rails that provide a generous 12 meters of drying space. Capable of holding up to 10 kg of laundry, this rack is made from durable aluminum and steel, making it suitable for both indoor and outdoor use. Easy to install and semi-assembled, it comes with a 2-year warranty for peace of mind.


A**1
Smart, Stylish, and Functional – A Perfect Use of Space
I love the concept of this drying rack—it’s an ingenious way to make the most of limited space. Seven months in, it still works flawlessly. The material quality is excellent, and unlike most drying racks, it’s a pleasure to look at. There’s just something about Italian design and execution —how do they always manage to make everyday items look so elegant?The product description states: “100% Designed and Realized in Italy”, and I appreciate this distinction. Many products claim to be “Italian style” or “designed in Italy” but are manufactured elsewhere—this one truly lives up to its heritage.Functionally, it’s a dream. I can adjust it to any height with ease, and once lifted, it stays securely out of the way, freeing up space below. Installation was straightforward with the manual, and I also found a helpful tutorial video.I highly recommend this drying rack and will be purchasing more!
A**O
Great Product!! Highly recommended!!!!
Great product!I found this item different from all other clothes drying racks. And I decided to try it. It does a great job, I can easily dry all types of laundry on it and adjust it at every height effortlessly. Once lifted it is always out of the way and I can use the space below it. Installation was easy and clearly explained in the manual. I also found a tutorial video in YouTube. Material quality is very good and it looks nice. It’s worth all the money. Recommended!
C**S
Works well
Installed nicely in my laundry room with 9 foot ceilings. Instructions were clear and easy to follow; which took about 45 minutes. Operating it is smooth. My only wish is that it didn't take so many pulls to raise and lower it
A**T
Great concept, terrible installation instructions
Pros: Great concept, correct measurements, works with slight modifications.Cons: Instructions are incorrect, missing steps and it does not include all tools to set it up.If you are attempting to install here are some helpful tips:1. Measure the horizontal holding bar (the one that says Up with the arrow) on the wall but do not install right away.2. Instead, install the vertical bars to the horizontal bar first, using a wrench and Allen key. If you follow the instructions, you will not be able to tighten as the back of the bolt will be almost flush with the wall and you will have no room to hold before tightening. Additionally, make sure the vertical bars are flipped facing you so that the larger hole is facing you and the smaller holes are facing the wall, or you won’t be able to put the screws in.3. Both bars have wheels, they don’t tell you to physically turn them slightly so they sit vertically - make sure you do.4. Once you attach the vertical metal bars to the horizontal one, you can measure and install on the wall.5. Be sure to install the “rack” that will hold your clothes correctly with the arch coming down. You also may need two people, one person to hold it up, one person to screw in the long screws into the wall.6. Don’t put the plastic snap on the 4th row - it’s too far to snap into the vertical bar to hold.7. When installing the string, the longer string goes from the top left, to top right to bottom right and then back up to the top right. To finally secure, push the string through the middle of the wheel (in that little hole in the middle) and then take one of the “wheel fasteners” which is a nut with a bolt inside and feed the end through it, tightening it with the wrench. Tip- pull the string as tight as possible and then secure it as close to the middle of that wheel as you can. Install the shorter string on the left side by going from the top left, to bottom left, back up to top left and secure the string through the middle
Trustpilot
1 week ago
1 week ago