🔗 Connect brilliance without the hassle—light up your space like a pro!
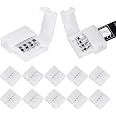
This pack of 10 solderless 4-pin connectors is designed specifically for 10mm wide waterproof 5050 RGB LED strips (IP62/65). It offers a quick, no-solder installation with a durable, water-resistant build, perfect for seamless indoor lighting projects requiring reliable, vibrant RGB connections.


| Color | White |
| Brand | D DrNeeko |
| Indoor/Outdoor Usage | Indoor |
| Special Feature | Waterproof |
| Light Source Type | LED |
| Power Source | Corded Electric |
| Light Color | RGB |
| Theme | Christmas |
| Occasion | Christmas |
| Style | Waterproof 10mm Gapless RGB Connector |
| Material | Copper, Plastic |
| Controller Type | Clasp Control |
| Number of Light Sources | 5050 |
| Voltage | 12 Volts |
| Wattage | 60 watts |
| Included Components | 10 pcs 4pin solderless connectors for 10mm RGB waterproof (IP62/65) led strip light |
| Number of Items | 10 |
| Item dimensions L x W x H | 4.61 x 3.46 x 0.4 inches |
| Control Method | App |
| Water Resistance Level | Water Resistant |
| Seasons | Christmas |
| UPC | 701413502456 |
| Manufacturer | LESCA TEK |
| Part Number | LT-DJ-08BB-2,l-DJ-10BB-2,l-DJ-10BB-4 |
| Item Weight | 0.704 ounces |
| Product Dimensions | 4.61 x 3.46 x 0.4 inches |
| Item model number | LT-DJ-08BB-2,l-DJ-10BB-2,l-DJ-10BB-4 |
| Is Discontinued By Manufacturer | No |
| Assembled Height | 0.4 inches |
| Assembled Length | 4.61 inches |
| Assembled Width | 3.46 inches |
| Finish types | Matte |
| Special Features | Waterproof |
| Batteries Included? | No |
| Batteries Required? | No |
3**N
Perfect
Perfect
T**J
Works wonders
My cat scratched up a couple strips I had and instead of buying new ones I resourced to these and they certainly so the job. Super easy to use and work perfect fine, even overtime. The quantity is nice for the price. Overall great purchase!
M**Y
Works, but not easily.
This product did work but it is very finicky. I had to do like one reviewer did and trim of done of the silicon weatherproofing and fold the copper contacts. After doing that I got a great connection. When cutting the strip to size don't cut between the contacts, leave both sets on the part you are using. Strip the silicone off the copper connectors and fold them back. Should work after that.
N**A
Doesn't work
You have to essentially break the product to open the clips. When you finally connect the strips, the connection between them is very poor, and the connecting LED strip doesn't get the correct amount of voltage to be the same color, or get any color at all. You have to use a vice grip on the clip to get the two strips the "same" color, and even then, it worsens the integrity of the first strip, so the two aren't actually the same color.
N**K
Does what they're supposed to.
I read reviews on how difficult these were to use, I found some ways to take some of the challenge out of these little clips.1.) Carefully peel back the thick clear rubber, take extra care not to tear the thin strip in any other areas.2.) When you cut the broken sections leave both sides of the copper contacts and fold along the line do not cut on the line.3.) Leave just enough of the thick rubber to cover the area you've just folded.4.) Using some sort of tool gently apply pressure to the pins to help pierce the thin portion of the strip. I folded the strip so there would be a definite contact on the pins. If I skipped this step it would sometimes flicker due to bad contact. After I folded it it was a solid connection.
G**I
Modify your light strips to work with these connectors!
These things are NOT at all easy to use. After spending several very frustrating hours trying and failing to make them work, I FINALLY found a method that does. I share it here so you may avoid these same strugglesStep 1. Ignore the way they tell you to set these upStep 2. Carefully peel apart the top plastic layer of the light strips themselves from the 4 metal tabs beneath, at the areas where the lights say they can be cut (see pictures)Step 3. Fold metal tabs onto back of light strip, so they are now facing the opposite direction of the lights, snip excess plasticStep 4. Place folded light strip into these connectors, tabs down and laying on top of the prongs. Close connectorThis is the only way I found that they actually work and work well, but jeeze what a headache
A**9
Works as intended and saved my led strip
I was installing lights to my product table for events and I accidentally broke a strip. I used this product to splice a strip in to repair it. I am horrible at soldering and this saved my bacon. An extra set of hands might make it easier to use but I managed by myself.
H**S
The little helper sent from hell
So, after ordering these once and ending up having the package completely lost and untraceable, we got annoyed and ordered a second set after receiving a refund.While I can say we successfully set up the lights, I can also say it cost blood, sweat, and tears. And a roll of duct tape.These little mo*fo’s DO NOT let you know that you have to pierce your LED strip all the way through, nor do they tell you the copper side- if there is only one side with copper- needs to face against the prongs.We learned this the very long and hard way- that being repetitive trial, error, and screaming.Once we finally got the copper side down and clipped in the godawful things: that’s when we realised it needed to be pierced through. Piercing Daybetter lights does NOT happen with these! You have to shove your finger or any other small object down repetitively until it finally gives and makes a hole.All in all: it works. It’s just hell to get it there, and even once you arrive it’s noticeably imperfect (we had to use duct tape to provide pressure so it would keep the RGB+ connected properly to the prongs... for some reason??)Pros: tests if your marriage is meant to last. Eventually works.Cons: Even once you get it to work, the stress you’ve endured makes your victory bittersweet.
ترست بايلوت
منذ 3 أسابيع
منذ أسبوع