🔩 Master every flare with precision and power!
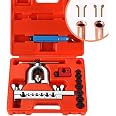
The Wostore Double Flaring Tool Kit is a professional-grade set designed for flawless flaring and cutting of copper, aluminum, brass, and soft steel brake lines. Featuring seven precision adapters, a chrome-plated alloy steel swivel, and tempered high-speed steel blades, this durable kit ensures long-lasting performance. Packaged in a rugged carrying case, it’s the ultimate all-in-one solution for automotive and plumbing professionals seeking reliable, precise, and efficient tubing repairs.


| Manufacturer | Wostore |
| Brand | Wostore |
| Model | Wostore Double Flaring Tool Kit for Copper, Aluminum, Soft Steel Brake Line and Brass Tubing |
| Item Weight | 2.94 pounds |
| Package Dimensions | 9.84 x 8.62 x 2.32 inches |
| Item model number | USAC01502-1 |
| Manufacturer Part Number | 1502 |
J**S
Doesn't get much better
Quality tool! I was worried about brackets bending or failing with regular use. These hold up great and do not feel like they will easily fail. I feel like this would be a great addition to any starter kit for someone getting into working on brake line repair or a/c work. Directions are quick and easy to follow, this is a great tool.
A**R
Worked Well With Copper Refridgerator Tubing
I had never flared copper before, but went with this kit because it seemed to have everything and was a good deal. It worked well. It definitely helps to watch a few youtube videos, but I found this kit worked great.
J**E
Fair price
Works well on soft metals. Don’t try on hard steel.
B**B
Don't be skeptical about this tool, it's a serious brake tool, it really works good!
For the price point this is an awesome tool. The tolerances on this tool where more than I expected at this price. The dyes proved to be very hard Steel I use the 3/16 die to double flare brake line and really pushed it to the Limit as far as tightening . I was able to flare the hard steel lines I know Chrysler Town & Country with ease. They were the plastic coated steel lines so I did have to shave off the plastic coating about an inch up for each connection in order to get a solid grip on the line in the 3/16 hole . I expect to be able to use this for at least a dozen more jobs. I was hoping it would just get me through one job. If you're the average do it yourself mechanic and you need to do one or two jobs this is your tool without question. You cannot go into the break business with this tool you have to spend a lot more money. But it will definitely get the job done!
L**R
Double Flare and Bubble Flare Capable
I have a 2002 Ford F150 and the long brake line to the back brakes rusted out. I have not done brakes for 30+ years but I thought I'd give it a try. I bought 25 ft of 4lifetimelines copper nickel alloy 3/16". I used the original brake line to figure out how much brake line I needed. I cut the line with a copper pipe cutter. I watched YouTube and how to make the flares. I knew the flaring tool would make a double flare, but I didn't know if it would make a bubble flare. It does, use the flat side of the flaring clamp and the 3/16 round attachment, secure tight and press down. 1st time that I did it, it looked good. Remember to put the fitting on before you flare. I double flared the other end, put it together, bled the brakes, checked for leaks on the 2 ends and I was good to go.
W**!
Heads up for virgin flarers
First time flarer here. You can't beat the inexpensiveness of this tool. However, we used 3/16" lines and this tool, in SAE, won't be sufficient to clamp the lines. European car, US tubes. Inner diameter works.I had to use a flaring vice grip from a different kit (the part that holds the brake line). I oiled the heads of the bubble flare tool and made many attempts as per attached photo before starting on the actual brake lines. Biggest criticism to this is that there is NO way to know how high to place the line to get the bubble flare done right. Too high, and you get a double bubble flare. Too low and it isn't a bubble.The instructions suggest (via an illustration) that the line is flushed with the top of the vice grip. That's clearly not correct.My flare where never clean. I had to use other tools to clean the edges off. You need height for the flaring.If you were to buy this kit, make sure to have a scive or someway to clean the inside and outside of the pipe before flaring. Even when using a pipe cutter, the inner diameter is smaller from the cut and thus the tool won't fit.For the height, I used trial and error and a caliper for precise measurements. Eyeballing it didn't work as you can tell from my photo.The correct height would also yield half of the flares to be off centered. So the method I found best was to figure out the correct height, go down halfway, flare.Then bring the whole tube up to the correct height and finish the flare. I had the tube vice grip part on a large heavy duty bench vice which helped tremendously.If I didn't perform the two step process, there was a strong chance that the flare would be off centered. The part where the flaring apparatus sits (vice part) does not sit flush on its side with the tube vice grip even though I used a different vice grip from another kit. They are both the same design and dimensions width and thickness so no variables there.Once flared, you need to knock the unit off the tubing as it gets stuck in it each time. A quick tap from the hammer to the apparatus and it comes off.While visually, my flares doesn't seat perfectly in the couplers, with some with a gap the thickness of hair, after installing all the brake lines, there was no leakage at all so am content. If there are faults to my flaring, then I'm gonna have the shop build them out. If you have money to spend, I'd go for a more quality type but seeing that I'm just a home mechanic and just needed this tool for what would likely be used for this one project, it was fine.Watching YT videos with other types of tools and was amazed how simple and clean the flares come out by comparison to this tool. Oh, all my lines had marks from the vice grip. You have to secure it tightly so it left imprints. It's not smooth for sure.If I had to do it all over, I'd rent a quality bubble flaring tool instead.ps: mine didn't come with the blue handheld scive tool unlike other reviewers.
D**N
Can’t beat the price
For $20 I’m surprised how quality it is. I have spent a lot more and brand name tools and knew they weren’t gonna last. For someone who does flared lines every now and then this is great.
A**R
Alas, beyond return time once i tried it.
I've worked on cars for more than 40 years, and done a fair share of brake lines including flares. I have an old classic Rigid flaring tool which I mistook as not having 3/16", I thought it only had down to 1/4", but needed to do some 3/16" flares.So I bought this Wostore with the idea I didn't need another more expensive flaring tool for the long haul, just to do a couple of these 3/16" flares on this project. I regret the purchase. . This tool is very bad. After failing 4 tries to get one good flare working on a line under the car, I took it into the shop and tried using a vice on a scrap piece of tubing... still, no good. I would not recommend this Wostore... period. Piece of junk. it is near impossible to get the surfaces of the clamping bar lined up flush, and it seems like either the casting that the cone head/screw is mounted into is crooked or the tapped hole is crooked, affecting the alignment of the cone/screw. And the swivel of the cone on the screw didn't correct the problem. I could not for the life of me get the tool to push the die straight in, and every flare was crooked.Then I got out the old Rigid, and had a Duh moment realizing that the size markings were not next to the actual holes. The 3/16" marking is a bit obscure, and 1/4" marking right next to the 3/16" hole. Points off to Rigid for this, but first try, success.
ترست بايلوت
منذ أسبوع
منذ أسبوعين