🏡 Hide the mess, flaunt the style – your pet’s secret sanctuary!
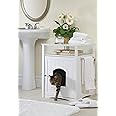
The Merry Pet Cat Washroom Litter Box Cover is a stylish, multifunctional pet furniture piece that conceals litter boxes up to 18.5" x 16" while doubling as a nightstand or coffee table. Made from glossy white MDF with stainless steel accents, it minimizes odor and litter spillage, offering a clean, elegant solution for pet owners who value both aesthetics and functionality.
A**N
Beautiful! Instructions tricky, so I tried to explain them.
I love this. It is a beautiful piece of furniture. The color is darker than the picture, but lovely. It is more of a dark deep cherry or mahogany color. It is not a flat color, it has grains in it if you look closely. From far away though, it is a deep chocolate, almost black. It definitely is NOT the color in the picture.Putting this together was tricky, and I never have trouble assembling items. I will try to walk you through it. Make sure you keep the instructions that come with it and read them along with what I am writing. My instructions were stapled incorrectly and it took me a little while to figure out that step one was on page 3...so read very carefully.Step 1 First you can attach the towel rod to either the right or left. I chose not to, because mine is sitting in my bedroom. If you want the rod on the right (as you are facing the product, then attach it to panel B. If you want the rod on the left, then attach it to panel A. The side with the paneling in the wood is the outside. It is easy to attach. Put the rod through the wood, (paneling side out), then put on a washer and then use the nuts.Now to put the box together.Step 2 Attach locking bolts into the two outside holes on the inside of panel B at the end that has the curve to it. The inside is the side without the paneling. Screw them in using your hands and then use a Philips screwdriver to screw them in. Then put the wooden dowel in the hole in the middle.Then take panel D and turn it so the side with the little groove in it lines up next to the same groove in panel B. (D is the bottom panel, and the part that hangs down is the front...it is easiest to line them up so the grooves will be next to each other) The legs of B stick up in the air (the aren't really legs, they are the top section of B and that really confused me for a bit). You attach the two pieces by sliding D onto the two locking bolts and the dowel. (The dowel doesn't fit in tightly, so be careful not to let it fall out). Once you have the two pieces together, take the SMALL cams and then twist them so the part of the locking bolt that sticks out, fits into the notch in the cam. BE CAREFUL TO USE THE RIGHT CAM! I didn't realize until I had to undo the whole thing, that there were different size cams. Turn the cam until you find the point where it feels like it sits in over the bolt. Once the cam is in, turn it gently with your screwdriver until it is tight. It doesn't take many rotations until it is tight. I think, one to one and a half rotations. Don't over tighten. Tightening too much doesn't make it stronger. You aren't screwing something in, you are twisting the cam so it covers the locking bolt. You do have to get it in snugly, but be gentle.Then put the little brown screw covers into the cams. You don't have to, the screws are only seen from the inside, up to you.Step 3 The instructions then say to take panel G and slide it in the groove. It won't stay in there very well, don't worry, panel A will hold it in better.Step 4 Put the locking pins and the dowels into panel A the same way as you did to B. Attach A to panel D the same way you did with B. The section with the little groove will be lined up with the grooves on panel D. Before you put in the cams (Use the small cams!) and snug it all down, adjust it so you have panel G in the groove properly. It is a little tricky to get it in there, as it keeps trying to jump out. I did it myself, but another pair of hands would have made it easier. You certainly don't need anyone else to help if you don't have a person handy. Part G is the back of the unit, and the side with the sticker on it is the inside. Look at the instructions to see how it all slides together.Put the screw (cam) covers into the cams if you want, again, this is the inside and you won't see those screws.Step 5 was on the back of page two...so again, read carefully. Attach the knob to the outside of Panel E. The outside is the side with the paneling.Step 6 insert 4 locking bolts into part C. Do NOT put the dowels in part C. If you do, when you try to put part C down, they will fall out and you will have to crawl under the couch to find them. Instead, put the dowels in the top of parts A and B. Then, put panel C down over the dowels and lining up the 4 locking bolts into the holes. The notches are there so the C fits around the little legs. (I thought this was all going to be the bottom of the thing, but actually it is the top of the unit). The magnet on part C is the front.After you have part C in place, and BEFORE you put in the cams, attach the door, part E. It is easy, you just have to line up the little pegs in the holes, but if you snug down part C, you can't get the door in. Make sure the magnet on part C lines up with the metal piece on part E.Step 7 insert the SMALL cams and snug them down. This time it is a little harder because you have to reach into the box and do it by feel. But, you have down a bunch of these cams by now and you are a pro! It won't be that hard. Just make sure you twist them right so they can be screwed down. Up to you about those pesky brown cam screw covers.Step 8. (Almost done and it is easier from here.) Put the locking bolts into panel F. This is the top of the unit. The instructions don't say, but there are three sides that have a little lip on part F and one side that is flat. I chose to put the flat side in the back, but it would work either way. If you don't put the flat side in the back, the unit will stick out a little from the wall. Ok...got those locking bolts in place...now put F into the little legs that stick up. NOW, it is time to use the BIG cams. If you got this far, you should have 2 small cams and 5 large cams left. (The 2 small cams are extras and there is an extra large cam too.) Put the large cams into the legs, turn, and tighten. NOW, you want to be sure to use those little brown cam, screw cover things. These holes ARE visible.Step 9. This unit is supplied with 4 dark brown wood plugs that you can put in the holes for the towel rod that you didn't use. On my unit, those plugs fell out every time I tried to put them in. I decided not to use them at all. If you have the same trouble, try using a little glue and I am sure they will stay in. Just remember if you do that, you might have a hard time getting them out, or you might damage the wood, if you later decide to put the towel rod in those holes.Voila!! You are finished. I hope that helps the next person put this thing together a little easier than it was for me. I didn't realize about the different sizes of the cams until I had to take it apart to fix it. And good luck getting the wrong cams out of those holes after you put them in! It took a nail file, gravity, and a lot of frustration to get them out.As everyone has already stated, make sure you get a small litter box. Check the dimensions of this unit and find one that fits. I had what I thought was a small litter box and it is too big. Silly me. Should have measured. I wish I had looked for one on Amazon to order at the same time so I wouldn't be sitting here with a lovely finished piece but no way to use it yet. Ah well, I can wait until tomorrow. The dimensions of the inside are 18 3/4" x 16 1/4".Even though the thing was a little tricky to put together, I gave it 5 stars because it looks lovely. The opening to the unit is 7" x 8". Little kitties will fit in easily. I am not sure about the mega cats. (If you know what I mean.) If you have a super duper sized feline, I would suggest getting a cardboard box first and cut the opening that size and see if your kitty will fit.
R**7
Fits Feline Pine double tray litter box - super easy to put together.
I am not handy by any means. Just looking at instruction manuals sends my head spinning so I always let my husband handle any assembly project. I was however, able to put this together! It took me about half an hour from checking that all parts were included in the box to the finished assembled product. My husband was impressed and surprised that I didn't just leave all the parts everywhere for him to deal with. So if I can put this together anyone can :)The internal dimensions are 18.5" L X 16.5". The Feline Pine double tray litter box fits perfectly.The product seems sturdy and all the pieces aligned well. Everything on the instruction manual was in the box. I thought the back panel looked a bit flimsy at first but after it is assembled you find it is well made and not a problem at all.I didn't bother to check height dimensions so this was my fault, but the unit is a bit shorter than I expected it to be. It's not a problem at all though - just a bit surprising.My only concern is that my cat will spray the inside on accident as the Feline Pine litter boxes are not covered. I had solved the uncovered box in the past by putting the litter box inside a plastic container that I had cut a door into, but the container will not fit in the washroom. So far I have taped up puppy training pads inside in case my cat sprays up. I can imagine cat pee could quickly ruin this unit even if cleaned quickly. I plan to get some sort of plastic container and cut it into sheets of plastic to line the inside of the washroom just in case. If your litter box with lid fits inside then you will have no problem. They don't make Feline Pine litter boxes with lids so this is what we have to do.Overall this looks much prettier in my laundry room than the plastic container/cat box I had fashioned before. I am satisfied with how easy it was to build, and my cat seemed curious about the unit from the beginning. I think he will enjoy it :) He is 15lbs and fits in and out of the hole in the door without a problem.We give it 2 paws up! :-DUPDATE: Our cat loves it and goes in and out with ease. He had no problems adapting to this at all. He is 15lbs and fits fully inside.Also, I went and bought some "Plaskolite corrugated Plastic Sheets" from Home Depot to line the inside of the washroom in case my cat misses the litter box. I do recommend doing this. I have the white unit so the white plastic sheets blend right in. I suggest buying these and having them on hand BEFORE you assemble your washroom so you can cut the sheets to size etc. This should protect the inside of the unit. It added to the cost a little (I had to buy 4 at $4.95 each but I think it is worth it.
ترست بايلوت
منذ شهر
منذ أسبوعين