
Desert Online General Trading LLC
Dubai, United Arab Emirates
Desert Online General Trading LLC
Dubai, United Arab Emirates


🚀 Elevate Your Creativity with Effortless 3D Printing!
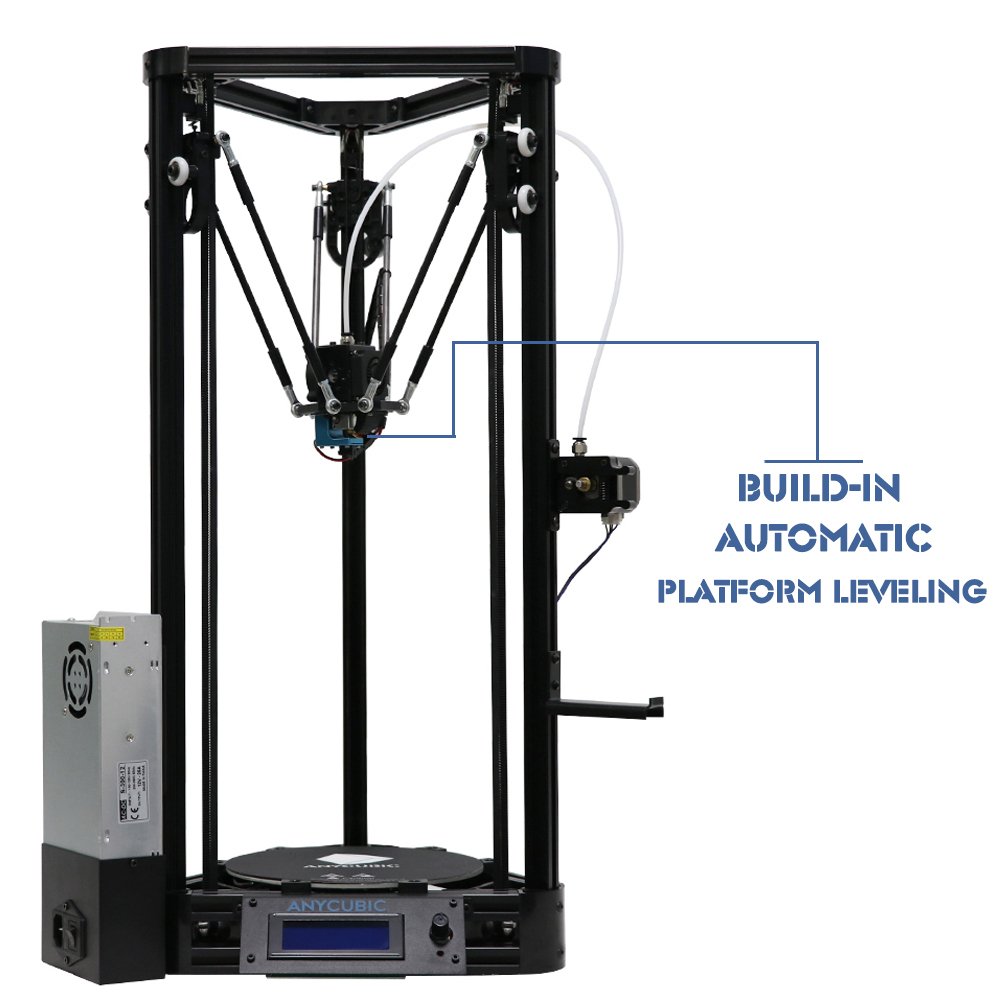
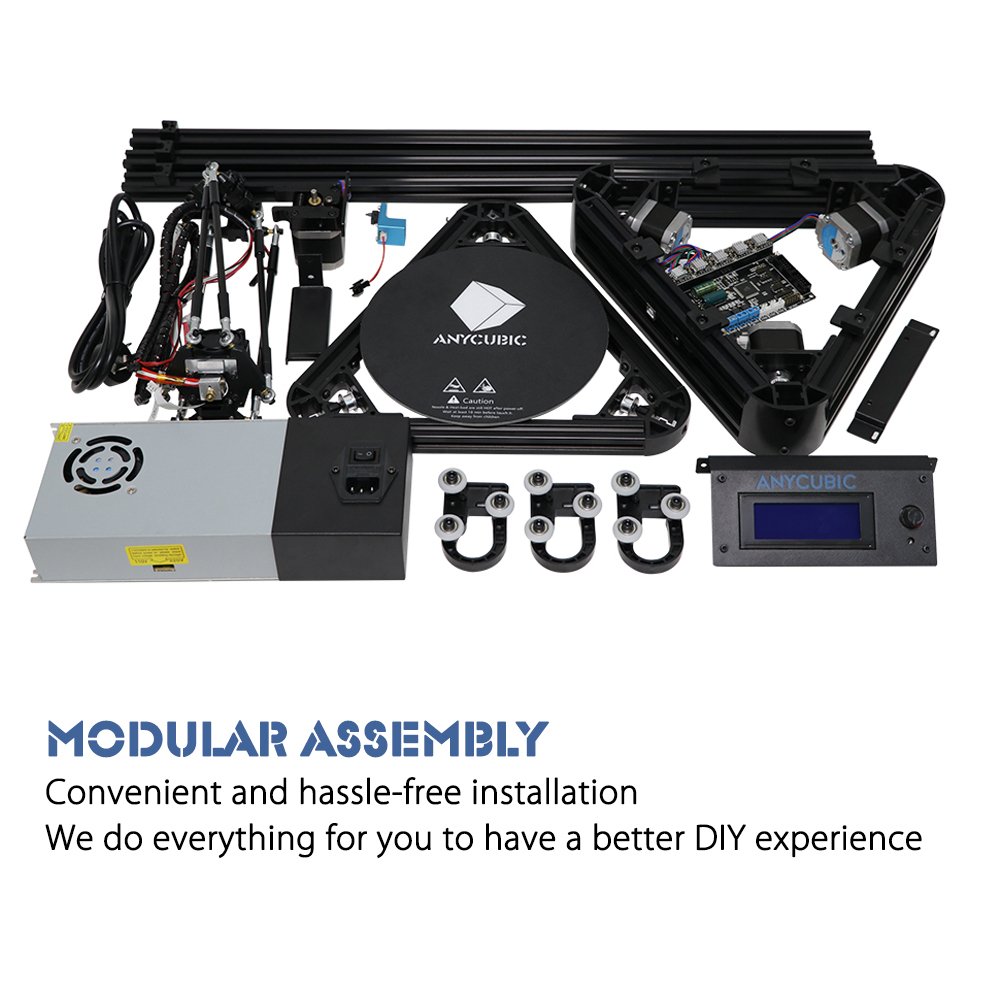
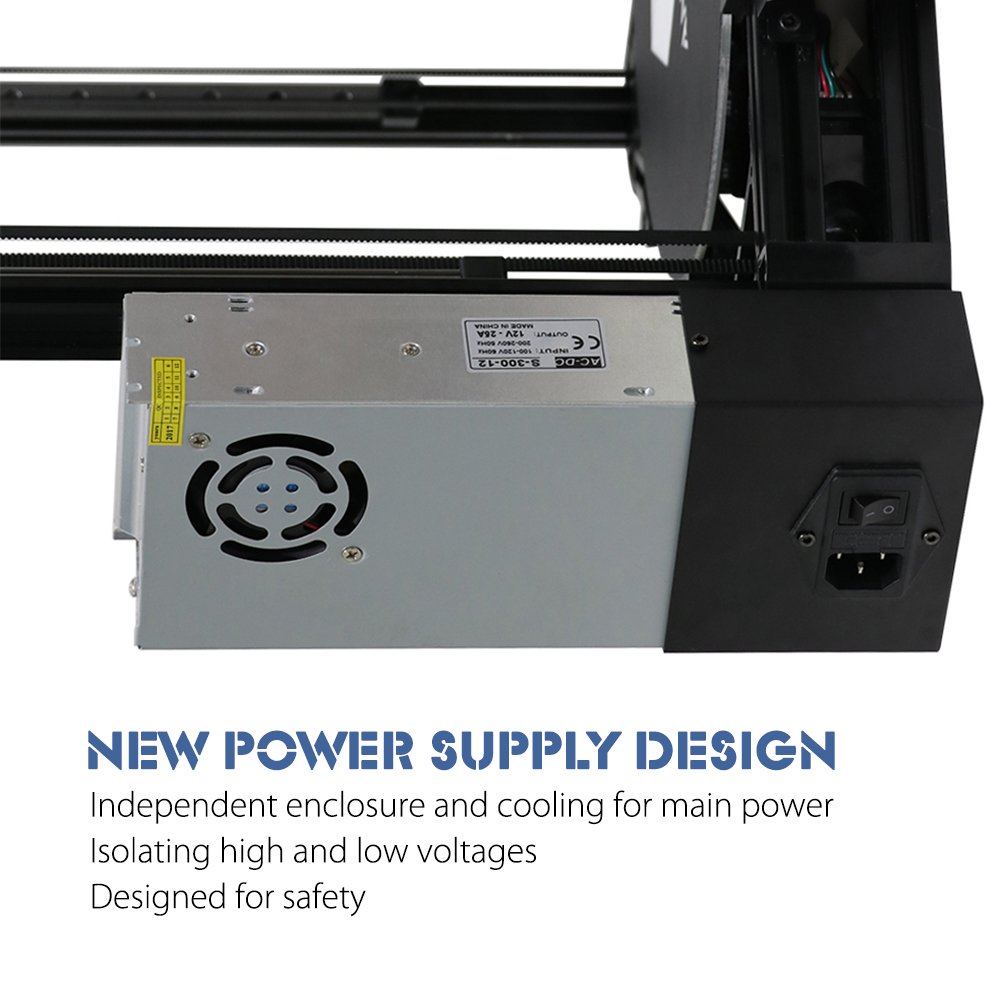
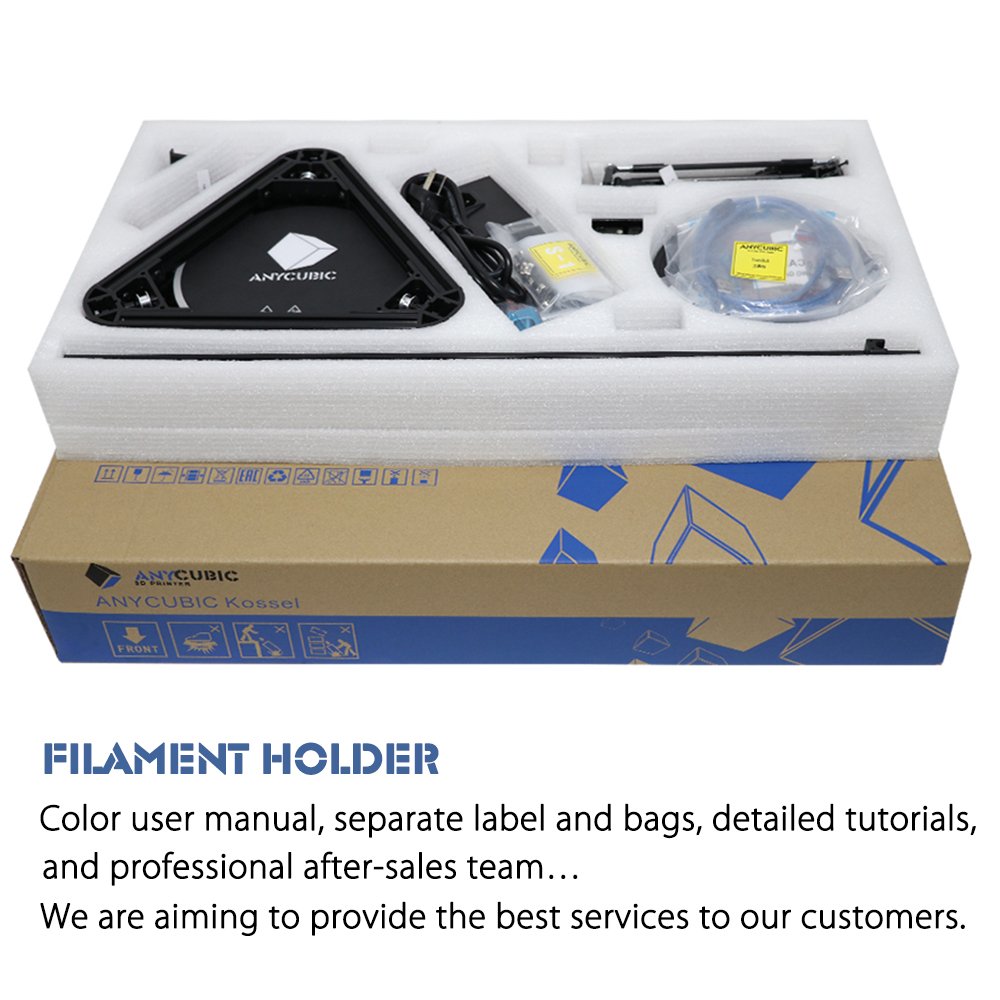
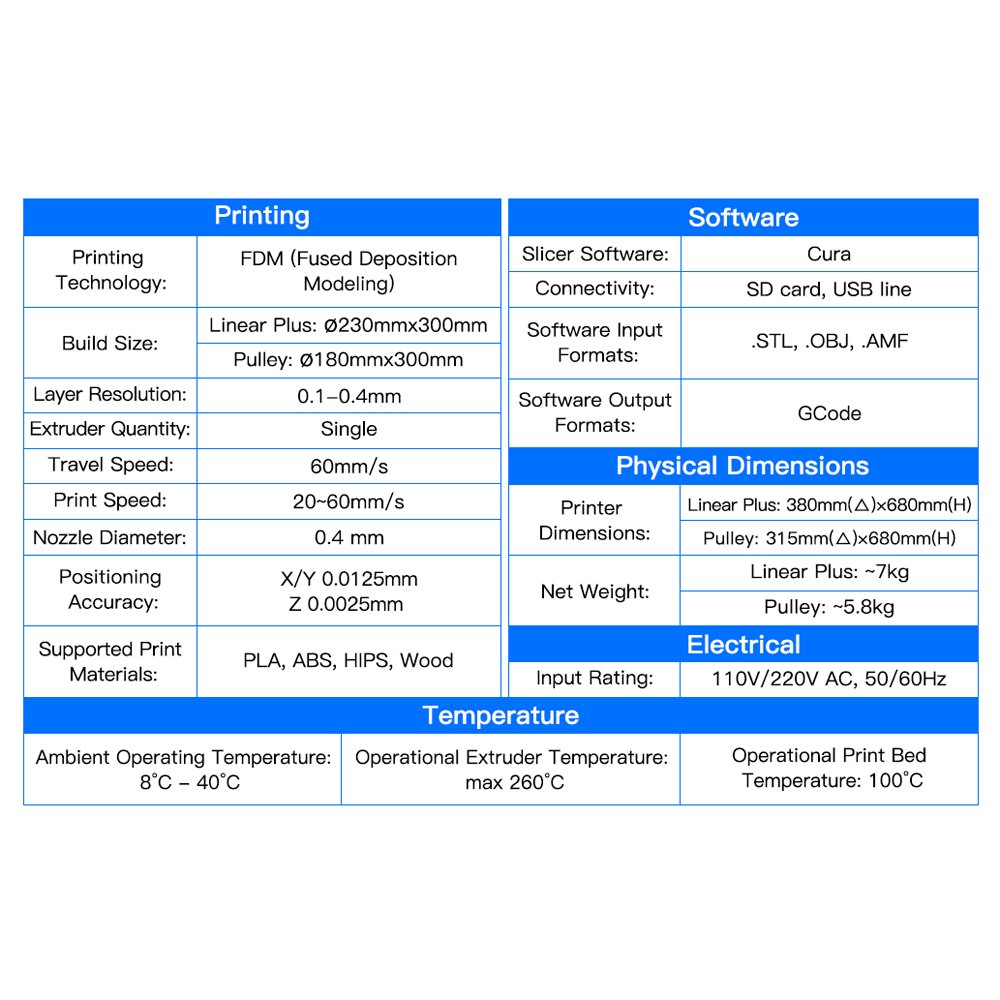
The ANYCUBIC Delta 3D Printer features an automatic leveling system, modular assembly for quick setup, a safe low-voltage power supply, and innovative carbon rods for enhanced printing accuracy and speed. Ideal for both novice and experienced users, it combines safety and efficiency for a seamless 3D printing experience.


D**N
Great DIY printer! Very Impressed (3 months later... STILL ROCKING!!)
Solid (Internal) Packaging! Was just loose in a much larger Amazon box which caused the inside box to be off center which made my USPS guy complain a bit about it's load moving around withing the larger box.All parts packed TIGHT in Styrofoam with zero chance of damage or bending of any part.Received at 12:00pm. Operating at 10:00pm. (Well, except Software configuration). All motors / Extruder / Bowden / Boards all check out. Able to play around with controls. After work today I will configure the software / firmware and do an initial print.I was not missing ANY parts. I agree with another poster about main board (Arduino) and housing not being as snug because of circuitboard solder and closeness of flat plastic. But not hampering anything.I had a LOT of extra nuts and screws left over. A LOT! I didn't skip a single step. re-Re-RE-Read everything as I went along. Sometimes I had to switch over to Youtube for better visual (Anycubic did an EXCELLENT job with complete start to end Youtube instructions.) So, EXTRA SCREWS!!! Woooo (Wife can't blame me for skipping spots).Manual was very nicely laid out. A real booklet, not just a printed PDF. Though there were a couple of extra (update) pages printed and folded inside.I have built my own D-Bot (Core X/Y) from scratch. This DIY kit was much more easy compared. There was no Cutting or Soldering and Everything fell into place. The only time I had to strip wires was from the end of the hot end wire so it can be screwed into Arduino board. Everything else had their own plugs and wires were already cut to fit. No Spaghetti.All in All 5-Stars for a Great DIY project. Firmware / Software are now my last bit. I will post initial print soon.EDIT: Operation. After getting everything checked out, verified and finally tweaked the Z, we printed the test doo dads. FRIGGIN' FAST! OMG! I had to slow down initial layer, but OMG! Zip Zip Zip. I'm going to tweak my D-Bot as this ran circles around it (Speed wise) and I just can't have that!My wife has now taken full control of it and about to try Repetier-Host (instead of using SD-Card) to make things, Load,Slice,Print a lot faster and convenient.Default software it comes with (ON SD Card and also available on Anycubic's google.drive) Cuda, Ponterface and a few STL's (not sliced). IT has both regular and PLUS versions, so make sure you select the right software settings.EDIT: 3/19/2017: I need to stress the fact that MANUAL BED LEVELING on a Delta can take the fun out of this printer. Get some kind of AUTO BED leveler!!!! (One isn't included and apparently, they've taken out the code for it). So get something like EZBED leveler or similar. Once you AUTOLEVEL, you're good for 10+ prints at the very least. There are a few autolevelers out there, but EZBed was the fastest thing I could get as I bought the switch locally and printed the part needed. (Yes, you have to print a part and grab a switch).EDIT: 04/23/2017: Still Rocking! Will definitely buy another if need arises!Also, after reading FACEBOOK groups on this, I really REALLY need to say this. (I try to help in the forums as much as I can)1. 3D Printers (in general) are NOT for general consumers. They are for tinkerers, hobbyist and troubleshooters. Things happen, things need adjusting. If you are thinking, put together and print without having at least 1 thing not right or no patience for going to forums/groups with questions or can find your same question asked (probably 100x before you) with any 3D Printer, 3D Printing will have to become more stable before you are ready.2. DELTA 3D Printers are the EXTREME Not for general consumers, as they are less forgiving than your Prusa's and CoreXY's and such. 1mm off on a rod length and you could spend hours determining what your issue was. (Luckily this kit came with perfect sizes and the firmware is kept up to date on GoogleDrive)3. This printer uses an E3D V5 (Five) (Clone or not) print head. Not V6. The throats are lined, and not an ALL-METAL version, so Jamming/Clogging can happen. On a search today on Amazon I tried to find V5 all metal throats. The only V5 item on Amazon is Cold ends. So take CARE of your hotend throat. (ie make sure Thermister is secure so you don't over heat the head and melt it out. -looks sheepishly around like he didn't do it when first building it- shhhh)So, Near end of April... STILL 5 STARS!EDIT: NEAR END OF MAY! STILL 5 STARS!Also, added TENNIS BALL FEET (Found on thingiverse) and it quieted this thing down 75%!!
G**B
The manual and the printer itself look great, much better than the first time around
The media could not be loaded. Update: 4/13/18 Anycubic has finally gotten back to me, I have sent them videos, I'll update review if a resolution is found.So this is my second attempt at a printer from anycubic. The manual and the printer itself look great, much better than the first time around. Sadly the product is still crap. I have 4 3D printers, I'm not new to them, and expect to have to do some tinkering. This unit arrives mostly assembled. and again the quality looks great. Got it put together, triple checked connections and turned it on. Followed the manual for the auto bed leveling. The 3 arms first start heading up to the endstops, but only one of the sets of 3 rods makes it to the endstop, the 2nd arm stops short and makes a grinding noise, the last set of arms don't' move past about half of the rail. It then goes down and starts the leveling process probing the bed, this appears to work, but when finished it heads back up tp the endstops, doing the same thing as when it starts. The unit then reboots, going back into the bed leveling to finish the next step, just send the print head crashing down into the bed. I've tried re-flashing firmware, disconnecting and re-connecting all cable to the motherboard. Still does the same thing. I'd say it might be the endstops, but its a different motor every time I try it. I have reached out to Anycubic support but have heard nothing from them. So, back to Amazon goes this hunk of junk.
J**N
With a few caveats, this printer might be hard to beat for the price.
Updated 04/17/17 with one star removed due to print area and Z axis limitations. Added issues #5 and #6 to the review, with details on build area and the included control board and stepper configuration.Since my initial review was written, Anycubic have responded with great support, and also uploaded a PDF of the manual to the Google Drive folder where they've made the firmware and other information available. If you're considering this printer or another Anycubic device, you should look at the manual to determine if it's a good fit for your abilities. Also added a comment regarding end stops on the linear rails.So far, I've been reasonably happy with what I received, though there have been a few annoyances that I think could be rather easily remedied by a few adjustments.Pros: The packing was excellent, and everything survived intact with most parts easily labeled and accessible. Even though the exterior box had taken a few hits in shipping, the printer itself was in perfect shape. Assembly was relatively straightforward, with a few caveats to be mentioned below. The manual was actually surprisingly good, again with a few caveats, and I believe most people with any experience in electronic assembly and knowledge could be perfectly capable of building this printer. It looks great, runs quietly, and heats quickly with no problems keeping the hot end heated at temperatures of 190-225 degrees. (my only tested temperatures so far)Cons: This is going to be broken up a little, because I think each of these issues needs a little deeper explanation.#1: The tray for the main control and power board is absolutely terrible. It only attaches to one end of the board, and cannot be held to the plastic mount, because of the solder points on the bottom of the board and the way they push unevenly at the mount. I'm already printing its replacement on my other printer.#2: The "horseshoe" shaped part that holds the hot end in place appears to have been a relatively weak part. Mine "popped" during the process of very light tightening, and made two of its four screw holes difficult to work within, as I believe the screw stripped out a part of the piece. I was applying a very mild level of pressure, and was shocked at the sound of a light "pop" followed by the screw simply spinning in place. Within a day of letting Anycubic support know about the issue after contacting them through Amazon, they responded to let me know that they'll be sending me a tracking number for replacement parts.#3: The manual, while excellent for this kind of product, could also use a few of its photo references replaced by wire frame or simple outline examples. It appears this manual was made with software like Solidworks which means whoever makes the manual could probably just change the rendering style to wire frame and be able to present a far clearer image. The newly uploaded PDF version of the manual is able to use color images however, and looks just fine. I strongly suggest using both a physical manual and the PDF during your assembly process.#4: The manual's instructions appear to leave out a small step regarding the linear rails. Once the rails are installed and the end stops in place, there are two red plugs on each rail that prevent the bearing from sliding off and coming apart. Removing these red plugs will allow you to increase the amount of safely available motion on both ends of Z. These plugs are not shown in the manual itself.#5: The print area for this printer seems conspicuously low if not exactly misadvertised. After building and extending the usable print area as far as I could, the best results I can reliably achieve are an area of 220mm in diameter and 205mm tall. The effector *will* move to the stated 270, but at that height the movement of the effector is limited to a very tiny amount of space at the top of the conical build area.#6: Calibrating this printer is a pain. One major contributing factor to that is that the steppers as configured out of the box appears to only operate in increments of 0.08mm. I discovered this while using the MatterControl control software and attempting to run through software calibration. The "fine" measurement stage uses increments of 0.02mm, but will only actually move the motors every fourth time. This makes calibrating a level bed quite difficult. There is a *chance* that this might be an issue created by my customized version of the firmware, but I believe I have all of Anycubic's configuration changes ported into the current build of the Marlin firmware. If this printer supports any kind of microstepping, I can't figure out how, and would find that to be incredibly helpful. Even an x16 microstepping setting would likely fix my problems calibrating the bed level. I chalk this up to the "Trigorilla" mainboard, which I don't believe is particularly *bad*, but it does run on an Atmega 2560 base, which is a rather underpowered processor when it comes to the advanced calculations required for delta printers. If Anycubic were to upgrade the processor to something similar to the Re-ARM (Which I will be doing shortly) this might be a different ball game altogether.Along with these main concerns, I have a few other small tweaks I would suggest that could elevate this printer to a whole other level in my opinion. A mounting plate for the control panel that came with integrated bolt posts would be great, as the current system of mounting the display while juggling four loose bolts, four loose spacers, and four nuts was an awkward proposition. The mounting position of the MOSFETs on the mainboard could be rotated 90 degrees to place the voltage adjustment pots in more easily accessible points and allow for more options when it comes to airflow over the heat sinks without interfering with adjustments but I'm aware this is a problem that goes well beyond Anycubic themselves and is a fundamental design choice that was made by many manufacturers of 3D printers. A larger knob for the front panel dial would be nice, to cover a gap in the metal plate and look a little more professional. Last, the addition of a high temperature rubber insulation boot around the hot end would be a great way to stabilize the hot end at higher temperatures.I will continue updating this review as my printer is used.
Trustpilot
1 month ago
2 days ago