

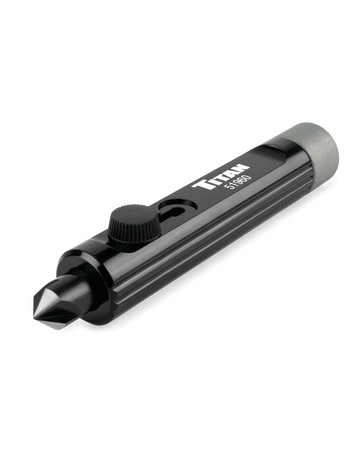
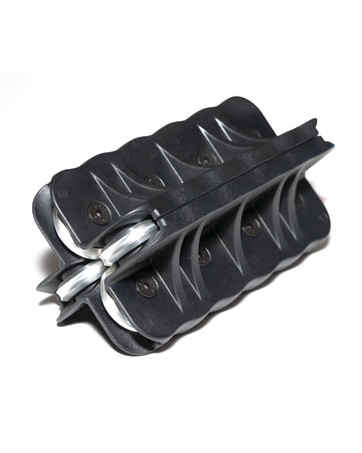
Titan 51535 3/16-Inch Double Flaring Tool
Product ID: 60100992
Details
- BrandTitan
- ColorFactory
- Head StyleHex
- Item Package Quantity1
- Item Weight0.89 Pounds
🔧3/16-inch tubing capacity
⚙️Perfect 45° SAE double flare
🛠️Compact for tight spaces
Desertcart purchases this item on your behalf and handles shipping, customs, and support to Morocco.
🔩 Upgrade your brake line game—precision and power in your hands!
The Titan 51535 3/16-Inch Double Flaring Tool is engineered for professional-grade brake line repairs, delivering perfect inverted 45-degree SAE double flares on 3/16-inch steel and nickel-copper tubing. Its compact, user-friendly design enables on-vehicle use in tight spaces, eliminating the need to remove brake lines. Featuring a removable handle, included lubricant, and double-ended punch, this tool combines precision, durability, and convenience, making it a must-have for automotive pros and DIY enthusiasts alike.


| ASIN | B06XPRVCPV |
| Best Sellers Rank | #23,769 in Automotive ( See Top 100 in Automotive ) #13 in Brake Repair Brake Flaring Tools |
| Brand | Titan |
| Brand Name | Titan |
| Color | Factory |
| Customer Reviews | 4.6 out of 5 stars 2,598 Reviews |
| Finish Type | Machined |
| Finish Types | Machined |
| Global Trade Identification Number | 00802090515354 |
| Head Style | Hex |
| Included Components | Titan - 3/16 Double Flaring Tool (51535) |
| Item Package Quantity | 1 |
| Item Type Name | Tools |
| Item Weight | 0.89 Pounds |
| Jaw Capacity | 3 Hundredths-Inches |
| Manufacturer | Star Asia Usa |
| Manufacturer Part Number | 51535 |
| Manufacturer Warranty Description | Limited Lifetime Warranty |
| Measurement Standard | SAE |
| Model Number | 51535 |
| Operation Mode | ON-OFF |
| Package Quantity | 1 |
| UPC | 802090515354 |
| Unit Count | 1.0 Count |
| Voltage | 1 Volts |
G**R
Bingo!
I spent several hours researching flaring tools that would make a bubble flare & double flare using cooper nickel 3/16 brake line for my 2000 Olds Silhouette / Venture / Montana (same 96-05). Here is the bottom line absolutely: 1. Although not a perfect match to the OEM bubble flare, if you just perform operation 1, you end up with a bubble flare that matches the factor bubble flare super closely. Made bubble flares for wheel cylinders with zero issues / no leaks whatsoever. 2. Replaced brake lines while still on van, and this tool worked excellently in tight spaces per making double flares and using brake line fittings & unions - no leaks! Saved me a lot of work not having to replace large sections of brake line because of the need to use a flaring tool in a vice or in a more open space, which would negate the option to replace just a small section in a hard to get to area. Simply a great tool, with a great design, and very practical applications. 3. Copper Nickel...no problem...nuff said. 4. Food for thought: Because of making the double flares on the vehicle, I had to be very careful not to allow falling rust, dirt, sand, and salt to get into the tool, lines, and fittings. I decided to simply take the tool apart each time and clean it, which is easy and quick. I can't image introducing contaminates would be helpful. Use plenty of grease, which comes with the kit. Highly recommend Lisle 44150 3/16" Tubing Bender Pliers for shaping brake lines. This is only my second ever Amazon review, but these two tools saved me tons of time and money, they made my repair efficient and straightforward, and they will make a good addition to my tool collection. 5 stars isn't enough...
B**N
Exceptional value and tool
This tool is awesome. It is well made from quality materials. There should be none of the issues described in knock offs where threads strip etc. Use this tool once and you will throw your old flaring tool away. The stop block allows for an exact, perfect double flare. It is invaluable for working in tight spaces. I had no difficulty with Nico or steel brake lines. It is Very simple to use and adequate instructions are included.
E**A
Unreal! Superb!
The quality of this product along with the quality of flare this thing makes is unreal. I've used a fare share of lower end and mid range flaring tool with the "clamp thing" that uses wing nuts, they all left lines and crimp marks on the line and even had some ends come out looking non concentric. I have even seen the brake line slip in clamps especially when using stainless lines. This tool has a nice long clamping area that doesn't require "teeth" to hold the line from slipping even with stainless, barely left any marks on the tube, and the flare came out absolutely perfect. The stop bolt this one comes with takes all the guess work out of "measuring how much of the line should be sticking out". Another thing I noticed is that the material of this thing seems to be of some forged steel there is no shitty casting marks and it seems pretty heavy for its small size. Also it comes with some nice "actually rated" grade 12.9 bolts for clamping and won't have to worry about gauling the threads or the block of steel. Recommend using some of the lube it comes with as you have to crank down on these and maybe a small washer to prolong its life as well. The forming tip also seems be be some sort of good quality hardened steel as it threads in super smooth and the threads didn't get all chewed up after one use like I've seen on others. This thing is also very ergonomic as it works perfect with the handle and makes it easier to fix a line on a car or if you don't have access to a vice. Thee best tool for doing brakes once in a while so you don't have to spend $2-300 on a professional one to get results that are superb.
E**N
Easy to get good double flares
Used a Titan 51535 3/16-Inch Double Flaring Tool for replacing both front brake lines on an antique car. I needed to use a union for the longer line since I didn't want to remove a bunch of mechanical stuff in the way of removing the original line. (Cutting it into two shorter pieces made it much easier to remove.) This meant I had 6 double flares to do. Like many amateur mechanics, I needed to redo one of the lines a couple times, so I made about 4 extra flares. Two of the double flares were not as good as I thought they should be, so I redid them. This was probably my fault for not tightening the two locking bolts enough. The imperfections appeared to show the brake line had loosened a bit during flaring. All of the flares were done off the car by clamping the tool in a shop vise. Take the time to tighten both bolts well and you should be good to go. As the instructions say, the shiny locator bolt needn't be tightened beyond hand tight. It simply prevents the brake line from being too far in or out of the tool before flaring. Be sure there's enough straight line to insert in the tool, allowing for the inverted threaded fitting you may need to slide on before flaring. You can bend the end portion of the line after flaring with the fitting onboard. The two locking bolts require a 10-mm socket or wrench and the flaring tool (Opt-1) requires 17-mm. All parts of the tool are of high quality and will withstand a lot of force. The flaring paste is also very handy and helps get a good result.
J**N
Compact and reliable
Compact and fool proof reliability
J**Y
One of the most innovative tools I've ever seen
I purchase literally hundreds of items on Amazon every year, most of them tools or tool related. I never write reviews. This is the first review I have written in years to my recollection. This tool is absolutely incredible. To even put it in the same sentence as the "other" inexpensive flaring tools for purpose of comparison is absolutely unfair. I am a "semi-professional" mechanic, and I think EVERY shop should own this tool. This tool is brilliant, innovative, small and can easily do flares on the vehicle or off. I also own the Mastercool hydraulic tool kit which costs like $300-$400 and has insane reviews on Amazon. It's the industry standard. Well guess what. The Mastercool IS an amazing tool. But I can honestly say that I DEFINITELY prefer this tool over the Mastercool. The Mastercool is great and pretty easy to use, but it requires three hands to set up the line inside the tool. And in a tight spot (or even not so tight) on the car? Forget about it. Also, there is room for user error with the Mastercool. If you stick the tube out too much or too little, or cockeyed, the flare is messed up. I have found that with the Titan tool, I get literally PERFECT flares EVERY time with VERY little room for user error. It's easily repeatable and consistent without even thinking about what you're doing. Anyone who has ever used the cheap tools knows that saying that sentence would be absolutely impossible. And I can't say it about the Mastercool either. Only this tool. The obvious advantage of the Mastercool is that it can make many different types and sizes of flares, whereas this tool makes only one. But this is the most common flare you'll encounter on American vehicles. And at the price point? Forget about it. If Snapon made a version of this tool they would probably charge $179 for it. A couple of tips: Use an impact driver with a 17 mm deep socket to drive the dies in and out. And a 10 mm socket to adjust the tightening screws. I realize that with hand tools, using this flaring tool would be more tedious. But anyone who even owns a drill can use sockets with the drill. We don't need crazy torque here. Although the torque of an impact driver does help. I guess if I could find one thing to "complain" about this tool would maybe be the tightening screws the way you have to go back and forth. But it's really not bad. Perhaps a "redesign" could make the two screws "captive" at the end, so they couldnt come out entirely. That would keep you from disassembling the whole unit while removing the screws. Not that that's a big deal anyway. Also, it would be nice if the threaded "nut" insert that you put the dies into stayed firm in its place even when the two "blocks" were totally separated from each other. It tends to kind of move around and change position. Maybe I would design it so it was permanently affixed to one block or the other. Anyway, the bottom line is if you ever flare brake lines, you should DEFINITELY have this tool, whether it's your only flaring tool, your second, third or fourth. Good luck with it.
A**R
Nice Product
Makes nice double flares ,easy to use
J**N
12 flared
Works Great
J**Z
Llegó antes de lo esperado!
Es tal y como lo describe y funciona muy bien!
P**L
Great quality and does a fantastic job.
Once you get the correct prep on the tube this little tool creates the perfect double flare every time. Easy to use in place under the vehicle.
E**Y
High quality flaring tool -- Just buy it
This is a very high quality flaring tool that creates perfect double flare on brake lines. I made several double flares and none leaks. Although price wise it is on the higher side, I highly recommend this tool compared to the cheaper ones.
R**N
Quality
Get this if you want a tool that can give you perfect strong flares on your brake lines, this is a quality made tool..
J**N
Easy to use
Good product, easy to use. Produces a nice flare. Works well in tight places. Be sure to be generous with the tool lube and properly debur the end of the tubing first.
Trustpilot
2 months ago
1 month ago