Desert Online General Trading LLC
Dubai, United Arab Emirates
Desert Online General Trading LLC
Dubai, United Arab Emirates

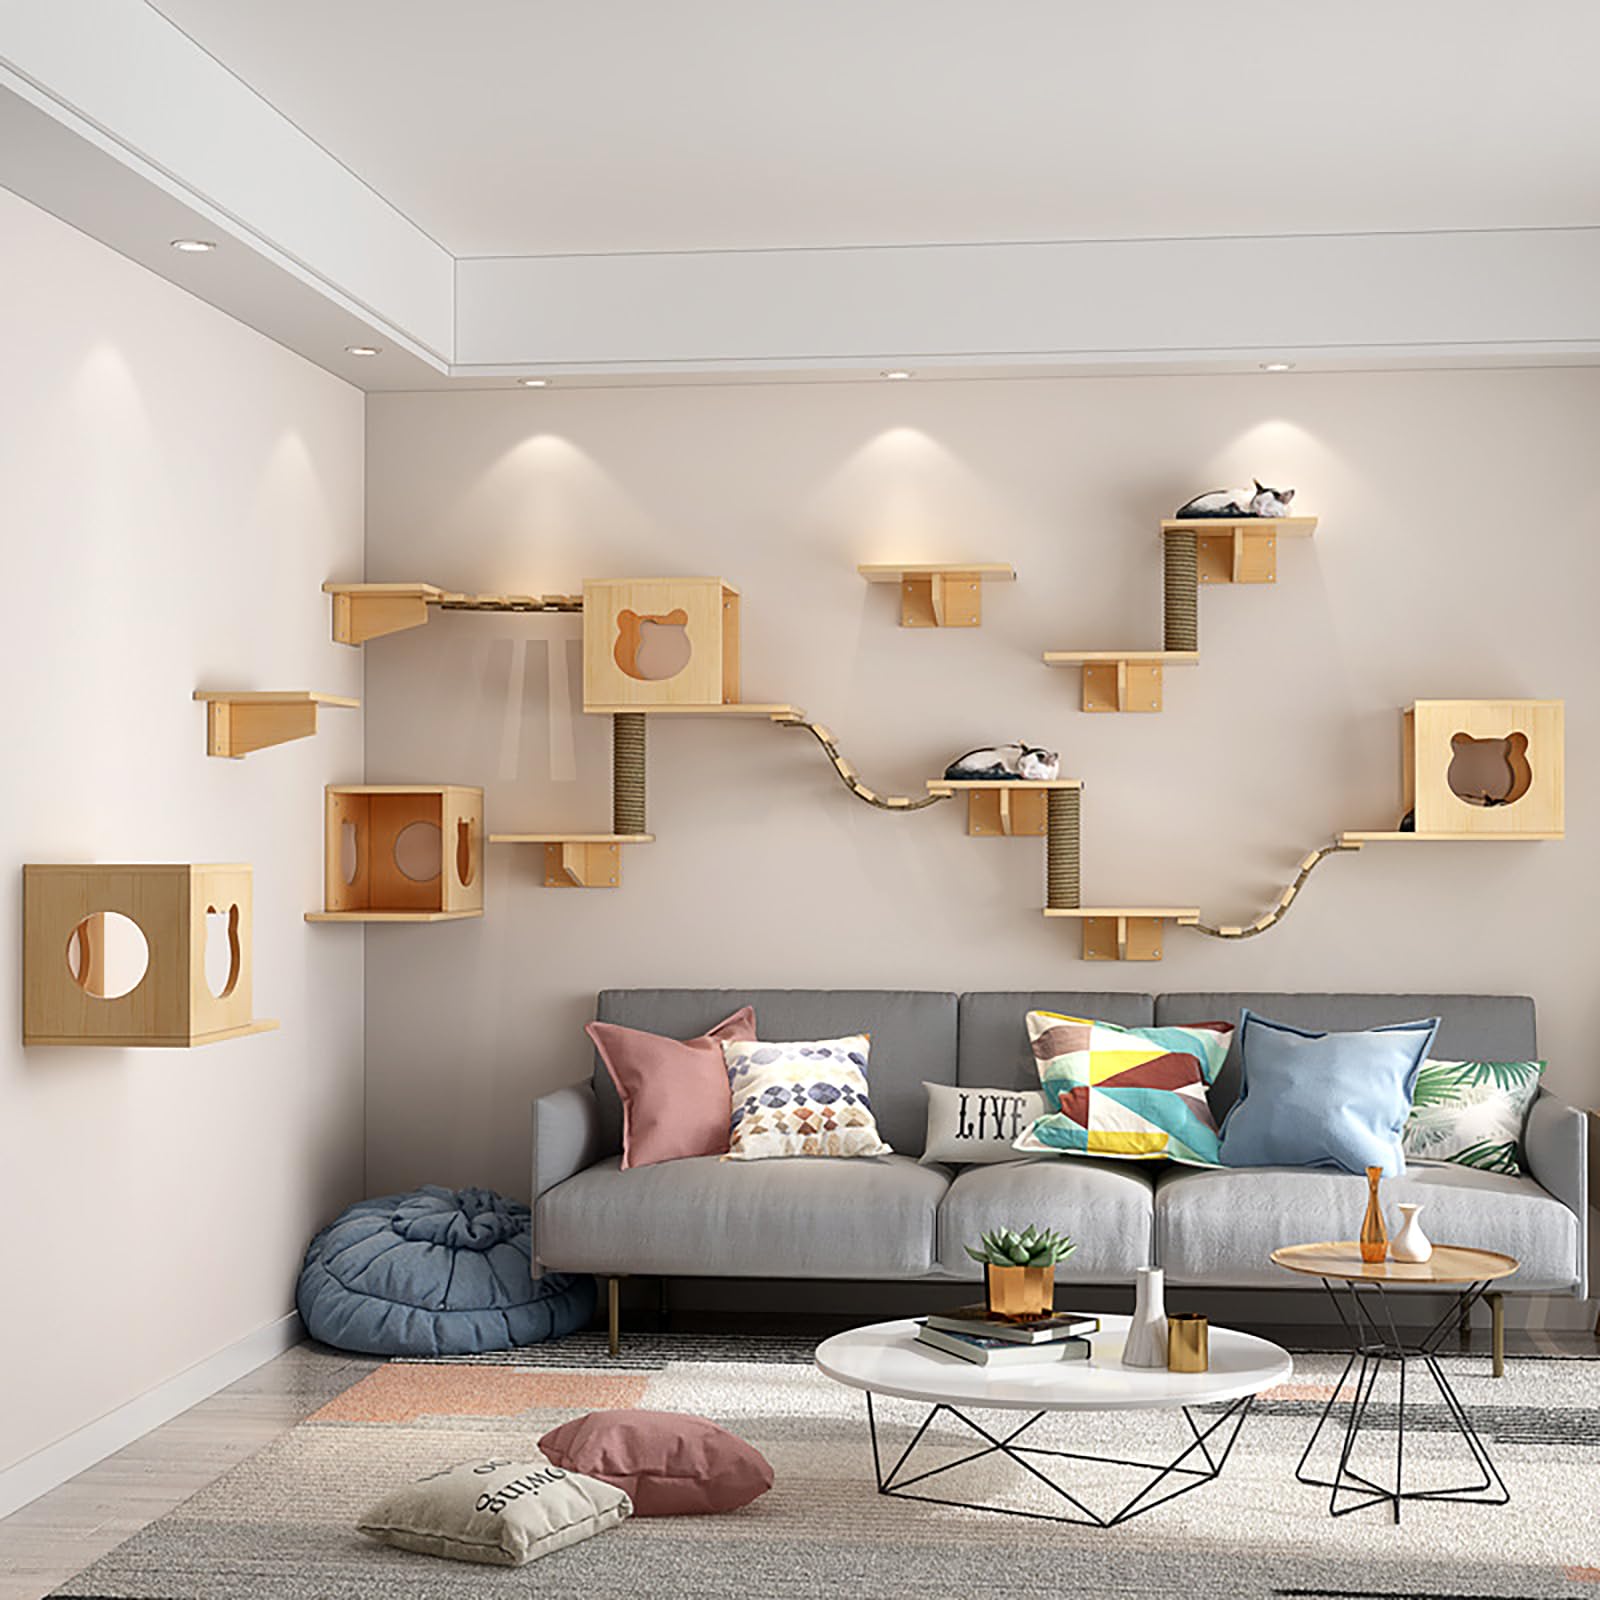


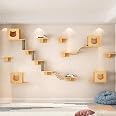
🐾 Elevate your cat’s kingdom without sacrificing your style!
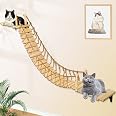
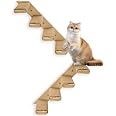
This Cat Wall Shelves and Furniture Set features a space-saving wall-mounted design with elegant wood tones, multi-level condos, perches, bridge ladders, and durable sisal scratching posts—perfect for creating an engaging, stylish playground that fits seamlessly into modern homes.


L**.
Great cat wall system
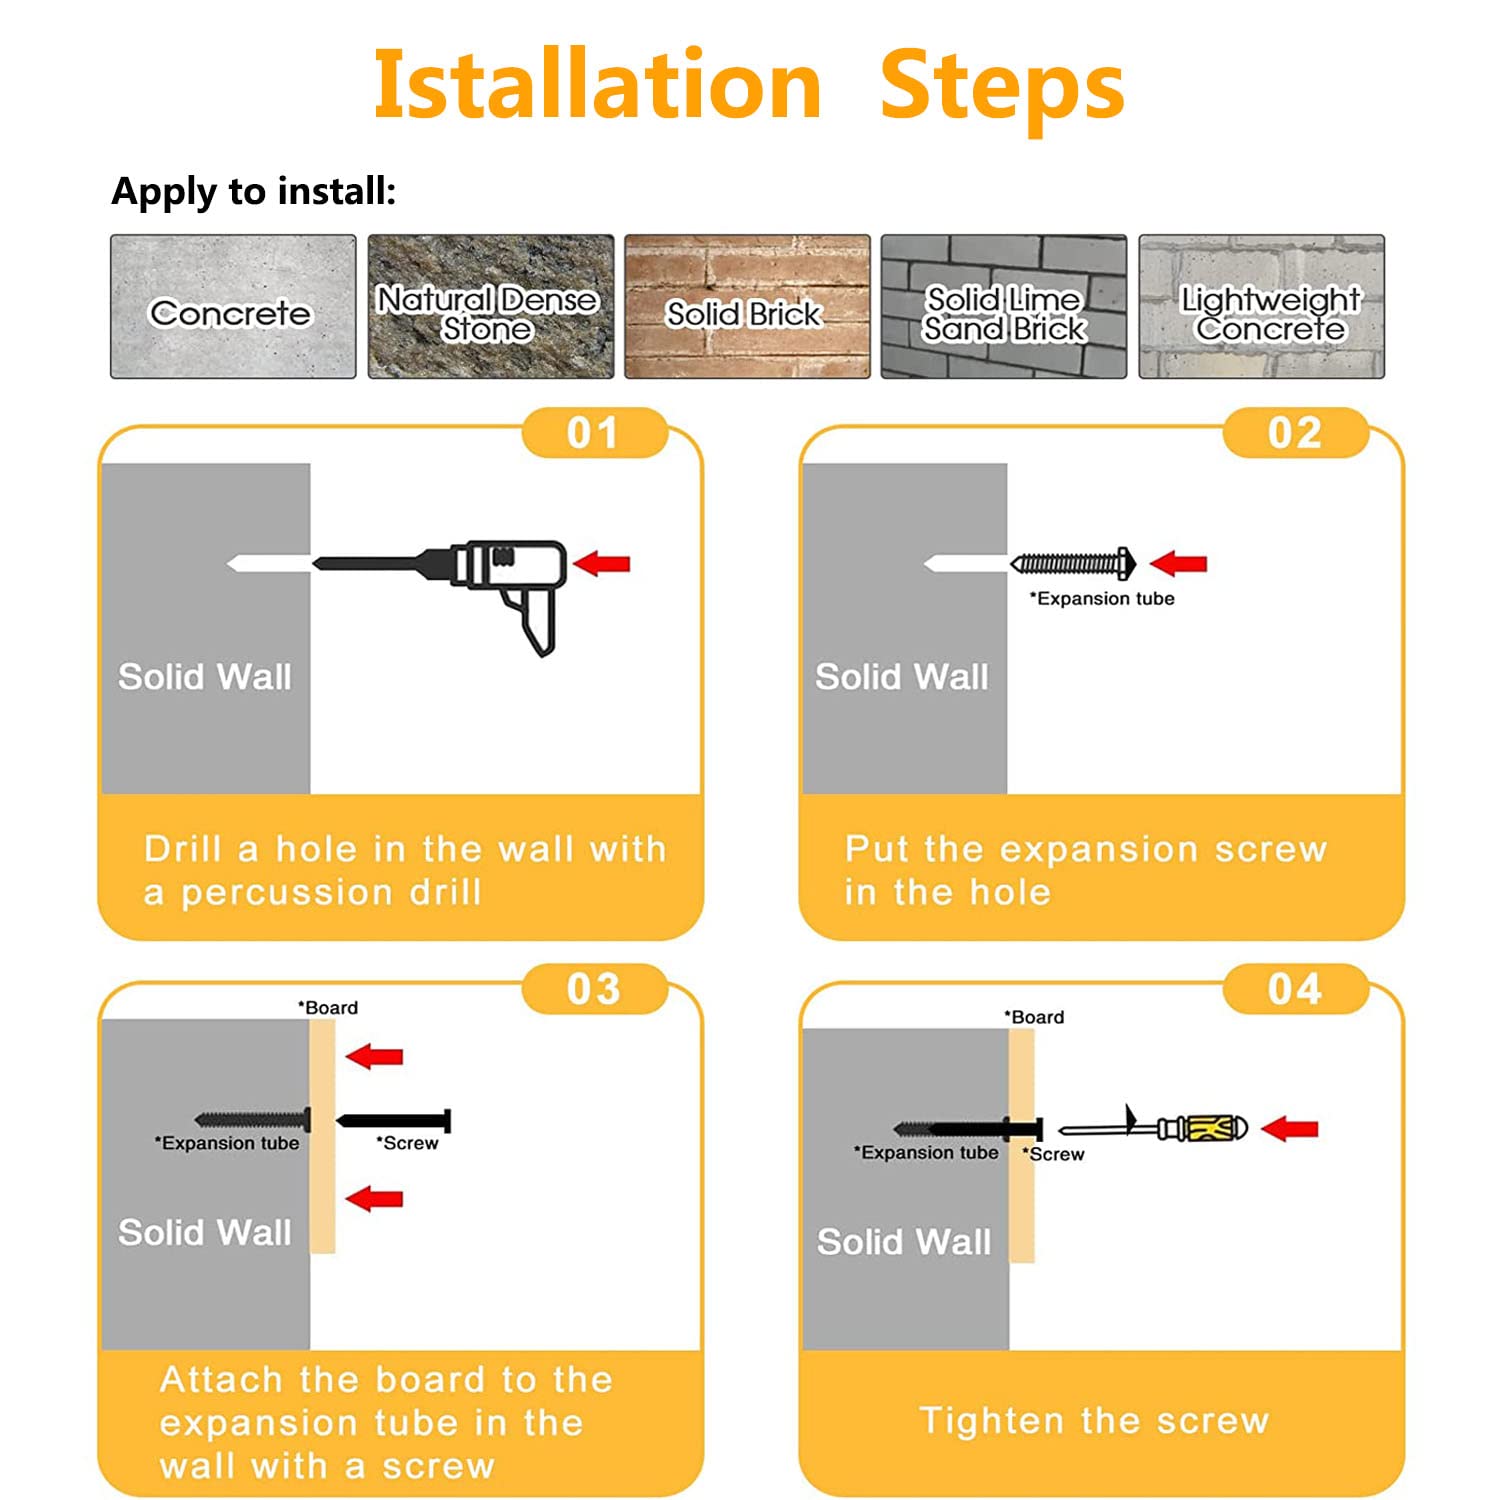
The media could not be loaded. Easy to assemble!I am not sure why some people had such trouble assembling it. It is a bit time consuming but with one person helping me, it took about an hour and a half to assemble. It may have gone by faster if I had used the drill bit attachment (I didn’t realize it was there until we were done lol) but it wasn’t that hard at all.I stained all the pieces and added some scratch pad paddings to the pieces and it looks great! My cats have been enjoying it so far and it came together better than I anticipated! Pieces are all sturdy, took stain very well. I did not use the included wall anchors due to some of the reviews stating they were of not great quality and just used my own from my department store. The included screws were used though and everything has been holding up fine with my cats getting on it too! It’s serving its purpose :)
G**T
Great Quality
Got lost in shipping twice but I ended up ordering other sets because I loved them so much. We stained them in a dark walnut and added carpet before hanging them. The wood quality is great. Overall amazing!
N**.
It’s a win…for the cats!
The media could not be loaded. Overall, this was a great buy! After unexpectedly inheriting 3 cats into our home (that already had 4), we knew we needed something. We ended up buying option B and option D to give them ample room. The cats range in size (8-16+ lbs) and age (1-8 years). They all use it and have naturally staked their claim to certain spots.CONS: 1. The hardware is less than great. The heads of the screws just snapped right off when drilling them into the wall. Save yourself the headache and invest in some quality screws. 2. Based on the picture, it should have come with 3 bridges. We only got 2. However, we made our own and the cats seem to really like it. 3. We, obviously did some upgrades by painting it. Not necessarily a problem. Just a bit time consuming.PROS: despite the hardware issues, it was fairly easy to put together. It’s sturdy and holds even our fattest cat. It has definitely got all of them way more active, with even our most timid one finally braving the second shelf. Lastly, the cats love it! And, honestly, that’s really all that matters.
E**D
Instructions suck but cats love it
Despite others reviews, pieces are made correctly the instructions are just so minimal it's easy to get lost. If you do mockups by placing the boards together, you get 2 right boxes and 2 left boxes with all the cat heads in the correct positions. What messes ppl up, is that one box (with piece labeled "E") has the ability to attach to a scratch post. Ppl think you need 2 of piece "E" to create the right facing box, but that's not the case. There is only ONE "E" piece, it would have been nice had they just made them all piece "E" with the extra hole on all of them for however you wish to modify the set on the wall.It took me about 8 hours to put it all together and up, and that's not even all the pieces (my walls are smaller and shorter than I anticipated, but I planned on lengthening it along the hallway so extra pieces work out for me), so expect to do this over hours, if not days, unless you have someone helping you. It will really help if you have a drill and it does come with a hole making attachment for one. Also wise to plan and even modify the pieces as you see fit if you have the tools to do so bc the kit is somewhat limiting if you are doing your own design for the wall. (the kit is designed for the way it is set up in it's picture, but that requires a very high ceiling and LOTS of space) My machine tools broke near the end (they're old) so I will walk you thru how to do this without them; without hurting yourself.What you will need in addition to the kit:*Tape Measurer*Painters/masking tape*Johnson Level (short/small)*Hammer*Step Ladder*A Map or general gist of where you want things on the wall, especially if you are doing a custom set design.What will be helpful if you have machine tools:*#2 diamond screwhead attachment*Your OWN 3/16" Drill Hole Attachment (it already comes with one, but the harpoon head it has is too big for making custom holes for more scratch post options) if you really want it to be sturdy and not wiggle.1.) If over a sofa, measure where the top of the tallest person's head rests while sitting down, and then add a foot above it. Mark that measurement across the walls you are applying this kit to, and apply a long line of painter/masking tape at that measurement across the entire walls you are putting the kit on. You will not apply any of the kit below that tape line. This will keep claws from sinking into scalps when your cats got the zoomies.2.) After you have assembled all the kit pieces, and assuming you have your map, you are going to hold your lowest kit piece against the wall at the top of the Painters Tape you set. Place the Johnson Level on top of the kit piece, and shift until it's level.3) Then you're gonna take your screwdriver and dig into each hole real hard to mark the wall where the screws will go.4) Put the kit piece down and then Drill/Hammer the drill-hole attachment into the marked holes, be sure it's not all the way so you can pull it back out for each hole. I found it helped a lot to go in after with the screwdriver and just wiggle it around to smooth the hole out else the Anchors can warp/bend while trying to hammer them in. If you encounter wood and you don't have machine tools, I suggest adjusting the placement until you find all drywall for your holes.5) Now Hammer the Anchors into those holes.6) Put 2 screws in the top two holes of the kit piece and hold them flush with your thumbs while you line up and press them firmly into the screw holders in the wall.7) Screw those 2 screws just a bit to lock them in and then place the bottom 2 screws in. Screw them all in flush with the screwdriver in an 'X' pattern while somewhat lifting the kit piece up so it's not hanging on the screws while you screw them otherwise you're gonna have a bad time if doing it by hand.TIPS: If you're like me and think it'd be smart to keep the lids of the cat boxes off to have access... Don't. The lid keeps it all from coming apart at the seams and the screws ripping out of the wood, just put the whole box together and work with it as difficult as it is.Cats don't like things that aren't sturdy and will avoid the rope ladders, so you can skip them, or use them as a means to keep them from jumping down on you while still keeping to the aesthetic.My ceilings are short, but my cats actually are afraid of different level heights and will not go past certain points each even on the scratching cat tree that goes from floor to ceiling. I made sure my set was made to their specifications and in a way that encouraged them to play with each other at levels they both separately feel safe at. I'd highly suggest you figure out their boundaries else you will go thru all this trouble with half, if not more, going unused.
A**R
Be prepared to buy new drywall anchors
Pros: appearance is beautiful! Boxes and shelves themselves are very sturdy and easy to put together. Cat loves playing on it.Cons: the tops of the boxes and shelves are slick, so I had to buy sisal rope and carpet and spend HOURS working to make the shelves grippable for my cat's claws. If you skip this step, your cat will fall and not feel confident. The sturdiest way I found to accomplish this was using double sided sticky paper and hot glue, though an industrial glue would work as well, I'm sure.Also, I had to buy different drywall anchors because the ones in the box were not of good enough quality to have a pouncing cat on the weight of the shelves, and also because they did not fit my wall. EZ anchor makes a heavy duty toggle anchor that fits any wall that works well. My cat has been playing on the wall for a month and a half with no issues.In conclusion, this is a good base for a cat wall if you're willing to put in a lot of extra time and money to get the product you want.
S**.
Stainable!
We got our kit and took it to the garage to stain the same color as our furniture. We use a dark walnut and these stone very well. We let them sit in the garage for a week to set the stain then used a wood oil cleaner before we put them up. The kit does come with plastic sheet rock anchors, but they did not work on our walls because our sheet rock is too thin for these. We went to the hardware store and got $20 worth of metal toggle style anchors. These style anchors are very had to use compared to the plastic style because they stay in the wall while you put the screws in. So if you can use the ones provided or use a different plastic style for your sheetrock wall thickness, it would be easier to install. Make sure they will hold the weight of the product and the weight of a cat or even 2. The last photo is what we used for anchors.
Trustpilot
3 weeks ago
4 days ago