We remain fully operational. Our teams are working around the clock to ensure your deliveries continue safely.

DOWNLOAD THE APP


Copyright © 2025 Desertcart Holdings Limited
DOWNLOAD THE APP


Buy anything from 5,000+ international stores. One checkout price. No surprise fees. Join 2M+ shoppers on Desertcart.
Desertcart purchases this item on your behalf and handles shipping, customs, and support to Morocco.
K**R
So Far, So Good
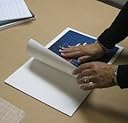
There is always a bit of trepidation with items that are "self-adhesive" - as in you don't know if the protective film is going to be a nightmare to remove, the adhesive is going to be too tacky (or not tacky enough), there won't be any shelf-life, etc. While I can't say anything about the long-term, I *can* say that the product I received strikes a great balance on tackiness (stickiness) and ease of backing removal. The tackiness of these boards is about the same as painter's masking tape. The protective backing film is robust and easily peels away and can be flipped over and placed on top of your print and used as a protective sheet to help apply the print to the board. When applying a print to the board it's best to have two people, but a method I used to successfully apply four prints to the boards (by myself) is as follows:1. Clear a decent-sized table of everything on it, and have enough space to comfortably move around the table. Lay the foam board, adhesive-side up on the table (do not remove the protective backing yet). I'm also assuming your print is relatively flat and not fresh from a shipping tube ... although you could probably make that work if you were adventurous ;)2. Peel back about an inch of backing from one of the short edges (let's call it "bottom edge"). Fold the backing over on itself, crease it sharply, and tape the flap down (to the backing). Leave a tape "tab" sticking out from the edge on one side - you will use this tab to grab the edge of the backing and peel it away in Step 5. The idea here is to leave an exposed strip to begin attaching your print to.3. Lay your print on top of the mounting board and align the "top" edge of your print with the (unexposed) top edge of the board. Use tacks or clips to temporarily attach the edge of the print to the board at the corners - this is just to hold the print in alignment with the board.4. Moving back to the bottom of the board (opposite the pins/clips): Carefully, starting in the center of the print and working out to the sides, begin pressing your print to the exposed edge of the board. The idea is to avoid bubbles and creases. Use gentle pressure - you are NOT trying to bond permanently at this point - just get it to stick and stay in place. If you screw up, immediately and gently peel the print from the board and try again (thank goodness for a not-too-sticky board). Once you have a smooth and straight bond, move to Step 5.5. If you have an assistant, have them hold the bottom edge of the board in place for this step. If you don't have an assistant, tape the bottom edge of the board securely to the table using something like painter's tape. Once the board is secured at the bottom edge, pull the pins/clips and lift your print away from the backing by the top edge. While holding the print away from the board, grab the "tab" you left earlier and peel the protective backing off of the board. Flip the protective backing sheet over to the face of your print and lay in on to protect it. Now, working up from the bottom edge, sweeping your fingertips from the center of the print to the outside edges as you go, gradually bond the print to the board. Do NOT lay the print down on the board, progressively "reverse-peel" the print to the board. Again, you are being gentle here - just trying to get the print down and semi-stuck without bubbles or creases.6. Once you've got the print semi-bonded, you can (keeping the backing sheet as a protective sheet) begin to bond your print in earnest. Pay special attention to the borders as this is where de-lamination will start - if it's going to start. That's it! You should have a nicely mounted print :)I hope this helps - and I hope the adhesive on these lasts. Overall, I'm very happy with this purchase.
W**Y
Works okay
Used to mount pastel paper.
S**V
Good quality product
I used this board as a backing for my framed pictures. It is OK. I can recommend it.
M**X
Not damaged, quality boards, great price!
I make funny posters with my Grandkids photos and place them on the boards, cover them with clear acetate and hang them in our place up "north". Reminds us of all the fun they have had at our cottage.
T**S
Great for poster and print framing.
I do a lot of picture and poster framing. Wanted to try the self-stick instead of spray adhesive. So I bought this four pack. Loved it. Won’t go back to spray. Now, to get a better value, I’ll order the 25 pack.
P**L
Perfect size. Strong Adhesive.
2x3 is perfect so minimal trimming and waste is involved when mounting posters. Permanent adhesive is VERY strong!
T**T
Works great as a backer
Works well for photo backer or poster, Requires some skill to properly mount, start small develop the skill, Once you learn the sources of failure and develop the patience you'll do it like a pro!
Trustpilot
4 days ago
2 months ago