

✨ Unlock your sink’s secret storage potential! ✨
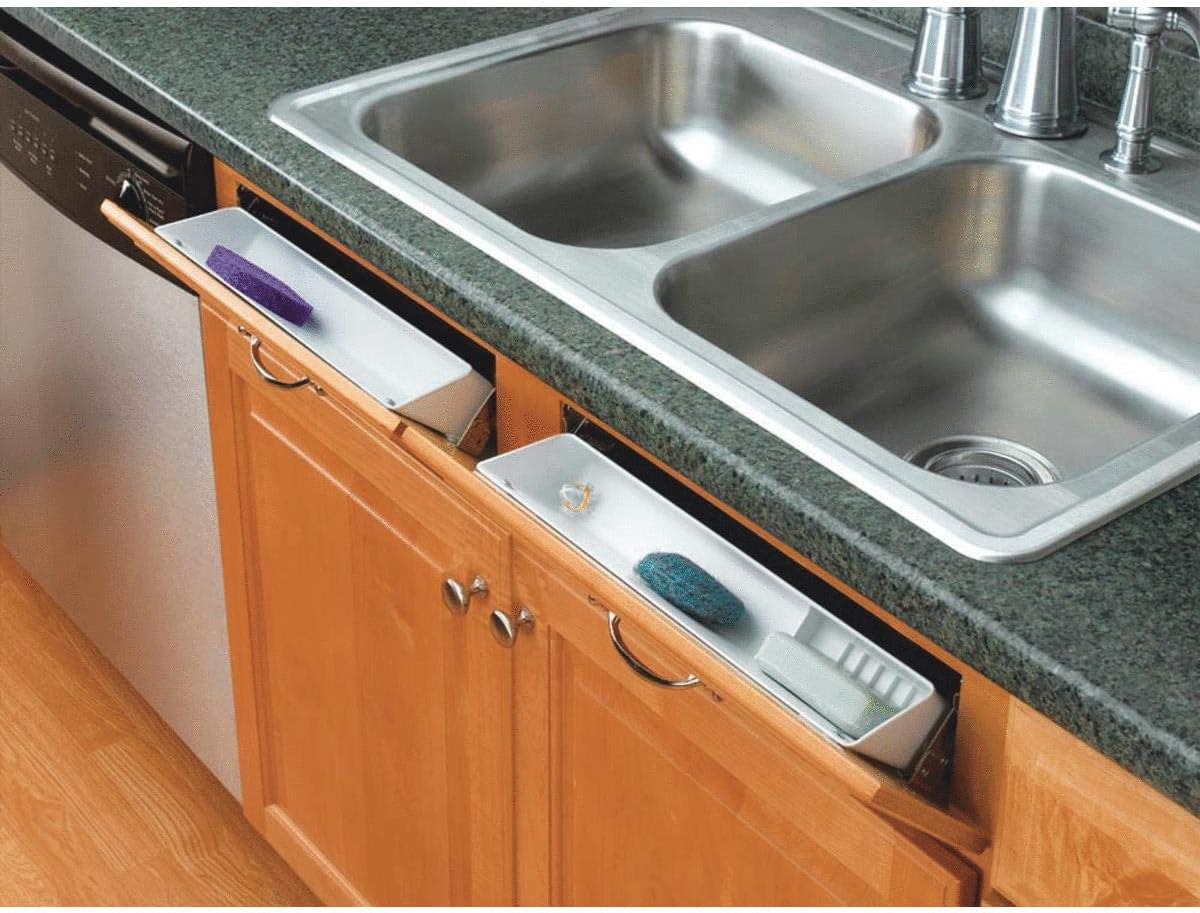
The Rev-A-Shelf 11 Inch Tip-Out Front Sink Tray Set features two durable white polymer trays—one open and one with a soap dish and ring holder—mounted on self-hold spring hinges. Designed to fit 11-inch sink fronts, it offers a smart, space-saving solution for kitchens and bathrooms, combining easy DIY installation with a sleek, functional upgrade.
| Best Sellers Rank | #254,848 in Kitchen & Dining ( See Top 100 in Kitchen & Dining ) #27 in Tip-Out Trays |
| Brand | Rev-A-Shelf |
| Color | White |
| Customer Reviews | 4.4 out of 5 stars 1,500 Reviews |
| Material | Plastic |
| Product Dimensions | 11.6"L x 5.2"W x 2.5"H |
| Shape | Rectangular |
| Tray Type | Sink Tip Out Tray |
K**Y
Great little hidden trays for kitchen
This is a great little invention. You have that little space behind the filler panels by the kitchen or bathroom sink that's perfect to tuck away those little things that you don't want to leave sitting out (drain stopper, sponge, toothpaste, etc.). I installed these at our last house and my wife said she really missed them in our new house. Got this set and 45 minutes later, they are installed in the kitchen. She loves it! Instructions say to drill a pilot hole for each screw. I highly advise pilot holes. Helps avoid splitting the wood. Another thing that helped was running a screw into the pilot holes on the cabinet for the hinges. Then back the screws out to install the hinge. This made it much easier to then hold the spring-loaded hinge with one hand and twist the little screw in just enough with the other hand before reaching for the electric drill to run it all the way in.
A**.
Great for DIY....Bring a drill!
I saw a lot of reviews saying these were hard to install but I figured I would try anyway. I'm glad I did because I found these to be easy to install as long as you have an electric drill. The provided templates worked perfectly and the hinges are very nice quality. Not too stiff and not too loose. I would definitely recommend for anyone with even a basic skill in DIY home improvement.
V**T
Useful, but tricky
Wow, was this tough to install; it took me over a week. I have one straight board, which I wasn't planning to cut in two, so I installed all four hinges on it. But first I had to repair the board; once I'd pried it off, I discovered it had a big cutout down the back for some reason, which I had to fill in with scrap because the hinge screws fell in that area. (With older houses, you just expect the unexpected.) Once I had a usable back on the panel, I put the nails back in (loosely) to hold the panel in place while I climbed into the cabinet with a pencil to draw the outline of the openings for lining up the paper templates that come with the set. You drill your pilot holes off the template. As for the screws, the only way I could get this to work was starting them with the hinges closed, which meant climbing into the sink cabinet with a flashlight and a screwdriver for some contortions around the sink bottoms. Once they're started in the holes, you can prop the panel open and screw them in (still by hand -- the heads strip easily) from the outside; if the pilot holes aren't deep enough, this will be a miserable process. Also I kept dropping the screws, and they're small and easy to lose (I never did find one of them), but fortunately the pack included an extra. I suspect the overall process may be much easier if you're only doing two hinges at a time rather than four. I didn't tighten the screws for the trays because I want to be able to remove them easily, and that's been fine -- they've stayed in place even when I accidentally let the panel slam. But that shallow inside rim means you have to be careful about how you pack things into these trays or stuff will go flying into the cabinet. I also needed sandpaper, wood filler, and stain for the gouges on the front from removing the nails; I routed finger pulls, which also got sanded and stained. I don't have drawers to spare, so this has been fairly useful for getting assorted items off the countertop. I'm judging it worth the effort.
M**A
Great idea, works well
These are pretty great. Pretty simple to install if you're handy and just think the movement of the bracket through. Couldn't find the template, thought it was left out, but was actually just packaged outside all the other materials so just look for it, that would have helped even more but again, felt it was easy and took about 30 mins total for both.
J**5
Nice retrofit draw but it can be difficult to install
These are nice retrofit draws for the front of the sink base but they can be difficult and tedious to install. Be patient and you also might have to modify the back of the blank panels if they are blank draw fronts with slots for the side rails. Those will need to be filled in so the screws will have something to bite into.
J**R
The trays work great in the end.
My order was missing a piece. The order was for 2 tilt out trays and 2 sets of hinges. I only received 1 set of hinges. I called the company and they said I had to call the seller in which I was unable to get in contact with. I therefore called Amazon Customer Service and explained that I was missing a set of hinges in my order, which made the 2nd tray no good. They said they would not be able to order just the 1 set of hinges that they would have to order a replacement order for the whole thing and that when I receive the order, to just open it and take out 1 of the set of hinges and then return the rest back. They approved a return of the item and sent me a QR code for me to return it. I received the replacement order and when I opened the new order, there was only one set of hinges in that box as well. There was 2 trays but only hinges for one tray. I removed the one set of hinges. I'm sending it back with the 2 trays. With that said, the trays fit great and were easy to assemble and seem to be very sturdy and they work great. Thank you to Amazon Customer Service!!!
T**S
Screwdriver, pen, tape and gift wrap was all she needed!
I used the grid on the back of gift wrap to make a template of the hole. Used a pen and the kit template to draw off the holes and used my screwdriver with the screws to make pilot holes. Then I taped the gift wrap to the back of the cabinet face and drew off the holes for the trays, making sure they were straight with the gift wrap grid. Used the screws and screwdriver to make the holes and left the screws loose and checked the trays. Then I used the front hinge template and found out the instructions were wrong and the holes needed to be at the bottom, not the top, then drew them off, making sure they were level with the gift wrap grid. Checked the dots with the hinges and then screwed the face plate on. Added the trays and tightened. I love this upgrade and so happy I can take them out to wash when needed.
O**S
Cheaper if parts bought separately, except this hinge seems to work a bit better.
Installation is fairly simple, except for the initial removal. That part took some effort and care not to damage the cabinet. Other than that, the Rev-A-shelf works really well, and the family is happy with this improvement. A bit overpriced in comparison to buying the parts.
Trustpilot
1 month ago
1 month ago