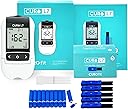
Desertcart purchases this item on your behalf and handles shipping, customs, and support to Morocco.
🩸 Take control of your heart health—anytime, anywhere!
The CURO-L7 is a professional-grade, all-in-one cholesterol testing kit designed for both home and clinical use. It includes a test device, 5 test strips, lancets, and an EziTube rod, offering accurate, reliable blood cholesterol readings in a compact, travel-friendly design. Backed by real customer support and easy-to-follow instructions, it empowers busy professionals to monitor their heart health with confidence and convenience.


| Customer Reviews | 3.2 out of 5 stars 356 Reviews |
T**O
Lipid Panel in less than 5 minutes!
The Curo L7 was a very advance monitoring tool for both Glucose and Lipid panel. As time went by the glucose analyzer was surpass by other products that let you control the diabetes and insulin better furthermore the glucose strips are not available any more, however the lipid profiles is excellent so is what I use this kit for I have seen many negative comments for this product here in Amazon and I wonder IF some of them are users errors. I will give you some tips that help me to get excellent results. 1. Be sure that the test strip expiration date is OK. 2. The Curo L7 device is already pre-calibrated so if the device works well the numbers should be reliable. 3. First do the Initial setup of the device: User Manual page #14. Ignore "Mode change" in page 22 because when you insert the blue code chip it will default to Lipid Mode what is what you want (Be sure the analyzer is OFF when you insert the code chip) 4. Second check if the device is working well without errors. Use the plastic strip test that comes with the kit. Page #43 of the User Manual 5. Blood sampling is tricky because you need far more blood than the small drops that you use for glucose test. Also the lancet provided can not be reset. Have another lancet ready jic or even better have one of the lancet that you use for glucose testing ready in case you need to stick another finger. You do not need to fill the tube to the mark in one time, you can get another drop and complete the filling. 5. The EZ tubing is a plastic pipette with one end close with a bulb so be sure you grab the tube not the bulb and place the tip on the sampling window and then very slowly squeeze the bulb between thumb and index to drop the blood. This is key, be patient and do it slowly until the "window' port is cover with blood. User Manual #31. 6. Do the test in a flat surface where the device is lying flat. 7. Be sure the EZ tube does not roll if you accidentally touch it with the finger. I have a small piece of packing foam where I made a grove so the EZ tube can not roll. 8. Wash your hands with regular soap and let it dry well ++. If you want you can use alcohol pad also be sure the finger is dry. Test can be affected if you do not follow these precautions. 9. The Lipid Test Strips comes with a insert with some extra info, worth to read it. Hope you get the optimal numbers as describe in the User Manual page # 37. I have a couple of questions and I sent an e-mail to support and they were answered the following day which is excellent. In summary this is a great pro kit to get the lipid panel.
A**R
The test strips only worked 1 of 5 times. E1 codes & shut down
It worked as advertised when I received it 2 months ago but has not since then despite very carefully following the exact same instructions I did the 1st time. The tester gave me an E1 code for 4 of 5 test strips they sent with it, & they were nowhere near expiration. I used all the test strips (as the book suggests) & can't get any more in time for what I bought this tester for. When I called during the hours specified nobody answered the phone for days & there is no answer machine. My email was not responded to. When someone eventually answered the phone they seemed to be trying to dial out. At first they implied I did not follow the directions properly after I them very carefully following both sets of instructions the 1st time & every time since then. The test strips failed 4 out of 5 times with an E1 code Then they told me to take a video of me performing a test & seemed confused when I explained I cannot do that because I followed the instructions & used all the test strips they sent with it. They refused to send me some more test strips, & even if they did I would not get them in time for what I bought the tester for. It worked fine when I received it (the results were in the ballpark of the professional labs I got about an hour before) but all the rest of the test strips failed with an E1 code even though I very carefully followed the exact same instructions I did for the first successful test. I also tried installing new name brand batteries, reset the tester, & did the setup process all over again, but still got an E1 code followed by a tester shut down. Curofit now says I must send the tester to them for "inspection", but I told them I did not have the time left to do that before what I bought the tester for, so it is a completely useless waste of my time & money
A**R
Puzzling readings deciphered
Using the very helpful videos from other Amazon reviewers, I successfully completed my first lipid panel test this morning. Like one other reviewer, I got a puzzling reading, but dug around a bit on the FAQ page for Curofit and found what it meant (because the reviewer was correct: it was NOT coded in the accompanying instruction manual). The reading for my LDL looked like that 0-8 with the bottoms cut off. It was actually "n - A" meaning "Not Available." What this meant, I gather, was that because my triglycerides came in as "lo" (meaning below the set calculation parameters: typically below 45 or 40, depending on how the labs are set), lacking a specific TG number, no precise LDL number could be derived. Still, the device gives a TOTAL for non-HDL cholesterol, and LDL can be generally inferred from this total. I'd have to say I'm pleased with how easy the device was to use on first try: but again, this is because other reviewers gave such good advice.
P**Y
Error codes and Inaccurate results
The initial product included material for 5 tests. The first test I used seemed very accurate based on my last lab test with my doctor. The next time I tried to test, it gave me an error code, and I had to use another test strip. It gave me extremely high LDL results and low Triglycerides (LDL about 40 points higher than it was 3 weeks prior) Tested again 3 weeks later, and again it gave me an error code and I needed to use another test strip. So I used my last test strip included in my test kit and I again got an error code. I'm reading instructions and following them closely. This was a total waste of money. For $169 I got one test that was reasonably accurate but this purchase has proven to be useless for me.
T**V
What does this mean?
Today I got a reading for TC, TG, and HDL, but then for the next values of LDL, LDL/HDL, TG/HDL, non-HDL the screen read as in the picture. It looks like 0 - 8 but with the bottom bar cut off. So I am not sure what it really is. There is nothing in the instruction book explaining this. This machine was working great the first few times, but now I notice that the collection tube tends to get stuck or slow in accepting the blood at the half way point. So that means it's a struggle to fill up to the fill line. I worry that if the fill process slows down too much that it might be creating a clog at the start of the collection tube. Some times there is a tiny bubble in the tube. So I just wonder if I failed to get a complete reading because of there not being enough blood? I did fill to the fill line, and when I deposited the blood on the strip, it beeped and told me to close the lid. I figured that meant it got the right amount of blood. So what is this all about? I've been trying to run hot water on my hands and swing my arms a few times prior to poking my finger in an attempt to get the blood to flow faster. Still I see the collection tube getting sort of clogged at the tip. It wastes tubes if I have start all over because a given tube won't accept enough blood. Other than that issue, I like the ease of use of the machine itself and the fact that one can get readings for TC, TG, HDL, and LDL. It feels like a good quality machine, but I feel that collection tube needs to be improved. UPDATE I have been getting the hang of it. I squeeze my finger to get a big blood drop, collect that, then keep on repeating. I notice that when I tilt the collection tube upright that's when an air bubble can form so it's best to keep it level and only tilt slightly when putting the tube at the blood drop. Once an air bubble forms there is danger of a clot forming in the tube and then it's possible that the blood gets sticky in the tube and won't come out. I wish we could by extra tubes for when mistakes happen.
M**S
Update #3: So far . . .so good - READ THE MANUAL - ONLY AS GOOD AS ITS USER!
01/14/2021 Did my first reading yesterday and it was spot on to my Quest Diagnostics reading the previous day (wanted to compare prior to starting at home testing). DESPITE taking the time to read the instructions twice . . . and then putting them into play . . . I still did it wrong. You must insert the tester first, close the door, wait for it to tell you to open the door and then add sample. I did call customer service and they were exceedingly helpful. Such a breathe of fresh air when a company actually wants to help you use its product. Update in about 2 weeks! --------------- 01/21/2021 Update: Still going well. I have used this 3 times now in a week. You MUST FOLLOW THE DIRECTIONS IMPLICITLY! If you don't put in enough blood - it won't work. If you put in too much blood - it won't work. If you add blood sample before the reader gives you the indication it is ready - it won't work. - Insert batteries and cartridge in reader. - Go through instructions to set time/date, etc. Not difficult. - Clap your hands, shake your hands - to get your blood flowing. - Alcohol your intended lance location. - Lance your finger with the provided lancet and squeeze (pick a location that you can "squeeze" easily). - Use 2 fingers to completely depress the bulb on the collection tube . . . so you have enough suction to suction enough blood the 1st try. - Fill the tube with blood to the black line as instructed (if you don't have enough - it won't work and you will waste a test). - Put the tube of blood on the side for a minute (at an angle with opening facing up so it doesn't drip out) . . . band aid your lanced area. - Turn on the reader (that you just programmed with date/time, etc.) - Insert the sample collection "tray" - you must hear a "CLICK" to indicate it is in its proper place. You do not need to open the cover to insert this piece. If you don't hear a click - it won't work. - Wait for the reader to tell you to add the blood sample. - Once the reader tells you to add the blood sample - open the cover. - Add the proper amount of blood sample. - CLOSE the lid. You will see a "thinking" hourglass for just a second. Then the 3:00 minute timer starts. DO NOT MOVE IT. DO NOT OPEN THE COVER. JUST LET IT BE! After 3:00 minutes . . . you have all readings. Arrow through to see them (instructions indicate as much). Readings are clear and concise. --------------- 02/05/2021 Update: Had an appointment with Quest today (order from my doctor) for annual cholesterol readings. I immediately came home and while still fasting did a test. Will compare and post numbers when Quest results come back. Update on process: I was having issues with sucking the blood from my finger into the little tube. So . . . now I drip blood into a 1/4 teaspoon spoon. After I have 5 of 6 good drips, I THEN use the dropper to withdraw blood from the 1/4 teaspoon into the tube. You only have to depress the bulb once (to create the suction) and the blood flows up into the tube in one movement. No worry about "bubbles" in the tube from trying to suck blood up several times via several suction actions. ————————- Update: 2/22/2021 I now drip my blood into a 1/4 teaspoon and then use the tube to suction what I need. _________________ Updated: 03/12/2021 Me and this thing have a relationship now. Do a test every week. Works like a charm. YOU NEED TO KNOW HOW TO USE IT - DON'T JUST GUESS! IT'S ONLY AS GOOD AS ITS USER! Update: 06/19/2024 Years later and still going strong. Again - READ THE INSTRUCTIONS. I can do a test in less than 1 minute now.
J**R
Questionable accuracy, but useful for monitoring trends in your lipid profile
First of all, contrary to many reviews here, the blood sample required for this meter isn't excessive or difficult to draw. Yes, it uses substantially more than your typical glucometer, but not "spoonfuls." The key to success is to use a 21ga lancet, which are included with the meter, not the smaller 31ga types which are common with diabetics. The 21ga types look intimidating, yes, but they are only slightly more painful than smaller ones, and used properly, they will ensure that you can get an adequate sample. Power on the meter with the door closed, place a test strip in the slot, and open the door when prompted. Once you've pricked your finger and squeezed out a large blob, allow the Ezi-tube to draw the blood by capillary action -- meaning, do not squeeze the bulb to suck the blood up. The tube will draw up blood only to the black line (where you need to be), and then it will draw no more. You can have the tube in any position, but it's probably easiest to lay it on a flat surface so you can use both hands to apply the sample. Apply all of the blood in the tube to the window on the test strip. It appears to help avoid errors if you poke and prod at the window a little while you apply the sample. Then close the door and pray. Within about 30 seconds, it should start counting down from 3 minutes, after which the meter will display your results. Now, having said all of that, the meter is actually error-prone, inaccurate, and somewhat inconsistent. Out of 8 attempts, I got an E-2 (inadequate blood sample) error 4 times, despite using the proper & exact amount of blood each time. That's $40 in wasted strips. To verify accuracy, I brought the meter with me to a Quest appointment, and ran a test with it right before they drew my blood for a lipid profile. The meter read 11% lower than Quest for total cholesterol, 6% lower for HDL, a whopping 25% lower for LDL, and 13% lower for triglycerides. To verify consistency, I ran two tests back-to-back. The only significant variation was in triglycerides, which was off by 8% between the two tests. Unfortunately, monitoring triglycerides is why I bought the meter. UPDATE 04/25/26: After four months of using this meter, I'm finding it more and more useful for keeping track of trends in my lipid profile. I'm still confident that it is not as accurate or consistent as a legitimate profile from a lab, but it has been very helpful in monitoring obvious reductions in cholesterol and triglycerides.
S**M
Not Worth Time or Money
DON'T BUY!!! I've purchased tens of thousands of dollars of items through Amazon in last 4-5 years and have NEVER WRITTEN A SINGLE REVIEW until today. This product is worthless and let me share why: 1. Requires significant amount of blood. 2. Getting blood into test area is very difficult. 3. Included tools are useless. 4. You will waste test strips without results despite lots of blood. 5. You will waste time going through all the steps with their provided poor quality tools. If you buy it, you will want your money back!!!
Trustpilot
3 weeks ago
1 month ago