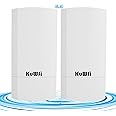
🌟 Bridge the Distance, Own the Connection!
The KuWFi CPE120 Outdoor Wireless Bridge delivers a robust 300Mbps WiFi connection over distances up to 1KM, ideal for extending network coverage to gardens, farms, surveillance cameras, and more. Featuring versatile operation modes, IP65 weatherproof design, and PoE-powered plug-and-play setup, it ensures reliable, long-range wireless connectivity with minimal hassle.
Brand | KuWFi |
Product Dimensions | 25 x 20 x 10 cm; 980 g |
Item model number | CPE70R |
Manufacturer | KuWFi |
Series | CPE120UK |
Colour | white-1 |
Wireless Type | 802.11a/b/g/n |
Are Batteries Included | No |
Item Weight | 980 g |
Guaranteed software updates until | unknown |
J**P
Excellent product and no complicated set up procedures.
A perfect product for my needs. No messing about with complicated set up procedures. For my simple installation of getting WiFi to an old thick stone walled building some distance from my house the factory setting were all that I needed. My router was at the front of my property but the bridge worked when plugged into a TP-Link booster which which provided WiFi to an office at the rear (via mains electricity circuit). The other end the of the bridge was connected to a Tp-Link modem and the signal was strong enough to site both ends of the bridge behind glass windows making installation much easier. Full marks for this product.
G**L
Great product
These are really good, and work really well. I have a caravan around 200 metres away from my mum's house, and wanted Internet for the caravan. I have one box in my mum's, one on a cow she'd, and a ethernet cable into an access point in the caravan.I would have given the product 5 stars, but dropped a star due to the instructions being quite vague, and I actually wanted to link them to a BT disc extender. The bridges would link, but without Internet. I'm not sure whether that were the bridges themselves, or whether it was the connection from the bt disc, to the tp link access point. Anyway, it didn't work, which was quite frustrating. Other than the instructions, these work really well, I'd highly recommend.
N**.
Great for Farm Yard Cameras
In order to set up a lambing camera down in one of the sheds on the farm, we needed to install one of these. Our house is situated on a hill looking down at the shed approx. 600 yards away. I have included a quick diagram of our whole set up.What comes in the box:2 WIFI Bridges – either can be set up as a master (receives connection from your home) and the other will be set up as the Slave (this will receive the connection).2 Short Ethernet Leads4 POE injector plugs – 2 UK and 2 EU (only two will be used)Cable Ties*Unsure if screws came with as we had a lot of open boxes at the time.What you need:I had initially assumed that two longer cables would be delivered with the Bridge, however I soon learned that that was not the case. No big deal, as I was able to purchase some cables on amazon pretty cheaply.You will need to buy two cables long enough to go from the following:Plug near your home router to the Master bridge box outside – we used a 10/15 m cable to go through the wall and reach up to the top corner of the house.Plug near your switch/poe receiver in the shed(or wherever you will need internet connection) to the slave bridge – we used a 5 metre cable here.Using cables are not your only option though – I have seen some reviews on youtube where they used tplink wifi extenders which plug straight into the wall at either end of the house (i.e one plugged near the router and another plugged near the bridge and then one short cable between the router and the extender and another between the second extender and the Master bridge. This is definitely a viable option; however, I chose to go with one long wire as it meant that the bridge received a stronger data connection.The Instructions:The instructions provided with the box were complete and technically had everything you needed written down, but I had a hard time following it. After about an hour or two I eventually went straight to Youtube and found a great video showing you the whole process – with that, I was done in no time!What you need to do:If you don’t want to watch the video, heres a quick outline of the steps needed:1. Plug in the two POE injectors into a socket beside yourself2. Open the cover on both bridges and set one as your Master and another as the slave (the instructions have this pretty clear)3. Plug each one of your bridges into the POE port of each of the injectors and wait for them to synchronise. The H (Master) and C (Slave) should both end up with the same number i.e. H001, C001.4. As soon as this is complete (or if it doesn’t sync) press the reset button on both of the boxes at the same time. When the set up is complete the boxes will have paired successfully. Please note – unless you press the reset button on each within a minute of the initial sync it will automatically reset, so try to be a bit quick about it5. Once the boxes have been paired, grab another ethernet lead (or just connect through wifi) and connect your laptop/computer to the MASTER Bridge.6. The devices themselves have been set up with a static IP address, which means that you will not be able to log straight into them until you change your IP address to the required IP address. The instructions are pretty clear on how to do this, however I still got a bit lost on this bit:a. You will have to change the computers IP address so that it is in the same subnet as both devices – i.e. Master Device IP is 192.168.188.253 and Slave Device is 192.168.188.100. Change your Ip address to 192.168.188.X (X can be any number other than the end number of each of the devices – aka do not use 100/253.7. Once you have changed your IP address you will go to your web browser and type in the IP address of the Master Device 192.168.188.253. This will take you to a landing page where you will sign in.8. Go through the Wizard and set up the various options needed – I would definitely do the following:a. Change Default passwordb. Change WIFI access PINc. Potentially hide SSIDd. Definitely disable Telnete. For the use of an IP Camera, I changed the Bridge so that it was no longer a static device – that way I can access the IP camera down in the yard on an NVR in the house9. Once you have gone through this, the Master will be set up. Next you should now connect the Slave device to your computer and you will do the same as above (7-8), however you will be going to the Slave IP address 192.168.188.100.a. The only difference here is that you have the option of creating a WIFI access point from your Slave device. I chose against this, as I will be using router access point connected into a switch so that the connection will be stronger10. Once these settings have been completed, you should change your IP address back to your normal IP address (refer to video)11. Finally, mount the devices – make sure they are in line of sight of each other then it will be pretty much plug and goThese devices are really good, and they have made lambing season a lot easier now that we do not have to get up in the middle of the night and walk down to the yard to check on the animals!
M**.
Bargain!
I'm amazed. I picked these up from Amazon Warehouse for £30, and they're great!I've been working with WiFi p2p links from Ubiquiti and Microtik for years, so I was very sceptical about this. But, I thought for the price of a takeaway these are worth a shot. They've been great for my requirements - a 25m link, one mounted externally and another in my loft. Pretty good speed and latancy and I haven't seen any drops.Configuration is rubbish though... check YouTube for a better guide.
Y**F
Bad instructions
The instructions to set up the product are unclear and until now I can’t connect it to my laptop. Wasted so much time trying to figure it out and still can’t do it. Waste of time and money
Trustpilot
1 month ago
5 days ago