🔧 Mount like a pro, shine like a boss!
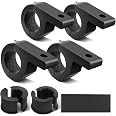
The Nilight 90028D Mounting Kit offers a versatile, durable solution for mounting LED light bars on 0.75" to 1.25" horizontal bars such as bull bars, roof racks, and roll cages. Featuring precision-welded aluminum clamps with protective rubber inserts and universal 10mm screw holes, it ensures a secure, damage-free installation compatible with most 8mm screw light bars. Lightweight and easy to install, this kit is backed by a 2-year warranty, making it the smart choice for ATV, UTV, and truck enthusiasts seeking hassle-free lighting upgrades.


| Item Depth | 5.5 inches |
| Mounting Type | Horizontal Mount |
| Manufacturer | Nilight |
| UPC | 812227032029 |
| Global Trade Identification Number | 00812227032029 |
| Model | 90028D |
| Item Weight | 1.19 pounds |
| Product Dimensions | 5.5 x 4.5 x 1.9 inches |
| Country of Origin | China |
| Item model number | 90028D |
| Exterior | Painted |
| Manufacturer Part Number | 90028D |
| Bulb Type | led |
| Special Features | Lightweight |
R**G
Good brackets, correct installation is important (tips and procedure in the review)
Perfect for the price. Tips for the install are below. For the money these are decent brackets. Using proper procedure they install cleaning and hold well. There are enough different bushing sizes to fit quite range of round bars. The finish of the brackets is ok, they are painted not anodized so keep that in mind. The paint will wear off but touch ups should be simple. 5 Stars at this price point.What could be better? The material. Its cast aluminum and quite soft. Were they made from a higher quality of aluminum or forged instead of cast buyers could have more confidence they wouldn't break under heavy use. The threads being in the soft aluminum brackets invite cross threading as many buyers will try to use the force of tightening the screws to bring the halves together. If the material has to be what it is then threaded inserts in the screw holes on the larger side of the bracket would eliminate installation concerns as good thread inserts would provide higher strength than just threading the aluminum.The thickness of the brackets is ok, as it should be considering they are cast and casting snap rather than bend. The functionality is good just don't put some huge heavy item on them or; use more brackets. I would safety wire these or at least zip tie them to the bars just in case the bracket snaps. This considers you are attaching a heavy light or device to the bracket. If you use these brackets for what most people do, to dress up a vehicle with lights that never gets driven on anything more than a paved street or gravel road they should be fine. If your vehicle is going to get out and off-road where its going to bounce back and forth then a bracket with gusseting and made from stainless steel or one made from forged and machines aluminum would be a better fit. Just remember that those types are going to cost easily many times what these do, just the way it works.Now, for those that say the screw or threads strip. It is important to know how to install ANY bar clamping light or device bracket. Typically, the bar is round and if you try to start the screws and then expect those screws not to strip out the threads as you try to tighten the two halves together you might not understand how it should be done. The vendor is selling you device mounting brackets and not teaching you how to install them since it's typically done the same no matter who makes them, you are supposed to know certain things.Here is the proper technique:1. First make sure the screws go into the threads cleanly. Any grit will make it impossible to install these correctly. If needed, blow out the threads and make sure the screws are clean (they are in sealed packages so they should be just fine).2. Test fit the two halves and try the different rubber spacers for the best fit. Nothing will ever be perfect so experiment a bit. You might need a ticker space on one side and a thinner one on the other for the best fit. A good fit is when you can barely get the screw to start threading into the bracket. DO NOT try to just tighten them together at this point.3. Use a C Clamp or one of those trigger clamps like those used to hold something together when gluing up some wood. If you don't have any, stop and get some. You would need one no matter which brackets you buy, there is a right way and the other way and doing it the right way means using a clamp. Typically these clamps have rubber feet so you won't mar the bracket finish.4. Adjust the clamp so that you need turn the adjustment only once or use one trigger pull to start pulling the two halves together.5. Place the bracket on the bar. Line them up so that when you put one of the screws in it lines up and will start to thread. Take your time. Patience is your friend. If you don't have patience, find a friend who does and let them do this for you.6. Using the clamp, compress the two halves together so that you can start threading the screws from one half to the other. Make sure you aren't cross threading the screws, the brackets are aluminum but the screws are stainless steel. The screws should start to thread easily. If they don't then stop because you are cross threading them. You should be using only light pressure on the key wrench supplied. First finger and thumb to twist is all you should need. Use patience.7. When you have both screws started (about 2 turns) tighten the C clamp just a little and then tighten the screws until you feel resistance. Repeat this procedure until the two halves have come close enough together. DO NOT try to tighten the screws hoping to get the two halves to meet. The brackets need some space between the halves in order for the rubber inserts to provide vibration isolation and slip resistance.8. As you tighten the screws, use patience and tighten each side just a little as you go. You'll feel the resistance as you tighten the screws, keep that resistance about equal as you tighten each screw.That is about it. Just remember, DO NOT try to just tighten the screws and think that will bring the two halves together. The screws are meant to hold tension, not act as to bring the halves together.So why the C clamp? The brackets are made of aluminum which is far softer than the screws. As you try to just tighten them the rubber inserts exert pressure outward and you are using the screws to work on the threads. All it takes is a little resistance and the much tougher and sharp screw threads will cut into the softer aluminum female threads and strip out.What do you do if the threads got stripped? Chase the threads with a tap and they should clean up but before doing that, drill the holes using the appropriate drill size a little deeper. Then chase the original threads and continue to the entire depth. That way you have really clean good threads for the screw. The screws are M5 so if you had to rethread, use a slightly longer screw, they are pretty commonly found or just get some on Amazon.
C**G
Good solutions for flat to round bar connection.
Bought these to mount a retractable awning on my teardrop trailer. These brackets worked well on Yakima round bars with the provided rubber strips. Good solution and seems very sturdy.
M**S
Well made great value!
Very well made, I suggest starting the screws as the threaded holes have paint in them that can cause you to cross thread the screws and then strip the threads.Make sure you are using the correct rubber bushings for you size bars. Simple installation. My only suggestion to the mfg would be to code the rubber bushings as to size, maybe a small dot of paint !
M**L
Buen material
Buen kid pero siento que le falta un poco más de apriete se le dio el máximo torque en las medida indicada y aún sigue un poco flojo
J**N
Missing bolts
All is excellent , but the plastic bag for the bolts was riped open and half of the bolts are missing.
R**Y
Nice light bracelet
Nice quality light mounts for the money. Easy install and stays where you put them.
M**K
Great stuff!
Excellent!! Great quality, always happy with this manufacturer!
J**E
Product looks good but not to advertised tolerances!
The finish of product looks good. But the tolerance of the cast product is undersized for use on 1.25 inch diameter tubing. The manufacturer should cast the product, debur the casting, assemble with spacers, and then broach the interior grooved diameter to ensure tolerance is kept. Or at minimum, while still hot from casting, assemble and clamp in fixture to ensure tolerance is maintained.
Trustpilot
2 days ago
1 month ago