


🚀 Upgrade your MacBook’s heart — faster, bigger, smarter storage awaits!
The JESOT M.2 NVMe SSD Convert Adapter is a precision-engineered DIY upgrade kit that enables mid-2013 to 2017 MacBook Air and Pro Retina users to replace their original SSD with high-performance PCIe NVMe M-Key or B+M Key SSDs. Compatible with macOS 10.13 and later, it unlocks faster data speeds and expanded storage capacity, perfect for professionals craving enhanced productivity and longevity from their Apple laptops.


| ASIN | B07VVNKRYR |
| Best Sellers Rank | #285 in Computer Memory Card Adapters |
| Brand | JESOT |
| Color | Green |
| Compatible Devices | Laptop |
| Connector Type | M.2 |
| Customer Reviews | 4.4 out of 5 stars 1,915 Reviews |
| Finish | Nvme |
| Finish Type | Nvme |
| Manufacturer | JESOT |
| Model Number | 5cb18261-6b6e-4ab6-aab4-a1dd52085b1c |
| Number of Items | 1 |
| Number of Ports | 1 |
| Package Quantity | 1 |
| Power Plug Type | No Plug |
| Smart Home Compatibility | Not Smart Home Compatible |
| Specific Uses For Product | Laptop |
| Unit Count | 1 Count |
M**L
Perfect!
Made it possible to revive an old MacBook and store even more info on it. Good deal!
B**B
Added more life to Mid-2015 MacBook Pro 15
I was afraid to touch these after reading about Kernel Panics with Non-Apple Upgrades in the past. But able to get a nicely discounted WD Black SN750 1T SSD and figured it was worth a try for so little financial risk. Last year I replaced the internal battery and that helped it, but the Apple 256 GB SSD only tested in the mid low 100s on BackMagicDesign and reading email could be a pain. I was using External Drives for DropBox and Photos because I had no room. So everything could suddenly become slow. Before I replaced the drive I downloaded the latest macOS Monterey 12.4 installer from the Mac Store and then used Terminal commands from an Apple support article to create a Boot USB Installer drive from a 32GB stick I had lying around. I confirmed I could boot from it and then opened the MacBook. At first I had an issue with my MacBook not recognizing the new SSD Card, but when I went to put the original back I realized I didn't have it pushed into the SSD slot far enough. After that I was fine. After booting from the USB and a fresh install of Monterey I then restored the rest of the data from my Time Machine backup that I made sure was current before this. And the OS install and restore went so much faster than any I had done before. In a couple hours I was back up and running and just had to fix some setting. Now my MacBook is portable again without all the extra drives I needed before and the drive is so much faster. After a week everything is great. Not issue at all. I used it off the power cable and external drives for the fist time for several hours this weekend. Will help as I wait for a new M2 Pro/Max PowerBook Pro to come out. My only regret is that I didn't pick up the 2T WD Black sn750.
W**T
Works as designed and perfect fit
I bought this for upgrading a Late 2012 iMac without realizing that model still used the older mSATA interface with a different pin layout. I ended up returning it but not before testing it on a 2014 13" MBPr out of curiosity. Snugged right up to the Nvme 2280 blade I paired it with, and the combined length was a perfect fit on the board with the screw at the end lining up nicely. Had previously cloned the drive off the blade it was temporarily replacing so system detected the new drive at startup and booted normally. I ran speedtest a couple times and noticed similar if not slightly higher numbers than the OEM blade it replaced, which isn't surprising given the bottleneck here is the older interface and not the drive itself. I then let GeekBench 6 run on a loop for an hour just to stress test it and didn't see any hanging or kernel panics either, both of which were an issue with older adapters of this design. TL;DR this is a suitable replacement for anyone running older per-butterfly keyboard or M series Macbooks and certain models of 2013 and later iMacs that support an SSD blade. Those OEM parts are harder and harder to find, and those available typically show signs of aging those early gen SSD's are known for. With this adapter, you can take the latest Nvme Gen 2 drive that run ~50-60 bucks/TB and give your older Macs a quick boost in capacity and possibly even performance depending on the condition of the drive you're swapping it for.
K**.
Failed after a week in a 2019 21.5" iMac (Kernel panics)
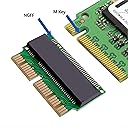
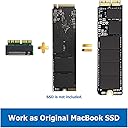
UPDATE: After a week of this being installed, my iMac began to kernel panic to then reboot to a missing volume (folder with blinking question mark). The cause was this adapter according to Console. Then I began reading that this isn't a reliable adapter as they can begin shorting over time due to heat, causing kernel panicking and potential data corruption. Luckily I can be in and out of my iMac within 20-minutes since I've yet to reseal the display. But to the novice, a failure of this magnitude may become time consuming if not costly by way of hiring a tech to redo the install again. Therefore, I do not recommend. ********************* I hadn't worked on an Apple product for sometime outside of software. So when I purchased a used 2019 21.5" iMac that came equipped with a 256GB SSD, I knew I needed to upgrade the drive as well as the RAM (came with 8GB, but neither here nor there). However, there wasn't a lot of PCIe SSD options available that were affordable. So I looked into picking up a Crucial P5 Plus NVMe 1TB drive instead, but needed to adapt it to PCIe. Therefore I took a chance on this adapter, though I hadn't seen anything about it being compatible for this particular machine. Good news: It's totally compatible. Low and behold, the adapter works great. I'm typing this review on the very machine I upgraded. I was able to format the Crucial drive to Apple's APFS format under a GUID partition map through this adapter without much issue. Drive speed tests were quick and I've yet to experience any stability issues. So far, so so so good. The only "issue" that someone needs to keep in mind regarding Apple's PCIe socket on the main logic board (MLB): It's a stiff, highly resistant fit. So install the adapter first to the MLB if you can while doing your best to support the PCIe socket itself to not hurt the MLB beneath. After that is when you can then put the NVMe drive in place. Do not try to install the adapter onto the NVMe first then installing to the MLB. You run a high risk of damaging the MLB, the new NVMe drive, or even the adapter. Sometimes you'll feel like the adapter is seated perfectly in there, like it cannot go in any further. But then you'll discover that the NVMe drive's screw hole won't match up with the logic board. The adapter will need to be pushed in further until there's a very noticeable 'click' into place. But that has nothing to do with the design of this adapter. Rather it has everything to do with the parts Apple used to assemble their main logic board itself. I'm not knocking any brand here, so you know. But it is advice should you encounter this same stiff socket on your own machine.
A**O
Keep those old Mac's working!
Has served me well with my MacBook Pro, easy upgrade to storage without hunting down OEM drives. I have heard mixed things about using boards like this but let's face it, you are using it on an old Mac, if you really need top of the line reliability, you probably shouldn't be using an old Mac. Better to keep one useful than let it go to waste, this is pretty awesome for that! Have used semi-regularly for a few years now, worth the price of admission!
J**N
So good, you won't know your Mac isn't stock
Normally I have a $10 cut-off for reviewing items. But this little guy works so well that I thought it'd be worth jumping on here and reviewing it anyways. Earlier this year, I picked up one of the "other" M.2 adapters on Amazon and installed it along with a compatible SSD in my 2013 i7 MacBook Air. Performance was great, but my poor Mac also suffered from the wake-from-Sleep issues that so many have reported, even after going into Terminal to update the Sleep settings. Fast-forward a few months to this little guy. I eventually ended up selling my Air, partially because it was 7yrs old, but also because my wife already has one (a 2015 i5), and we don't need two computers. But hers only had a 128GB SSD, which I knew I'd have to upgrade if we were both going to use it. So this time I decided to try out the JESOT adapter in upgrading her Air with a 1TB SSD (the same Western Digital Black that I'd installed in my last Mac). I expected some hiccups, including that I'd probably have to make the same Terminal adjustments and even then still wind up dealing with some bugs. It's an adapter, so my Mac probably won't function the same as OEM, right? Nope. It's perfect. I've tested this Mac in all kinds of wake-from-Sleep scenarios that would've made my other Mac choke- zero issues on this one. Read/write speeds are still bottlenecked to ~1350MB/sec (which is still cruising relative to SATA III), but that's an expected limitation of this Mac's older PCI interface, not this adapter. I haven't been this keyed-up about a <$10 computer component in a while. Now that I know this one works, I'm planning to upgrade my parents' Macs with a similar setup. That said, if you're hoping to upgrade your compatible Mac's storage while avoiding the Apple/OWC storage surcharge, go with this little guy and a compatible SSD. You'll never know it's not stock.
C**H
Mostly works in Mac Pro 2013 (A1481, MacPro 6,1)
This mostly works in the Mac Pro 2013 (A1481, MacPro 6,1). I say that because I may have a bit of a lemon in terms of this adapter being manufactured slightly off spec (green model, not black). I tried both a Sabrent Rocket 1TB and a XPG SX8200 Pro 2TB NVMe drives and they both are just slightly too tall once plugged into this adapter so out of alignment with the SSD screw hole. Not a big deal as I can screw in partially and keep enough tension on the drive to stay in place but its a bit janky (see last pic). In terms of installing the drive: Install the drive with adapter into the machine, the first time you boot reset the PRAM (hold down OPTION+COMMAND+P+R during boot), then plug in a bootable Monterey USB thumb drive (follow Apple's support page on making a bootable USB for Monterey), boot off the thumbdrive (hold OPTION key during startup) and then run thru the install process. My 12-core/128GB Mac Pro took about 30 mins to install Monterey. When I first tried installing, Monterey kept hanging on the language chooser and this "updating macos" popup that never moved. Once I reset the PRAM this fixed that issue. Also special thanks to @M. Shepard's review confirming Mac Pro 2013 support.
V**O
I get : Not recognize error on MacBook Pro mid 2015
Hi folks! I bought this adapter to use in a MacBook Pro mid-2015 with this SSD: DATO 1TB SSD M.2 2280 PCIe Gen3x4 NVMe (DP700Pro Series, up to 3300/3100 MB/s). I’m getting a “not recognized” error — does anyone know why?
S**W
Funciona bien pero solo con un NV1 de Kingston o Samsung
Lo adquiri para una mac 1466 y fue incompatible con un ssd nv2, tuve que poner un Nvme Samsung 1TB oem y ahí si funciono correctamente, por lo cual recomiendo verificar que tu SSD sea PCI 3.0 porque al ser 4.0 como el Kingston Nv2 de 1TB no lo reconoció, fuera de eso todo perfecto! recomendado para la 1466 2017.
S**I
Dot by it
Worst product it's make my macbook Air 2017's motherboard short item doesn't work
S**S
Easy to install and so far is working as advertised for a MacBook Air 2017
Easy to install and so far is working as advertised for a MacBook Air 2017 with Samsung 500GB 970 EVO Plus M.2 NVMe SSD
A**N
محول sad
لاستبدال الهارد دسك للابل لاب توب
B**S
Produto Excelente
Produto de alta qualidade
Trustpilot
3 days ago
2 days ago