We remain fully operational. Our teams are working around the clock to ensure your deliveries continue safely.

قم بتنزيل التطبيق


معلومات عنا
حقوق الطبع والنشر © 2024 Desertcart Holdings Limited
قم بتنزيل التطبيق


Buy anything from 5,000+ international stores. One checkout price. No surprise fees. Join 2M+ shoppers on Desertcart.
Desertcart purchases this item on your behalf and handles shipping, customs, and support to Morocco.
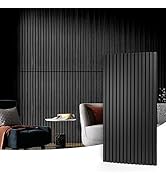
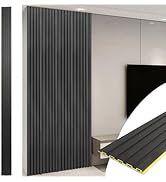
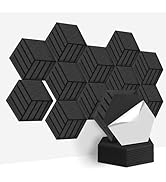
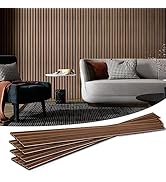
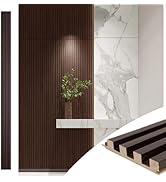
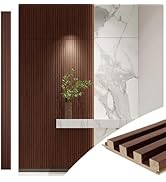
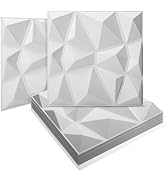
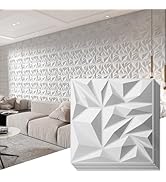
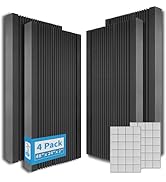
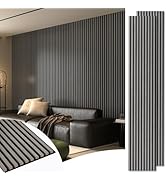
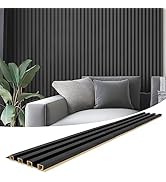
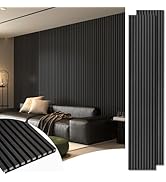
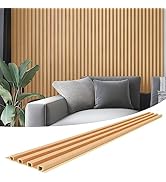
🖤 Elevate your walls, elevate your vibe — Black Diamond 3D panels for the bold and the brilliant.
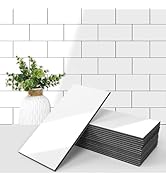
The Art3d Black Diamond 3D Wall Panels come in a 12-pack of 19.7" x 19.7" sheets, covering 32 square feet with a striking diamond texture. Made from premium, waterproof, heat- and scratch-resistant black PVC, these lightweight panels offer a no-fade, no-odor finish ideal for stylish interior accent walls. Designed for easy DIY installation with glue or command strips, they suit a variety of spaces from living rooms to commercial studios, delivering a modern, durable upgrade that’s renter-friendly and visually impactful.


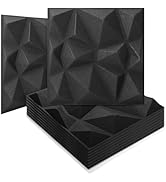


| ASIN | B07B9TNXGF |
| Best Sellers Rank | #193,300 in Tools & Home Improvement ( See Top 100 in Tools & Home Improvement ) #306 in 3D Wall Panels |
| Brand Name | Art3d |
| Color | Smoky Black |
| Coverage | 32 square feet |
| Customer Reviews | 4.5 4.5 out of 5 stars (1,252) |
| Installation Type | Glue. |
| Is Stain Resistant | Yes |
| Item Dimensions L x W | 19.69"L x 19.69"W |
| Item Weight | 8.9 Pounds |
| Manufacturer | Art3d |
| Material Type | Polyvinyl Chloride |
| Style Name | Modern |
| Theme | Space |
| Unit Count | 32.34 Square Feet |
W**2
Easy to install. Look great. Xtra tips for cutting & sticking to wall...
Overall, these plastic tiles are great. Definitely a unique looking accent wall. Lightweight, easy to work with, but there are some tips for making the job easier. 1. Use 3M Command Strips to hang them. It's much easier and you can repositioning if you need to. Get the poster size and cut them in half. 2. Practice a layout. Use 2-3 command strips to temporarily hold your pattern on the wall. You can then figure out if it works best to center your design or start on one end. Also, will help you figure out if you want to alternate the direction (I did) or lay them all the same way. 3. Make sure you are level horizontal & vertical. Use a laser, snap a chalk line, use a level, whatever you prefer. Just don't assume everything is straight & level. 4. To cut straight tiles, I used a diamond bladed tile saw (used it dry, not wet). This will allow you to cut straight for your ceiling & corners. Do not use a regular table saw or mitre saw blade. It will chip & splinter your edges. 5. To trim, use a pair of tin snips / aviation snips. 6. To smooth out any edges or to trim, you can use a Dremmel with a sandpaper head on it. Works great. 7. Outlets are very difficult. I took off the outlet cover, then cut out only the size of the outlet with tin snips so it would sit flush up against the wall. Hope those tips & pictures help make your project go smoothly.
B**Y
Awesome accent wall!
I used these panels to create an accent wall in the gaming room, and it turning out amazing! I was a tad hesitant at first because I live in an apartment and wasn’t sure how to make a floating accent wall without doing a bunch of damage. But after some brainstorming, I figured out a way to make it work. Here’s how I created a renter-friendly floating wall with backlights. Supplies: 6 of these awesome panels in black 3 20x30 inch black foam boards from Michaels A bag of 1-inch square wooden blocks from Michaels Double sided gorilla tape Small D-ring hangers Light strip I used the tape to stick two panels to each of the foam boards and trimmed the extra bit of foam board off the sides. On the back of each foam board, I taped one wood block at the top and two at bottom of each board. Then I screwed a d-ring hanger to the top wood block on each panel section. I did have use nails to hang each panel but that’s because there’s too much humidity where I live to use command strips for this. But you could definitely use command strips instead of nails to hang up these panels. Once all three panels were up, I stuck a nice light strip to the back edge of the whole thing. It definitely gave the gaming room a very cool vibe!
S**G
Full Installation Tutorial / Honest Review
Love these wall panels. Read for full installation tutorial (one of many methods) First off, the description says “32 sq feet”, which to most people not using the metric system, means 8x4, which is the standard size for most sheets of plywood. These panels, however, are 19.65625 x 19.65625...so they don’t cover a traditional 8x4 sheet of plywood. I didn’t want to ruin my drywall in case I didn’t love them, so I wanted to put a backer board over my drywall so that I could remove it/the tiles if need be. Using liquid nails or double sided tape on drywall is a recipe for disaster if you ever want to remove it. I purchased 3 sheets of 4x4 hardboard from Menards at $5.50 a piece. I didn’t want to make a mess with liquid nails so decided I was going to use double sided tape. I picked up 3 rolls of 150 feet Gorilla heavy duty for $10 a roll. So my total for the project including the 3D panels themselves was about $130. The box has 12 tiles and I could fit 6 length-wise on my wall with about 7 inches left over. So I decided to do 2 rows of 6 panels. 1. I took 19.65625 x 6 and got 117 15/16 and 19.65625 x 2 to get 39 5/16. So I knew that was the size my backer board needed to be. 2. I laid the sheets on the floor, measured, marked, and drew straight edge lines across at the marks. 3. I cut the sheets with my circular saw. (They Cut very well if you cut with the grain) 4. I brought the sheets inside, marked the edge on the wall where the first sheet would sit, and then I marked the stud lines above the sheets so that I knew where to screw in so that I hit the studs. 5. I screwed the panels into the wall at the stud points. For the corners of the sheets that were not close to a stud, I hammered some nails so that the sheets would not come away from the wall in those areas. 6. I framed the entire structure with double sided tape. I also added a line of tape through the direct center. This way the panels would have at least 2 contact points with the tape in all spots. **note - if you mess up and pull the tape from the hardboard, the tape will not stick again so you will need to use new tape. 7. I carefully placed the 3D panels onto the wall and pressed down firmly to secure with the tape. Take your time, it’s tough to unstick the panels from the tape. 8. I ran my finger slowly along all the edges to make sure all the panels had good contact with the tape. 9. Enjoyed my new wall. Hope this helps. These panels are awesome. With a little planning and patience, they can make a nice feature wall.
C**9
Pretty simple to install
I will admit I do think these are a little expensive for what they are, but they are pretty good quality... The instructions said to use glue for the walls, I used command velcro strips instead and they are still there. Pro: Easy to work with Pretty cool looking Con: Kinda pricey in my opinion I like these they are easy to work with and look great, they do like dust... For my application, I think the command strips will work fine, but if you intend on making a feature wall with them I would go ahead and glue them.
A**Y
3D wall panels - cool way to change a space up!
We are turning a large closet into a little whiskey den and wanted an easy way to change up the look of the white walls and not have to fix a whole lot of drywall issues in the process (taking out the closet hardware caused a bunch of superficial dry wall damage). These 3D wall panels were super easy to install albeit a little tedious (until you get quick at running a line of glue on the edges of the panels). I used Gorilla Heavy Duty Ultimate Construction adhesive to adhere the panels to the wall without any issue (and no glue drippage). These panels are a super quick way to make a big change in any space and we’ll likely use them in the future for other spaces!
E**Ü
Ürün çok güzel ancak kesildiğinde köşeler için bir çözüm yolu üretilmeli
S**K
I initially accidentally ordered the 30cmx30cm and immediately exchanged it for the 50cmx50cm. These panels are a sensational piece of art when used with the proper lighting. I'm just mind blown at the beauty. It's like I'm at an art museum. Great product although very pricey! Strongly recommend to get it if you are looking for a cool backdrop for your youtube podcast/channel. The photos attached have NO filter, raw photo taken with my Samsung S22.
D**Y
Impeccable facile a poser
Q**I
Todo muy bien el color muy brillante buena calidad
A**R
Quality 👎
ترست بايلوت
منذ شهر
منذ شهرين