✨ Peel, Stick, Impress — Upgrade Your Space in Minutes! 🏡
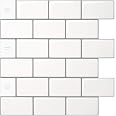
LONGKING’s 10-sheet peel and stick backsplash tiles offer a stylish, large-format 12x12 inch subway tile design with grey grout lines. Made from eco-friendly vinyl, these heat and moisture resistant tiles provide 40% more coverage than standard tiles and install effortlessly without grout or tools, making them the perfect quick upgrade for kitchens, bathrooms, and more.


| Brand | LONGKING |
| Material | Vinyl |
| Size | 12x12 Inch |
| Color | White with Grey Grout |
| Finish Type | Painted |
| Style | Subway tile |
| Installation Type | Peel |
| Product Dimensions | 12"L x 12"W |
| Pattern | Geometric |
| Item Weight | 2 Pounds |
| Shape | subway tile |
| Item Thickness | 0.06 Inches |
| Edge Style | Micro Beveled Edge |
| Unit Count | 10.0 Count |
| Item Display Dimensions | 12 x 0.06 x 12 x 0.06 inches |
| Recommended Uses For Product | Kitchen backsplashes, Bathroom Bedroom walls, Laundry rooms |
| Form Factor | Subway Tile with Micro Beveled Edge |
| Water Resistance Level | Moisture Resistant |
| Special Feature | Heat Resistant |
| UPC | 767550426000 |
| Manufacturer | LONGKING |
| Part Number | LKA2300B0 |
| Item Weight | 1.96 pounds |
| Item model number | LKA2300B0 |
| Is Discontinued By Manufacturer | No |
| Finish | Painted |
| Item Package Quantity | 1 |
| Number Of Pieces | 10 |
| Special Features | Heat Resistant |
| Usage | Wall / Backsplash |
| Batteries Included? | No |
| Batteries Required? | No |
K**N
Great for Rental Homes - Easy to Apply and Remove
The LongKing Subway Tile Kitchen Backsplash Peel and Stick Tiles worked great at dressing up our otherwise bland looking kitchen wall. Because we don’t own the home we’re in, we wanted to dress up our walls without damaging them. The peel and stick tiles are essentially large textured stickers. Up close, it’s evident that the tiles are not real simply based on the slight shine of the grey grout. The tiles themselves are slightly textured and are harder to determine if they’re fake or not - I was pleasantly surprised to see that they didn’t look too flat or overly fake - they do rise up slightly as opposed to the grey grout and have a light shine to them. The stickers cut easily so you can customize them as you need, and as per the recommendation of another reviewer, I cut off the “overlap here” area so nothing can be seen through. To cut, definitely use a metal straight edge, a sharp Exacto knife, and a self healing cutting mat - it will make your life much easier. Also, when applying the sticker around electrical outlets, simply remove the wall plate, put the sticker over the outlet, then use your Exacto knife to cut around the outlet opening - the outlet plate can go right on top of the tiling afterwards and no cut edges will be seen. Because we put our sticker on a white wall, there was no noticeable bleed through. Putting up the tiling took two afternoons as we had to order more tiles, and the end result was fantastic - the tiling looks so much better than the plain white wall. The stickers stay firmly in place without peeling up, and they are easy to wipe down when oil or food slashes up on them. As noted before, it’s nice because we can also remove the tiles down the line without damaging the wall. Overall, if you’re looking for a quick and budget friendly means of dressing up your walls a bit, this is a good option to consider.
B**E
JUST GO FOR IT
A little bit tricky to figure out placement at first but once you get in the groove, it’s as simple as can be! Obviously, you won’t get the exact look of real tile/grout but these are close enough that nobody takes the time to notice. For installation, I bought a new utility knife and steel ruler like a few reviews recommended but scissors ended up being so much easier to handle. At no fault of the product, I had a little bit of difficulty since most counters are, apparently, not level at all. Simple fix if you have the same level of care from your builders: keep your scraps after you get done with the main pieces to cut and fill in any slanted gaps along the bottom. Then just add some caulk and even I don’t notice it (close-up picture is attached). I ended up using 3 1/2 packs and the total installation time was under 3 hours.I also bought additional adhesive but these things are sticky enough that it gripped well to our 30-year-old formica backsplash. I think using Krud Kutter before installation helped enormously since it removed the sheen from the surface to give it something to stick to. I was very careful and made sure to press every single seam down as I went but at the very end, I took a damp towel and went back over every seam. We live in the very humid state of Alabama and these have held up without issue for six months.We had an old phone jack in our wall that was next to a cable jack and an outlet and NONE of them were level or spaced evenly (again, go builders). I added a blank plate to the cable jack but since the phone jack stuck out like a sore thumb, I capped the wires and carefully placed the tiles over the opening. It took me forever to find the right angle and the right lighting to be able to see my coverup even the tiniest bit (I circled it in the picture attached) but you’d never be able to see it otherwise.Side note: I used the Giani countertop paint kit and my kitchen has been transformed in 3 days for under $200 and you just can’t beat that. Both items sat in my cart for months while I Pinterested how-tos instead of just doing it so if you’re on the fence, stop waiting for “one day” to come and just go for it. I finally love walking in our kitchen!Another side note: These sometimes go out of stock and when I had to reorder, I panicked and found some listed under “Art3d Subway Tiles” on Amazon that were the exact same ones!
L**A
Lasted 5 years!
These lasted me 5 years! They looked great and held up well to washing. My recommendation is to paint the walls behind them the grout color so if/when gaps start appearing you don’t notice them as much. After 5 years they turned yellow — even the ones in a box I had of extras.
ترست بايلوت
منذ يوم واحد
منذ شهر