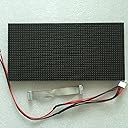
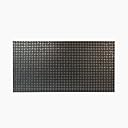
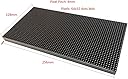
✨ Elevate Your Display Game!
The AZERONE Led Matrix Pixel 4MM Pitch LED Panels offer a remarkable indoor display solution with a 64x32 dot configuration, delivering exceptional visual effects for text, graphics, and videos. With a wide viewing angle, high contrast ratio, and durable design, this LED module is perfect for any professional setting.
G**G
Works great
The media could not be loaded. This works great with the Arduino Morphing ClockQ project. I used an ESP8266 to drive the RGB board.
A**S
I love it
Great LED board! I bought an ADAfruit bonnet (so I could totally avoid soldering), used a raspberry pi 3 B and I power it with a 10A5V power cord. It's wonderful and with the rpi-rgb-led-matrix library it's easy to use in Python. There was a bit of flickering to start out with which I originally attributed to the board itself, but it turns out it was a number of factors that had nothing to do the actual product. Even with a 4MM pitch, it's a little hard to see some details up close so being at least 6ft away helps with viewing, or else a smaller pitch would be preferable.
D**F
NO Luck
I purchased this along with XICOOLEE RGB Matrix Adapter Board Converter. I have not been able to get this to light even once. I'm just not sure if one of the 2 hardware pieces is bad or a problem with my RPI or programming.
S**N
Lacks level shifters
I’m (hopefully) going to save you some time (and frustration) by offering some key points about this (and any) LED matrix. I am using a Raspberry Pi 3 B+ as it's controller and my review is reflective of my experience of the matrix being driven by it. So all of the review might not be applicable to your specific use-case.---> image notes: 1 and 2 appear blurry due to the camera itself (they are crystal-clear in reality). They illustrate basic functionality. 3 is of the logic level shifter that is serving as an intermediary between the RPi output and the matrix input).First, the general aspects - I would five stars easily but took off one due to the absence of proper level shifting chips.Pros:1. It works correctly! (even though there, potentially, are some requisite steps before you get it to)2. It comes with a hub75 interface ribbon cable and 4-pin molex power supply cable (w/ fork terminal connectors). The power supply cable is spliced with a secondary molex connector so you can power 2 panels off of one power supply connection - which is a nice touch.3. Well cushioned during shipping, it also comes in a static-proof bag.Cons:1. Does not have the proper chip-set for the panel to interpret the RPi's native 3.3V GPIO signal.2-ish. It would have been nice to have included a longer hub75 cable (I improvised a daisy chain of 3 jumper wires to elongate the connection).If you plan on using the Adafruit led adapter hat/bonnet, then you should be perfect from the start.If you plan on directly wiring your RPi's GPIO to the hub75 data-in port then you NEED to use a logic level shifter(3.3V to 5V) to successfully do so. You should not use a standard shifter (i.e. - 8 channel logic level bidirectional converter) they won't be fast enough for this application. Rather the HCT245 chip is required to do the shifting. . . If you don’t level shift, you can still use this matrix and it will perform decently (if you plan on using the hzeller library --> you MUST use append the ‘--led-slowndown-gpio=’ argument to your bash command. If you don't use it at all then your matrix will appear completely defunct and broken. You still won’t be able to achieve a precise matrix without shifting (there will likely be many artifacts, erroneous pixels triggered, etc.)If you're in a similar situation then I'd recommend either:1. The Adafuit hat:Pros:Ease of use (after setting it up). Just pop it on top and plug in your hub75Cons:MONOPOLIZES all 40 GPIOS on your RPi (if you're using a single panel/chain all you use are ~15)Reduces RPi camera/display interface portsReduced RPi heat dispersionComponents must be manually soldered (I accidentally attached the GPIO connector upside down :( was a ~$40 lesson )Requires power supply/coin cell for clock functionality as well2. Building the shifter circuit yourself. All you need are the HCT245 (DIP type) ICs --- assuming you have a basic circuity kit already. Just review the ICs data sheet. Check out hzeller's active adapter board and its schematic (and even the Adafruit hat) for additional guidance. . . Then do it!It seem somewhat daunting but the ICs/RPi and matrix are all highly resistant to errors! (unless you do something potentially fatal like connecting the 5V GPIO to a GND GPIO)If you’re getting undesired/no outputs on your matrix. It is quite likely it is an error on your part. You're interacting with every facet of hardware/software to make this work correctly, and one small error can cause it to not work. I actually returned my first led matrix to this vendor thinking it was a dud (in all likelihood it was an error on my part.Basic hardware troubleshooting:Check and/or REDO your wiring from scratch (at first I had two address lines switched and didn't figure out why it wasn't working correctly for the first day).Make sure the I/O lines are each properly matched and that they are in good condition.Verify your matrix power supply is 5V and at least ~5A (if using a single panel).Working with LED matrices can be quite challenging and frustrating at first, but once you get past the initial learning curve the fun begins!
J**E
Perfect for making a stoplight toy
Bought two of these LED panels to use as the traffic lights for my homemade stoplight Christmas present for my kids. Both panels work great and are high quality. These panels are being used with a raspberry pi 3 B+ along with the Adafruit pi hat. As you can see in the picture, they look great and work well. Very satisfied with them!
K**.
Excellent display
The media could not be loaded. I bought 4 of these and decided to make a large multipupose display. Here it is showing the next arrival times for the train at my nearest subway stop. I'm using a Raspberry Pi, Adafruit RGB Matrix Hat, HZeller driver software plus my own softwware to run it.
S**S
works with some effort
I'm driving these panels with a QMTECH Spartan-6 FPGA board, and they seem to work just fine. As usual, no documentation, but they follow the hub75 "standard" that everyone else is using. Can't beat the price -- I will likely order more for other projects.
O**R
excellent quality display
The media could not be loaded. Needed to do research to get the correct hookup information and libraries, but once I found the correct info it was simple too hook up and works well. Wish the info and libraries were available from the vendor. Video of first project uploaded. Stars are supposed to be twinkling - looks much better in person. NOTE: The video has a few seconds of black before it starts.
ترست بايلوت
منذ شهر
منذ يوم واحد