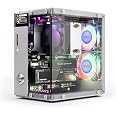
🚀 Elevate your Raspberry Pi 5 setup with the Pironman 5 — where power meets style and smart cooling.
The Pironman 5 is a premium aluminum mini PC case designed for Raspberry Pi 5, featuring an expandable NVMe M.2 SSD slot, Hailo-8L AI accelerator support, advanced cooling with tower cooler and dual RGB fans, a 0.96” OLED display for system monitoring, dual HDMI ports, and safe shutdown functionality. Ideal for NAS, media centers, and AI edge applications, it combines robust performance with sleek aesthetics and easy assembly.

| RAM | 2 GB |
| Number of USB 2.0 Ports | 1 |
| Brand | SunFounder |
| Series | Pironman 5 |
| Item model number | DE-A-Pironman 5 |
| Item Weight | 13.4 ounces |
| Product Dimensions | 6.1 x 5.3 x 3.7 inches |
| Item Dimensions LxWxH | 6.1 x 5.3 x 3.7 inches |
| Color | Black |
| Computer Memory Type | DDR3 SDRAM |
| Batteries | 1 Lithium Metal batteries required. (included) |
| Manufacturer | SunFounder |
| ASIN | B0D5CTRSQK |
| Date First Available | May 28, 2024 |
G**9
As close to perfect for a Pi case I've seen!
Wow! I’m really enjoying this case. Not only was it entertaining to assemble, but it’s fun to look at even after assembly. It keeps the Raspberry Pi 5 cool, as well as the NVME drive. It’s functional AND beautiful.Assembly only took about 30 minutes for me, and the kit contained spares of nearly every screw, cable, and standoff. The printed instructions were very easy to follow and even give visual indications on which way the FPC’s should be inserted! The most difficult part of the entire assembly was getting the protective paper off laser cut acrylic plates.However, as with all things, everything isn’t quite perfect (even if it’s really close…) While the list below might seem long, these are all really minor things and I’m only mentioning them to try and help to make a better and more perfect product.For the instructions, during assembly, it would probably be easier if the 4-pin header was left off until after the M2.5x18+4 standoffs were installed. This would make it much easier to install the standoff nearest the 4-pin header.I really don’t like how the power switch wires block access to the button battery. If (when) I change that battery, I’m going to have to remove the power switch first to avoid breaking the wires soldered to it. The only thing I could suggest to “fix” that would be if the wires were soldered at a 90-degree angle. (I’d bend them myself, but with my luck, I’d break the solder joints.)As I’ve seen mentioned elsewhere, the fan filters are useless for fans that are blowing air out of the case. What purpose are they serving? To keep dust inside the case? If those fans were aligned to pull air inside the case, the filters would make more sense. However, as the case is designed, they only serve to restrict airflow.Speaking of the fans, please consider using non-RGB fans (or find some way to allow user control of the fan LED’s.) Having the fans randomly rotate colors completely out of coordination with the LEDs on the IO Expander board is nuts. It’s too much. It’s ugly. (The fans are also a bit noisy when they're spinning. I hope I can find some quieter non-RGB replacements.)
T**.
Excellent Rasperry Pi 5 Case with NVME Drive Support
I received a Pironman 5 on Oct. 8, 2024, and completed the assembly in about an hour. It is operating properly, and I am very impressed with the case. I am not new to the Sunfounder product line, as I also own a RasPad, which I use regularly.During the assembly, software installation, and making changes to configurations, I noticed some trouble points and issues in the instructions. In the interest of only helping make a very good product even better, I have suggestions for the assembly instructions, and other possible improvements. I am a retired engineer by trade, and am always critical of designs, to facilitate more efficient designs, and better products.First is air flow. The instructions do not clearly indicate the orientation of the RGB fans. Since you placed filters between the fans and “Plate B”, the unclear instructions indicate that air would be flowing into the case, rather than out, as outgoing air would not require a filter. So, I installed the fans for incoming air. I also noticed that the tower cooler fan would be blowing air towards the incoming air from the RGB fans, so I reversed it, to use the already accelerated air from the RGB fans, and draw air through the heat sink, and move it towards the front of the case. The only issue I had here was that since the rotating part of the RGB fans rubbed on the filter, and did not rotate properly. To resolve this, I replaced the M3.5x10 fan screws with M3x12 machine screws and nuts, with flat washers between the filters and fans. This works quite well, but one of the nuts is pressed against the NVME PIP board, but not adversely.Second, I noticed a difference in the number of thermal pads. The official Raspberry pi heat sink has a pad for the voltage regulator, but the kit does not supply one. The tower cooler has space for a pad, so I installed one. I expect that there was a reason for the inclusion of the pad in the official heat sink.Third, is the soft rubber foam that is meant for the case to sit on. With stiff HDMI cables, these “feet” do not support the case in any way, causing the case to sit in a not so vertical position. Because of this, I removed the foam pads, and replaced them with four low profile 3M stick-on feet. This has completely corrected the instability of the case.Forth, is the screw attachment. Many if not most of the people who will be assembling this kit are not familiar with proper assembly methods. In particular, the inexperienced builder will put a screw in, and tighten it before adding the next screw. As with all assembly, all screws in a single part should only be started, not even close to tightening, so minor adjustments can be made so ALL screws line up, and can be started. Only then should the screws be tightened. In the case of attaching “Plate A” to “Plate B”, there are two screws that are not in the same plane as the other four. These two screws should only be tightened AFTER the four screws are tight, so the holes on the “two screw side” are aligned before tightening.My thought is to keep a positive pressure inside the case, as I believe that having air flow directed at the tower heat sink is a plus. Since the filters block the majority of air flow, I have removed them, and tested temperatures. This resulted in a 9 to 10 degree reduction in CPU temperature, without the tower fan operating. My primary computer (operates 24/7) has a 3-bay liquid cooling radiator for the motherboard components, I only have to clean the dust out every 6 months. I expect that this will be the timing to clean the Pironman 5 case as well, so the filters are more of an airflow reduction than a real advantage.My personal preferences regarding case lighting is that I don’t really go for it. It’s just a bit too flashy for me. So, I have replaced the LED fans with a pair of dual ball bearing fans that run a bit louder, but not much. I have set the addressable LED’s (commonly called NeoPixels) on the IO Expander board to a solid bright blue with a bit more green and less red creating a slightly turquoise color to illuminate the inside of the case, which is very pleasing to me.In conclusion, I feel that this is an excellent case for the Pi 5. The aluminum parts are good quality aluminum, and were properly annealed before bending, so all bends are very clean. The OLED display is bright, and shows pertinent information, including multiple IP addresses (in my case the VPN IP as well as the LAN IP). The NVMe interface works well, and there were no issues installing the Raspberry Pi OS, and booting to it on the first attempt.
ترست بايلوت
منذ أسبوع
منذ 5 أيام