معلومات عنا
دعم العملاء
احصل على التطبيق

قم بتوجيه الكاميرا لتنزيل التطبيق
حقوق الطبع والنشر © 2024 Desertcart Holdings Limited


🛡️ Elevate Your Airflow Game!
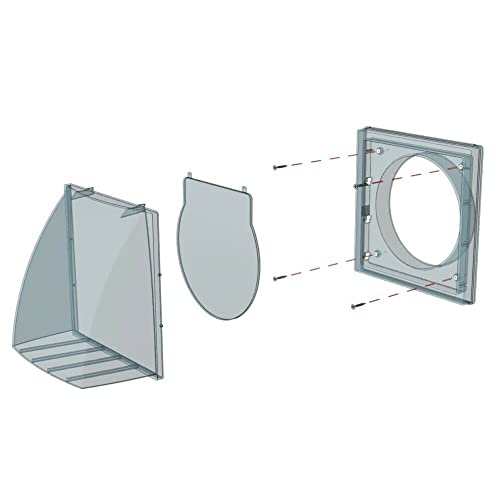
The AirTech-UK Cowl Gravity Flap Wall is a 125mm non-return valve duct cover designed to protect your ventilation system from weather elements while preventing backflow of odors and draughts. It comes complete with installation accessories, ensuring a perfect fit for your extractor fans in kitchens and bathrooms.
| Manufacturer | AirTech-UK |
| Size | 125mm |
| Colour | White |
M**S
Silence is Golden (with some amends)
We have spent weeks looking for an extractor fan that is truly ‘silent’ (extractor vents that tap/bang in the wind are like noise torture) and doesn’t make the bathroom chilly with a back-draught as well as stopping bugs 🥶Unfortunately, we don’t think these exist… Not straight out of the box anyway, which seems crazy as sooo many people have these same issues.We purchased the 100mm version of this extractor fan in black, which has a flap that remains (almost) closed when a bathroom extractor is off (limiting the air and bugs that can travel through the vent into your bathroom). The flap then opens when the extractor is turned on, due to the air pushing against it in the correct direction - Simple, yet effective.This product would work great straight out of the box, however…- The plastic flap can bang against the plastic when opening and closing and it can be loud depending on where it’s located / how sheltered it is from wind- It’s not fully bug proof as the flap (for us) didn’t fully close all of the time when extractor fan was offSo, I have slightly modified ours to achieve what we wanted - Here’s how, just in case you find it useful (photos included).First, I made sure the item fit my vent duct size which was 100mm. I held it up where it was going to be fitted and it was a great fit, so I knew I could start modifying.On the front of the vent just inside the first black border of the vent were 4 very small plastic clips (2 on each side), I very carefully used a tiny screwdriver to gently push these clips, one side at a time. This separated the vent in two.Please be very very careful, if these clips were too cold or handled roughly, I imagine they would snap extremely easily.The next potential disaster (which would make the vent useless) is if the flap inside both parts of the vent fell out and the little plastic loops that hold it in place snap… You can see the flap and the two plastic loops in my photos. Break either of these loops and it’s game over. Open the vent with great care over something soft and not from a height 👍I then took some fine bug netting (also purchased from Amazon) and cut multiple squares the same size as the vent.Using some ‘Hard as Nails’ (but any suitable adhesive could be used), I carefully put a circle of glue where I wanted the bug netting to stick to.I then placed multiple layers (like 7) of the netting onto the glue, making sure the layers were taught and firmly in place, with no sagging. I cut the excess netting off, as the flap will sit against this net, so didn’t want any rogue/unnecessary netting to hold the flap open further when the extractor was off.I then put that piece of the vent to the side. Placed a few heavyish items onto it to squish the adhesive/netting together and left to dry (make sure adhesive is dry enough before putting something heavy on, as it may stick to your netting and not come off or pull the netting off).Now I wanted to avoid the flap banging onto the opposite side of the plastic when it opened. I got some foam-like material (just old packaging from a delivery we’d had recently) and I cut this into a square, folding it over once and using the adhesive to secure the fold together, making it nice and squishy for the flap to hit against (eliminating any sound).I then put a decent amount of adhesive on one side and holding the flap up where it would hit the plastic, I made sure I covered the right area with the foam. Then pressing down to bond the adhesive to the plastic and again putting to the side with something heavyish on top of the foam for a while to get a really decent bond that wouldn’t fall off.After a few hours of the adhesive drying… and very happy with myself, I put the two parts of the vent together… Looked to the side… “Ooops, I’ve forgotten to put the flap back in”..Don’t be like me and do this 😂 Luckily I managed to get the plastic tabs open and the vent in half again without breaking it.Best plan is to put the flap carefully back in position ‘before’ you put this back together (remember to note which way round it comes out when you first take it out! One side is smooth and one side isn’t).Flap safely back in place and two vent halves back together I could now secure to the wall. You do get plugs and screws included with this item, but I opted for the quicker and less drilly version of using adhesive to whack it on the wall.Make sure it’s a nice day if you’re going down the adhesive route too ☀️Once on the wall, I stood and pushed the vent for a good few minutes to help it get bonded. Use a spirit level to make sure it’s nice and level…Then you’re done ✔️ I hope this helps someone having the same issues we were 🤓Silence…. Absolute bliss. Would highly recommend this product as great, nice and easy to modify if you want to. Or keep it as it is if plastic banging in the wind doesn’t make you want to rip your own ears off like it does with me 😆So far, mine is doing great and I don’t even know it’s there 🙌
B**M
Exactly what I needed
This was perfect for shutting an awful draught coming through my kitchen exhaust hood. During a recent reno my contractor didn't think to use something with the back draught damper, so we bought this one after reading the reviews. It really stopped a cold wind blowing in my kitchen in the middle of the winter. This is a simple but clever device. The curve prevents the wind pushing against the flap, so the kitchen fumes can get out no matter what the weather. Very easy to install and sturdy enough.
ترست بايلوت
منذ شهرين
منذ شهرين