


🛋️ Elevate your drive with comfort and style—because your Pilot deserves the best!
ISSYAUTO’s Center Console and Front Door Panel Armrest Cover Kit offers a premium, waterproof PU leather upgrade tailored for 2009-2015 Honda Pilots. It provides full protection against scratches and wear, enhances armrest comfort by reducing heat and sweat, and installs easily with a peel-and-stick method. Highly rated and quality-tested, this kit is a perfect blend of durability and luxury, making it a top choice for drivers seeking both style and function.


| ASIN | B07RDPQTS6 |
| Best Sellers Rank | #30,714 in Automotive ( See Top 100 in Automotive ) #105 in Automotive Armrests |
| Brand | ISSYAUTO |
| Customer Reviews | 4.5 4.5 out of 5 stars (2,047) |
| Date First Available | January 17, 2017 |
| Is Discontinued By Manufacturer | No |
| Item Weight | 6.4 ounces |
| Manufacturer | ISSYAUTO |
| Manufacturer Part Number | AZH0073-02 |
| Package Dimensions | 11.6 x 8.3 x 1 inches |
| Special Features | Console & Door Panel Cover Kit |
K**N
Quality and Fit.
Great Quality. Fits well. Looks very high end.
N**3
Worth the upgrade and good quality
Very sturdy and my dog has tried but could not damage it. Went on easy and stays in place.
A**R
Fits like a glove looks amazing
What an awesome product. It offers protection to our arm rest and looks like factory material. Great product for our 2015 Honda Pilot. A+++
D**L
95 minute install
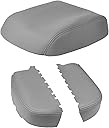
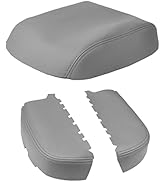
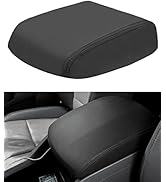
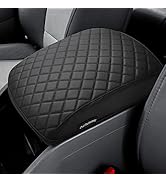
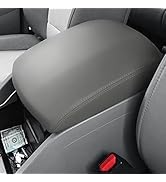
This product appears to be well made; we'll see how it wears now that it is in place. The product is a little thinner than the OEM material it replaces. However, this is NOT a simple installation. My comments refer to installing the center console cover in a 2014 Honda Pilot. There are TEN screws to remove, not two as indicated in the online description. There are four screws for the underside support. Once removed, pressure needs to be applied next to the latch, and the lower support will separate easily from the cover. There are four screws to remove from the hinge. This allows the top to be fully removed for servicing. There are two screws holding the latch, and these will need to be removed. The next step is removing the 80 PLUS staples holding in the leather cover. Needlenose pliers will help, as will a set of right angle needle nose pliers. Many of the staples will break off. Don't run your finger along the edge - you will get cut on the residual. Once the old material is removed, position the new material allowing sufficient overlap to secure all four sides. The product is wide enough. But truthfully, it could use an additional 1/2 inch in length This would make installation much easier. The major difficulty comes with attempting to staple into the plastic. I have three different manual staplers, and none could adequately secure a 1/4 inch staple in the plastic. I resorted to a DeWalt power stapler, on max settings. One of three stapling attempts would take. The others would break or just not take. Once the product is secured, reinstallation is a snap. The hinge has pilot guides, so it is easy to reinstall. The Latch fits only one way. The underside support fits only one way. Total time for an amateur was 95 minutes start to finish. Not too bad, but not the "two screws" described online. The biggest problem was stapling the new product to the old plastic. Finished - the product looks absolutely great - no different than the OEM product when we purchased the car. We'll see how it wears.
Q**.
Require some small hand tools and upholstery stapler.
Love the fit, it is right on. Proper installation would require removal of the old cover and the new cover glued in place and stapled peripherally on the lip. I cheated and just stretch the new cover over the old. Process: 1) Remove the arm rest by removing the screws from the hinges with a Philips screw driver. I work on the cargo area surface like a work bench. 2) Remove the plastic panel under the arm rest using an interior panel tool or just a butter knife will do. 3) Remove the locking mechanism, again use a Philips screw driver. 4) Stretch the cover material around the hand rest. Staple in place. (I used a powered stapler) Press down very tight as working on the cargo area as well as the foam in the armrest will absorb the impact not allowing the staples to penetrate. Use 1/4 inch long staples but becareful in the back ledge of the armrest, the staples would be too long and protrude a bit, enough to feel the end of the staples if you press your elbow down hard. I use a pair of pliers to bend the tips down resulting in a line of perforation on the back edge, not a big deal, you'd have to look for it to see it. It'll take a little work, it is not just a cheap over wrap like cheap overwrap (shower cap style) so for those who aren't handy with hand tools, this is not for you. Edges where you have to clear the waffle mold injected stiffening pattern of the arm rest, I just trim around these features but be careful not to over trim exposing the cuts to the upper side beyond the internal panel making it unattractive. I used hot glue to tack things in place as I was doing this by myself and hot glue is a good third hand. Over all job took me just over an hour but, plan it out, have all your tools ready and go at it. Good luck, take your time and you will be rewarded with a nice new looking hand rest. Mine was light gray and the material's color is a 95% match. You'd have to look close to notice it isn't the same material/color but is a very good looking attractive enhanced the look especially if your original armrest cover is torn. Definitely recommend.
T**O
Fits great and works great! It's comfortable as well as protective. Just what I was hoping for.
J**N
never knew this existed! husband is very happy!
ترست بايلوت
منذ شهرين
منذ يومين