✂️ Craft Signs Like a Pro, No Sweat!
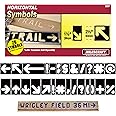
The Milescraft 1212 SignPRO Kit is a comprehensive router jig system designed for creating professional-quality engraved wooden signs up to 36 inches wide. Featuring self-spacing character templates in multiple sizes, tool-free TurnLock bushings, and durable carbide router bits, it streamlines sign making with precision and ease. Its low-profile clamps and sturdy rails enhance stability and router compatibility, making it the ultimate upgrade for serious DIYers and pros alike.
| Material | Wood |
| Brand | Milescraft |
| Style | Custom |
| Product Dimensions | 3.15"L x 3.15"W |
| Item Weight | 1 Pounds |
| Manufacturer | Milescraft Inc. |
| UPC | 893264000615 |
| Global Trade Identification Number | 00893264000615 |
| Size | 1-(Pack) |
| Part Number | 1212 |
| Item Weight | 1 pounds |
| Item model number | 1212 |
| Is Discontinued By Manufacturer | No |
| Color | Black |
| Item Package Quantity | 1 |
| Number Of Pieces | 1 |
| Measurement System | English |
| Included Components | (2) low profile c-clamps, to permit easy passage of the router, 1/4" tungsten carbide router bit, 2 sets of 1-1/2" horizontal characters, 2 sets of 1-1/2" vertical numbers 0 to 9, 2 sets of 2-1/2" horizontal characters, 2 sets of 2-1/2" vertical numbers 0 to 9, 3/8" carbide tipped router bit, 5/8" metal nose bushing, 7" TurnLock™ BasePlate with 4 mounting screws, 7/16" metal nose bushing |
| Batteries Included? | No |
| Batteries Required? | No |
| Warranty Description | 3 year limited warranty. Milescraft will at its option, repair, or replace without charge, any defects due to faulty materials or workmanship for three years from the date of purchase. |
L**T
Milescraft vs. Rockler Sign Making Kits
I have been using the Rockler Interlocking lettering kit for several years with excellent results but found them a little tedious to use. I saw the Milescraft kits and liked what I saw . I also saw mostly good reviews but some bad reviews but went ahead and ordered the kit along with extra lettering.I had already watched a couple of videos on how to use the Milescraft and after unpacking the kit went right to work making signs.The kit comes with a router base plate with many holes to fit many different routers, including mine. The reason for the new base is because the kit used the Milescraft nose bushing that fits into the letter templates. I have a complete kit of nose bushings that work with my existing base and one of them was exactly the same as the Milescraft bushing. Consequently, I went ahead and used my existing base and nose bushing. If you plan on buying a complete set of Milescraft nose bushings then you would need to use this base plate since each bushing interlocks with the base. Compared to my bushing set the interlocking set would be nice if you want to quickly change bushings.Here are some Milescraft to Rockler comparisons:- Lettering Material is pretty much the same, fairly stiff plastic. In both cases I found this to be more than adequate- Rockler interlocks, Milescraft slide into a slotted rail.- Router slides over the Rockler plastic templates, Router slides on Milescraft aluminum rails and does not touch the template+ less friction and no chance to hangup on tape with the Milescraft+ i found it easier to see what I was doing with the Milescraft+ sawdust does not build up in the router with the Milescraft- You must tape the Rockler templates to your work, You clamp the entire Milescraft rail system to your work- tape can leave residue on the work pieces as well as on the letters- Using Milescraft's extra rails you can increase the length of your work area to around 36 inches. Rockler is limited by the number of letters you have. The drawback with Rockler is that long lines of letters becomes unwieldy since you must usually change several letters and make as many as three passes through the line to get complete letters. You are constantly messing with your tape and trying to make sure that you have the correct letter parts installed. With Milescraft you simply string the letters together and route! Letters like A, B, D, O, P, Q, and R require that you maintain the nose bushing against the template to keep from routing out the 'islands'. This was not difficult to do as long as you stay focused. If you are making several signs with the same lettering you simply slide a new board under the Milescraft and route. With Rockler you must un-tape and move the unweildly string of letters. Most letter stings require that you change the template and make multiple passes. This makes the Rockler harder to use.- It is easy to facilitate longer lines of text with Milescraft. I use a 6 foot work area and screwed boards to the work area that are no thicker than my sign material. My sign board slides between the two boards. I align the left side of the Milescraft to the left side of my sign board and use the Milescraft clamp to clamp this end. I then screw the right side of the Milescraft to the boards I attached to the work area. After routing the first set of letters I change the letters in the Milescraft by removing the clamp on the left, remove and replace letters, reattach the base, slide my sign board to the left the appropriate amount, re-clamp the left side and route. I don't do anything with the right side. If you are using sign material that is wider than about 6 inches you can't use the clamps or the extra boards. Instead you will need to figure a way to lock down the rail system. You can use tape which would probably work very well or screws if you don't mind small holes that might need to be filled. This system worked very well for me.When I get to making a sign on a larger work area, for example 2' X 4 ' I will probably attach some material to the turn-lock base plates to increase the width of the plate to accommodate taller material. It may work just as well with good tape. We shall see.- I am going to order another set of rails and rail connectors from Milescraft for $12 which will allow me to extend the lettering length to about 45 inches which will be plenty. I will screw a piece of angle aluminum to the rail connectors with the flat end on my work surface so that I can tape to my work surface to help stabilize the rails.- Some reviewers commented that they had damaged the letters because they were flimsy. If you do not have a plunge router I don't recommend either the Milescraft or Rockler systems because trying to drop the bit onto the work surface with the bit spinning would make it very difficult to get the nose bushing into the slot and very easy to have the bit contact the template. Here is what I do:- with the bit raised and motor off drop the nose bushing into the template slot.- start the motor and press the router into the sign material, lock the router in the down position.- carefully push the router along the template taking care when doing certain letters (mentioned earlier)- Raise the router bit then turn off the motor.- You could lift the router at this time but I like to wait for the bit to stop first.Why don't they make the templates from stronger material? Simply because a carbide bit spinning at 12,000 RPM that hits a stronger surface could be disastrous. If it hits plastic you have just sacrificed the template and possibly saved an eye. An entire set of letters only costs about $10.I can easily recommend either sign making system but think that the Milescraft is much easier to use. If you need to make many signs you will like time saving aspects of the Milescraft system. I am thinking of fabricating a rail system that would accept the Rockler letters if it gets to where I think it might be worth the investment of my time. Us retired folks have so many irons in the fire that we don't have any spare time!Since I now have 4 different lettering sets between the Rockler and Milescraft there are so many options.Good luck with your sign making! Buy the kit, BUT WATCH THE MILESCRAFT VIDEO BEFORE YOU USE IT!
B**S
Not perfect, but pretty darned good
My experience seems to be a little different than most of the others who like this jig. For one, the bits seem too short. I haven't seen a lot of comments about that. If I follow normal procedure and bottom out the bit in my DeWalt plunge router and then pull it out a 16th, the bits are much too short. I can buy longer bits. In fact, I have some on hand. For another, the Milescraft included directions say to set up the router so that it cuts a 3/32 groove. The videos just say to adjust for the depth you want. At 3/32, the one letter I cut was perfect and did not need sanding or removal of fluff at the edges.. At deeper depths, it certainly does. But at 3/32, you won't be making a very visible sign. I'll cut deeper and clean up the edges as needed.Nevertheless, despite those things, the kit does allow me to create signs, albeit, signs that need a little work after cutting. I haven't used the extension bars yet, but I know that those have to be braced.The second sign I created came out perfect, except for the top of the A. I have two of them in my name, and one of them chipped out the top of the A where it comes to a point. I may have been better off routing out the whole top of the A. As it is, I'll cut both of them down a bit to just below where the tearout is on the one A.Overall, with a little practice, I should be able to turn out satisfactory signs. Compared to every other system I reviewed, this is the best and/or the cheapest.For those who seem to nick the letters when removing the router, the trick is to not remove the router while it is running, or at least, not remove the router until you raise the plunge mechanism. Take your time.
M**S
It's a nice set, however...
Okay, so it's a reasonably nice set. Instructions lacked a few things. For example, how to line up the base when there is rarely more than one hole to use. It is vague and ignores ideas on how to drill your own holes, or find a way to secure it. A person can around that. One would think that there would be a list included that would help a newbie get past those kinds of road blocks. As far as some saying that the dies crack too easily or get chewed up, my reaction is, "huh?" If you use the bushings correctly and only turn it on once the bit is in place, no die should be able to be chewed up. Me thinks the ones who complained about this were those same guys (and they've got to be guys, after all; women read the instructions in every language!) anyway, they are the same guys who NEVER read the instructions. This is the easy part. Just use the sign pro the way it was designed to be used, be a little careful, and you'll be pleased that you bought it. Some little ticky tacky things that could be improved are: why force people to tighten the bars with a flat head screw-driver, but then, force us to tighten the top adjusters by using a Phillips screwdriver? And those screws that require a flat head screwdriver? They are soooo cheap. At least use decent screws there. It seems as though one of the bar holders could allow the bars to go all the way through it so that you would not even need to bother with spacers... You could simply push the letters together that way and tighten the side (flat head) bolts. No need for the top brackets that way... Explain to me why they couldn't do that. If there's a reason, I'll be happy to hit my forehead and cry out, "Why am I such an idiot!"
ترست بايلوت
منذ أسبوع
منذ شهرين