We remain fully operational. Our teams are working around the clock to ensure your deliveries continue safely.

قم بتنزيل التطبيق


معلومات عنا
حقوق الطبع والنشر © 2024 Desertcart Holdings Limited
قم بتنزيل التطبيق
Buy anything from 5,000+ international stores. One checkout price. No surprise fees. Join 2M+ shoppers on Desertcart.
Desertcart purchases this item on your behalf and handles shipping, customs, and support to Morocco.
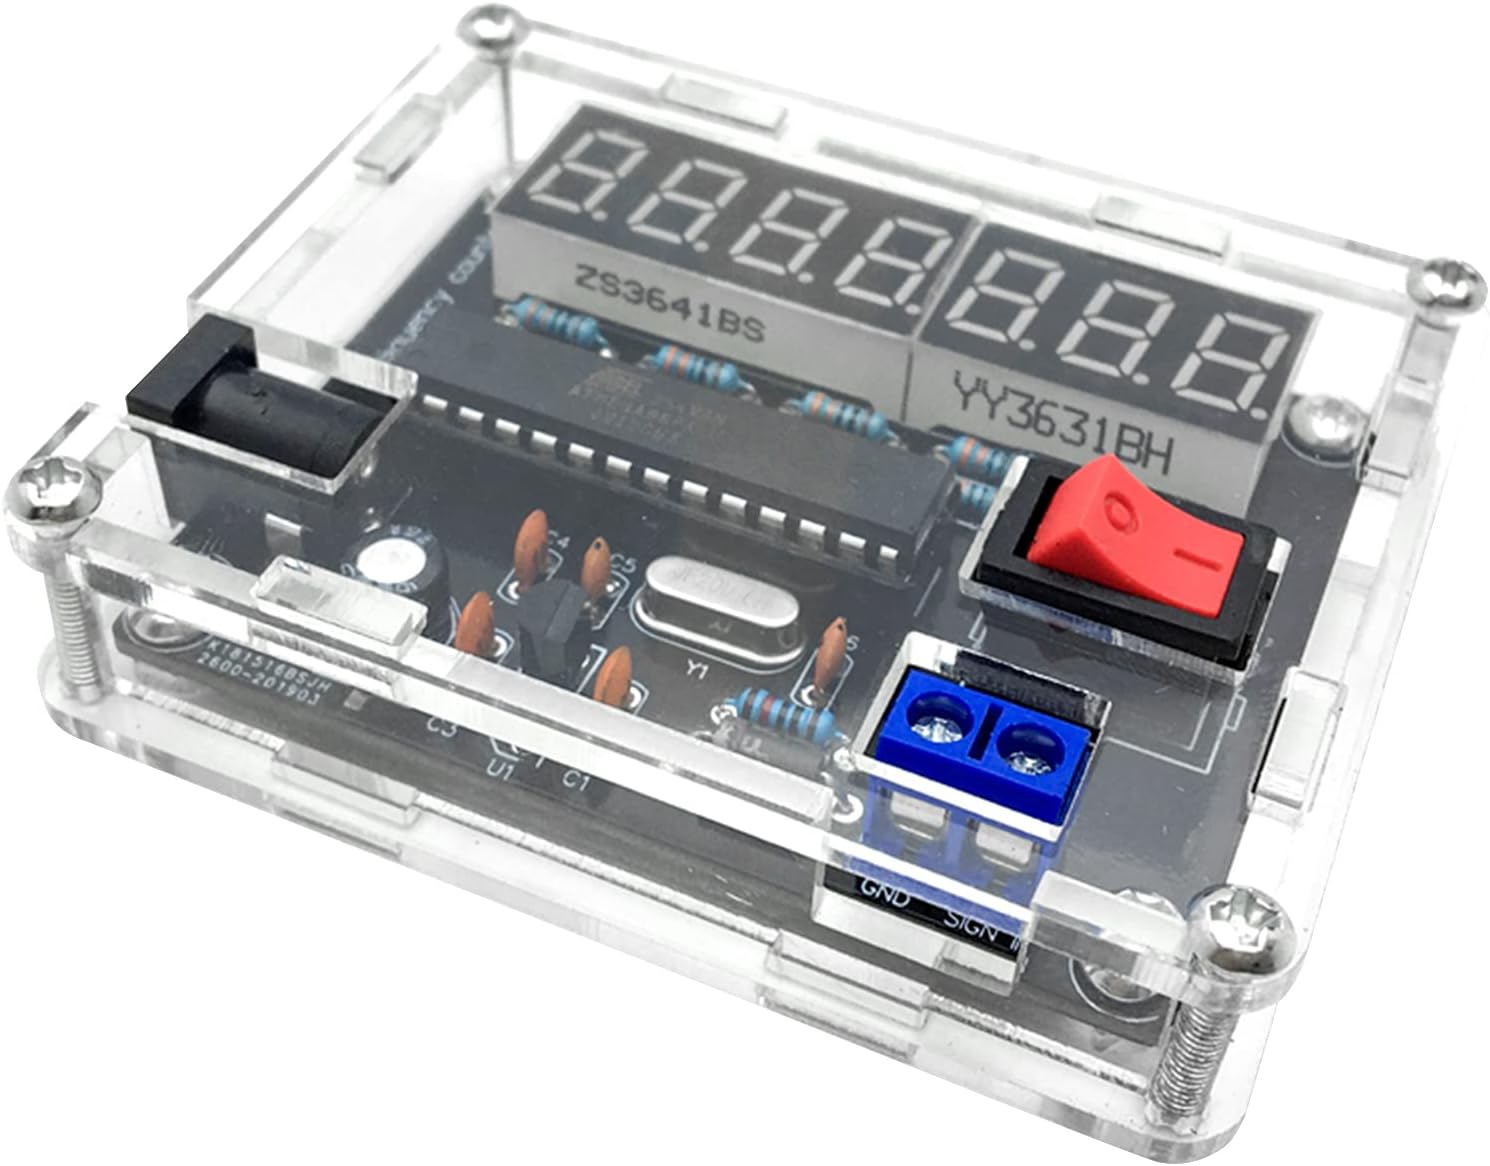
⚡ Build. Measure. Dominate your frequency game.
The DIY Frequency Counter Kit by Risegun offers a professional-grade frequency meter with a broad 0.45Hz to 10MHz range and ultra-high 7-bit resolution. Designed for electronics enthusiasts and professionals alike, it features smart automatic range switching and versatile power options including USB and battery. The kit includes all necessary components and a transparent acrylic case, making it an ideal hands-on project for learning and precise frequency measurement in home or industrial settings.


| ASIN | B09GYD314R |
| Best Sellers Rank | 267,916 in DIY & Tools ( See Top 100 in DIY & Tools ) 672 in Multi Testers |
| Brand | Risegun |
| Customer Reviews | 3.7 3.7 out of 5 stars (34) |
| Date First Available | 23 Sept. 2021 |
| Item Weight | 90 g |
| Model Number | Risegunkayudt83p4 |
M**D
Excellent product and currently at a very reasonable price.
This is an excellent product and currently at a very reasonable price. The quality of the PCB is excellent, as good as any used in professional equipment. The Meter comes as a kit, and components need to be soldered. The number of components is not large but some soldering skill is required, but with a bit of care it can be done easily and quickly even by those with only elementary soldering skills. I used a soldering iron with a pointed tip and run it hot (400 deg C) so that the solder melted quickly, minimising each component exposure to heat. I used thin solder wire (about 2 mm diameter). The frequency Meter works very well, I tested it up to 100kHz, and a quick comparison with another frequency meter (different make) showed that it was reasonably accurate. The red switch toggles between measuring of frequency to measuring of period in microseconds. The transparent case is easy to assemble and is held together with four of the screws provided. All in all an excellent product, currently at a very reasonable price, and I recommend it.
A**R
Incomplete kit.
I don't know, as the baseplate was missing so I could not build the kit and test it, so will reorder later.
J**M
I loved the look of this module
I loved the look of this module. It’s elegant engineering saying more about the care that went into designing it than the finished product promised! I’m afraid, on assembly my kit did not work, perhaps one day I’ll try again? Unfortunately I don’t think it was my error that jinxed it but some error in the program code!
J**I
Pretty Good Kit
This is the second one I've built, the first one went bang... entirely my fault This particular one has three more digits above any other on sale of a similar type so I decided to try again and was successful Pretty accurate frequency measurement but the extra digits are a gimmick really, it's not accurate to that resolution 😂
E**N
Was working for 3 weeks
Now it won't do anything, something in it has malfunctioned, disappointing.
L**I
hobby
F**B
der Bausatz ist einfach zu fertigen u funtioniert ausgezeichnet ! leider ist die Verpackung schlampig gemacht. Einige Pins der LED,s waren stark verbogen, weil das Styropor in dem sie aufgesteck waren, an einem Ende zu kurz war und diese Pins lose in der Luft hingen. Nachdem die Pin,s beim Zurückbiegen nicht gebrochen sind ist alles ok. Das Gerät zählt sowohl WechselSpgs-. und auch GleichSpgs-Impulse ab einem Eingangspegel von ca. +4,5V. Ich würde den Bausatz wieder kaufen, allerdings sofort zurücksenden wenn etwas nicht in Ordnung ist. Nachtrag nach einigen Monaten: Der Zähler schneidet am Eingang die neg. Signalanteile bei ca. 0,7V ab und das Messsignal wird damit stark verändert. Lösung zwischen dem SignalEingang und der Diode einen Widerstand einlöten. Der Widerstand hängt von der Signalstärke und der Messung ab. Ich habe einen 2,2k; wäre natürlich besser wenn es mit einem 10k funktionieren würde. Dies habe ich nicht getestet, weil es ja auch von der jeweiligen Anwendung abhängt.
B**3
Cablé en 1h , j'ai plus bataillé avec la mise en place du boitier . Reste à tester en fréquence . 8 traits rouges à la mise sous tension .Le bouton on/off n'est pas un bouton on/off , autre fonction . je l'ai supprimé. Bon j'ai cru avoir une panne mais non il est sensible aux tensions d'entrée . Si vous avez les 8 points rouges votre appareil n'est pas en panne . Voir le signal d'entrée tension faible . Maintenant c'est bon .
L**E
Preis_Leistung OK! Dokumentation eine Katastrophe !
B**S
Dés la mise sous tension, 7 traits horizontaux s'affichent sur la rangée de digits, ce qui atteste d'un fonctionnement correct sans signal sur l'entrée, ou un signal hors fréquences limites ou une tension d'entrée insuffisante (environ 1 à 2 volts). L'inverseur de mode : Position [ O ] affiche la fréquence en Hertz Position [ I ] affiche le durée de la période en micro secondes. Je l'ai encastré sur un fréquencemètre qui ne possédait pas d'affichage de la fréquence.
ترست بايلوت
منذ أسبوعين
منذ شهر