معلومات عنا
دعم العملاء
احصل على التطبيق

قم بتوجيه الكاميرا لتنزيل التطبيق
حقوق الطبع والنشر © 2024 Desertcart Holdings Limited


🌟 Brighten your outdoors with effortless style and protection!
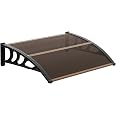
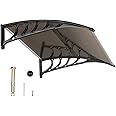
The F2C 40"x80" DIY Outdoor Polycarbonate Awning features a durable 5mm polycarbonate cover that resists weathering and rust. Designed for easy manual assembly with included accessories, it offers modular installation options for wider coverage. Finished in a vibrant yellow with a modern solid pattern, this awning blends functionality with contemporary outdoor aesthetics.


| Required Assembly | Yes |
| Operation Mode | Manual, found in image |
| Style | Modern |
| Pattern | Solid |
| Color | Yellow |
| Fabric Type | polyester blend |
| Material Type | Polycarbonate |
L**A
Very sturdy and beautiful
2 month follow up:We had the worst wind in the mountains and even though my tiny house was shaking like crazy from the wind, there was no shaking in my awning! It is still up like new and is bringing me a lot of happiness and protection from rain!Amazing awning for my Tiny House and installed it myself.Things you will need To buy for this project to do it by yourself:-6 3” or 4” inch wood screws-6 large flashes for your screws-8ft 1x4 piece of wood-long level (for more accuracy)-painters caulk or paintable silicone-tape to tape the level-wood drill bits to match your screwsThe bolts that come with the awning are for cement or rock siding and will not work if you have a regular wood/vinyl siding, so don’t even bother with them and get yourself 6 3” or 4” wood screws with a flash, because the hole on the awning attachment is somewhat large and your screw will go through.1. I pre-drilled the wood and made sure the holes fit perfectly while the awning was still on the ground. Made sure to measure the holes in the same distance on the wood.2. Taped a long level on the top of my wood, so my holes are level while I’m drilling into my siding. I did the first side hole, then put a screw in and worked on the other two holes while I had the anchor from my first screw holding the wood in place. After the top holes are made unscrew the wood and tape a towel on one side of the wood so some can give you some support while you are trying to screw the awning in.Had my 10 yo daughter give me some support with an 8 foot wood while I was screwing the last screw.3. Prefill the holes with the caulk and put the caulk on the shaft of your screws one at a time to prevent wood rottening in the future. Just wipe off the excess after the screw is in.4. Instal the part of the awning with two sides first, because it’s easier to instal a one sided part after the two sided is already on. Don’t tighten the top screws hard , because you will need to adjust the bottom holes using a level and it’s hard to do if you tightened it too hard.5. After the awning is on adjust the bottom holes using the level vertically, and drill your holes starting from middle. Make sure your awning is put tightly and doesn’t come apart, mine came apart in the middle and I had to readjust using the bottom holes.6. Apply a line of caulk between the awning and siding to prevent water from sipping in. There is like 1/16 of a gap between awning and the siding.The rain and high wind literally started right after I installed this awning. I was worried it would fall apart as some other reviewers said their fell apart.It’s been 3 weeks and it is on and doesn’t even shake when it’s windy. I love it.P.S. I also attached a 1” foil tape to the middle part of the awning. I read some reviews that the bugs are able to crawl in and it doesn’t look good. So I bought a 2” foil tape and cut in in half and covered all the sides to prevent bugs from coming in.I hope you enjoy your project!
S**M
Perfect for my needs in mild climate
I put this over a set of French doors on the side of the house that seemed to leak a bit when it rained. Problem solved. It resembles the pretty glass-and-metal ones you see on European homes. I love the crazy good price and the fact that it is so lightweight and simple to install. Having said that, I'm in a climate that seldom sees rain, so I don't know how it would be in torrential weather or if it got loaded with snow. And it's on a side of the house that's not really viewed from anywhere else. I say that because it's clearly plastic, so I probably wouldn't show it off on a more visible door. But it serves its purpose beautifully for my needs.
B**9
Good product. Easy installation
It's easy to install and looks great. However, the installation plan must be done carefully first. The whole thing also must be assembled on the ground to make sure all parts fittings are correct (this eliminate any surprises during installation). Extra hardware might be needed. Great product for the price. I will buy another for spare. It may not last very long (plastic aging issue).
T**N
Instruction Suck!
This reason for a 3 star rating is the direction were not clear at all. Making it difficult to put together. Eventually I was able to figure it out. The quality is good and easy to install where I needed it. Now that I know how to put it together I would buy again.If you buy this let me know and I can walk you thru the process.
A**A
how to install on facia board
pros: sturdy, good looking, and easy enough assembly if you are "handy"cons: very poor instructions.how to install details: The included instructions are worthless regarding how to attach this awning to anything. I installed on a 3/4" cedar facia board. Used 3/8 zinc bolts, washers and T-Nuts from home depot. When installing multiple the easiest way is to install 1 panel (2 beams) then mark a stick with the distance between beams and then mark the location. After marking the location, use a square to mark a vertical level line then hold up a beam and mark the drill holls. Drill pilot holes, then drill oversized holes, just big enough for the t-nut to snugly grip. will take about 20 minutes each additional panel.
M**N
Not sturdy
This material is plastic and is not sturdy. Also hard to put together .
M**S
With over 20 + years of DIY remodels and renovations experience I don’t recommend this product save your money
Upon un -boxing I observed that each piece was structurally poorly made. The panels cannot be connected without using your own methods as it will come completely apart during the assembly process. When attaching the screws to the anchor points beware that there is no real support holding the screws to the cover and they will break off at the least bit of pressure. Plastic parts cannot connect without a struggle as you have no way of locking each section then moving on to the next. This is a low end cover that I would never put on my home and or use as its materials are the lowest grade. This product is fragile the cover is hollow . With over 20 + years of DIY remodels and renovations experience I don’t recommend this product save your money.
M**N
Can be installed by one person
Great product for the price. It would probably be better to install it with two people. However I did it on my own and everything worked out great. I installed screws in all the places that were pre-drilled and that added stability to the finished product. Last pic is after HURRICANE Sally. Awning withstood cat 2 storm.
ترست بايلوت
منذ 5 أيام
منذ شهرين