🔧 Fix it fast, fix it right — Moen’s brass cartridge keeps your flow flawless!
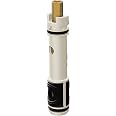
The Moen 1225 Single Handle Faucet Replacement Cartridge is a durable, brass-stemmed OEM part designed for quick and easy repair of most Moen single-handle faucets. Engineered for hassle-free installation, it includes tools to simplify replacement and is backed by a 1-year limited warranty, making it the smart, sustainable choice to restore your faucet’s smooth operation without full fixture replacement.


| Material | Brass, Plastic |
| Brand | Moen |
| Color | N/A or Unfinished |
| Product Dimensions | 12"L x 3"W |
| Exterior Finish | Brass |
| Special Feature | Easy to Install, Durable |
| Included Components | Replacement Parts or Service Kit |
| Item Weight | 1.6 ounces |
| Metal Type | Brass |
| Handle Material | Brass |
| Customer Package Type | 1 |
| Unit Count | 1.0 Count |
| Number of Items | 1 |
| Manufacturer | Moen Incorporated |
| Item Depth | 1.4000 |
| UPC | 026508012253 |
| Part Number | 1225 |
| Item model number | 1225 |
| Is Discontinued By Manufacturer | Yes |
| Size | 1 Pack |
| Finish | Unfinished |
| Pattern | Cartridge |
| Item Package Quantity | 1 |
| Number Of Pieces | 1 |
| Water Consumption | 1 Gallons per Minute |
| Number of Handles | 1 |
| Special Features | Easy to Install, Durable |
| Batteries Included? | No |
| Batteries Required? | No |
| Warranty Description | 1 Year Limited |
| National Stock Number | 5136-01-431-1591 |
T**G
Excellent replacement, BUT...be aware...
My shower cartridge was from 1977!! Original to the house being built. I am the second owner. The cartridge became very difficult to pull in and out, and turning was okay but required a good grip. It got to the point though, that pushing it in to turn it off didn't turn it all the way off. Unless you put some body weight into pushing it in. Being that I had no idea what cartridge I needed, I wrote to Moen and ask them. This was the cartridge they recommended for my situation. I'm a 63 year old lady , and I've never replaced a cartridge before, so I read a lot of reviews and watched YouTube videos. I bought a cartridge puller tool, which I'm glad I did!! Excellent advice from those that advised it.Following the directions of YouTube videos, I was able to remove and install the new cartridge very easily. I was concerned that it wasn't going to work because the cartridge I purchased was completely different than the cartridge I pulled out!! Not even similar! So when I got everything put back together and turned the water back on, I had a little bit of trepidation that water was going to come blasting out because it was the wrong cartridge. LOl!! I even pulled the shower curtain closed, just in case!! However that didn't happen, and the cartridge worked flawlessly. As a matter of fact it works so smoothly that it's almost completely effortless. Such a wonderful change!! I will add, that I did lubricate the cartridge (per video advice) with silicone meant for swimming pool equipment and gaskets. And I'm sure that that helped make it operate more smoothly.Now you may be wondering why I said "But" in the title. Well, the cartridge I received is not the cartridge pictured for this item. The only picture that looks like the one I received is if you scroll down through all of the information and you see the Moen box with the cartridge in it, and the cartridge is actually transparent. That's the one I received! I did not see Moen stamped on it, and I actually looked! So that's why I said "But". I did not receive the cartridge that is shown in the picture at the top of this item. I really think that the picture should be changed to accurately represent what the buyers are going to receive.
B**F
Works great, but can be a tricky DIY job
There are a few tricks to a DIY job of replacing the old Moen shower valve cartridge from the shower water supply pipe.1) Once you've removed the plastic handle and shower valve cover you should thoroughly soak the area between the old Moen shower valve cartridge and the shower water supply pipe with a CLR (Calcium, Lime, and Rust remover) solution. In fact you should keep spraying this area with the CLR solution, and even let it sit soaking overnight. The reason is that the old shower valve cartridge has a tendency to stick to the shower water supply pipe thereby making it very difficult to remove. Soaking with the CLR solution should help to un-stick the valve cartridge thereby making it easier to take out.2) You are now ready to remove the old Moen shower valve cartridge.3) Pull up and out the retainer U-clip on top of the old shower valve cartridge. Important: you cannot remove the old shower valve cartridge until you've removed the retainer U-clip. Make sure to save the retainer U-clip and do not lose it, you will need to put it back in when the new shower valve cartridge is in place.4) Insert the white plastic tool, which is included in the replacement valve kit onto the cartridge stem so that it straddles the ears in the old shower valve cartridge. Use pliers on the white plastic tool and loosen the cartridge by twisting it clockwise, and counter-clockwise. If need be, spray more CLR solution in between the shower supply pipe and the old shower valve cartridge.5) If using the white plastic tool you are able to cause the old shower valve cartridge to freely rotate within the shower supply pipe (i.e you have un-sticked it from the pipe). Use the pliers to grasp the cartridge stem and pull it straight out of the shower supply pipe.5a) If the entire old shower valve cartridge comes out then proceed to install the new shower valve cartridge at step 8.5b) If only the center valve comes out and the cartridge casing remains within the shower water supply pipe. Then you will need to either purchase (Amazon link below) or rent the "Danco Moen Cartridge Puller" tool. Your local hardware store (like Denault's Hardware) will also rent these out for a nominal fee, my local hardware store rents it for $3 for a 3 hour period. Then proceed to step 7.Moen Cartridge Pullerhttp://www.amazon.com/Danco-Moen-Cartridge-Puller/dp/B000DZKXDQ/ref=sr_1_2?ie=UTF8&qid=1351998625&sr=8-2&keywords=moen+cartridge+puller5c) If you are unable to get the old shower valve cartridge to freely rotate within the shower supply pipe, or you destroy the white pastic tool because the old shower valve cartridge is really stuck then you will need to either purchase or rent the "Danco Moen Cartridge Puller" tool described in step 5b above. Then proceed to step 6.6) Using the Danco "Moen Cartridge Puller" tool, insert the end of the tool onto the cartridge stem so that it straddles the ears in the old shower valve cartridge. Grab the handle of the tool and loosen the cartridge by twisting it clockwise, and counter-clockwise. If need be, spray more CLR solution in between the shower supply pipe and the old shower valve cartridge. Once the old shower valve cartridge freely rotates within the shower water supply pipe, use pliers to grasp the cartridge stem and pull it straight out of the shower supply pipe.6a) If the entire old shower valve cartridge comes out then proceed to install the new shower valve cartridge at step 8.6b) If only the center valve comes out and the cartridge casing remains within the shower water supply pipe then go to step 7.7) If you get here, then you have pulled out the center valve from the old shower valve cartridge, but the old cartidge casing is still inside the shower water supply pipe. Now you will need to use the Danco "Moen Cartridge Puller" tool to remove the old cartidge casing still inside the shower water supply pipe. This is done by moving the brass slip on the tool to push the springed pin at the end of the long skinny tube of the tool down. Next insert the tool's long skinny tube into the the old cartidge casing inside the shower water supply pipe until the brass slip is pushed off the springed pin and it pops up and engages a hole at the end of the old stuck cartridge casing. You may need to play with this for a little while by rotating and pushing the tool until its springed pin engages and catches the hole built into the old stuck cartridge casing. Once the tool's springed pin has been engaged, then you need to yank and pull out the old cartidge casing. It may take a bit of pulling, and as before it's a good idea to keep spraying the area with the CLR solution.7a) In the unlikely event that you still cannot get the old cartidge casing out with the Danco tool. Then your options are to either call a plumber, or try to remove the old cartidge casing by threading it and inserting a bolt into it which you would then yank out. The following YouTube video shows how to do this, but this is to be used only as a last resort.[...]7b) If the old cartridge casing is successfully pulled out, then proceed to install the new shower valve cartridge at step 8.8) INSTALLING THE NEW VALVE CARTRIDGE: If your new valve cartridge does not come with the outer casing pre-greased, then you should apply plumber's grease to it in order to ensure that it will be easier to remove in the future.9) Push the new valve cartridge straight into the shower supply pipe, making sure that the ears of the cartridge are lined up precisely with the retainer U-clip notch.10) Re-install the retainer U-clip on top of the new shower valve cartridge by inserting it down into the notch.11) Re-assemble the shower shower valve cover (add caulk around it) and the plastic handle.
B**A
Plug and play
No issue changing out the well used cartridge. Installed and works as expected.
A**R
Good OEM product
Bought for a dripping tub faucet. Cartridge came pre-lubed and ready for use. Just had to pop out the old one and pop in the new one and was good to go.Good price for an OEM product and did come with the white plastic tip that you can use to loosen the old cartridge. Would recommend.
T**H
Works as advertised but looks different than advertised
Looks different than listing (got a clear plastic housing one instead) but it functions the same.Comes pre greased/lubed.Fixed my leaking faucet handle.
L**F
Shower replacement part needed.
Fit in the shower no problem and works like new again. Hopefully I don’t need another one. Would buy again.
M**Y
Easy job for novice. Don’t be intimidated
This is for you if your decorative “plate holes” are at the 5 & 7 positions AND you only have ONE handle for controlling the water. NOT TWO HANDLES - and certainly NOT THREE.One tub handle that you pull out to start water, and you turn lefty /righty to increase/decrease temperature. If that describes your scenario plz continue reading. I got lucky, as both of my existing cartridges slid right out with gentle pulling using a locking pliers. Hard water will likely make this a sticky widget - especially if it’s been 20 years. Carefully watch the washer and the retaining clip folks. Both can disappear easily. The included white plastic spacer thingy helps a lot. Last FYI - I had to call my city water utility because there is no shutoff accessible for me.
ترست بايلوت
منذ 3 أيام
منذ يومين