Description
🛠️ Fix it once, fix it like a pro—PC-Masonry Epoxy seals the deal!
- FINISH LIKE A PRO - Paintable, stainable, and machinable after curing for seamless restoration.
- TEMPERATURE TOUGH - Operates in extreme temps from -20°F to 200°F, ensuring reliability year-round.
- ROCK SOLID STRENGTH - Delivers 1690 PSI tensile strength for durable, long-lasting masonry repairs.
- WEATHERPROOF WONDER - Resists moisture and works flawlessly on wet or dry surfaces—indoors or out.
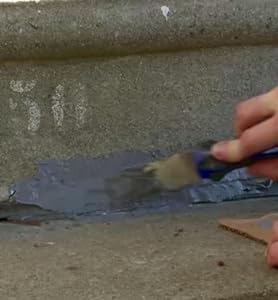
- VERSATILE APPLICATION - Non-sagging paste perfect for horizontal, vertical, and overhead fixes without mess.
PC-Masonry Epoxy Adhesive Paste is a two-part, high-strength epoxy designed for repairing and restoring concrete and masonry. With 1690 PSI tensile strength, moisture resistance, and a broad temperature tolerance, it works on wet or dry surfaces indoors and outdoors. Its non-sagging formula allows easy application on any surface orientation, and it can be painted or machined after curing, making it the ultimate solution for professional-grade masonry repairs.