Desert Online General Trading LLC
Dubai, United Arab Emirates
Desert Online General Trading LLC
Dubai, United Arab Emirates


🚪 Unlock Convenience: One Remote, Endless Access
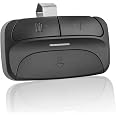
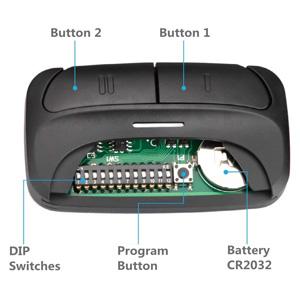
The Acvoce Universal 2-Button Garage Door Opener Remote is a compact, dual-channel device compatible with a wide range of major brands including Chamberlain, LiftMaster, and Genie. Featuring support for both Learn Button and DIP Switch programming, it offers versatile control over up to two garage doors or gates. Powered by an included 12V lithium metal battery and equipped with a convenient visor clip, this remote combines reliability and portability for the modern homeowner.


| Manufacturer | Acvoce |
| Item Weight | 1.44 ounces |
| Product Dimensions | 3.23 x 1.73 x 0.71 inches |
| Item model number | 749607459209 |
| Batteries | 1 Lithium Metal batteries required. (included) |
| Color | Purple/Yellow/Red/Orange/Green/DIP Switch |
| Style | Remote for Learn Button & Dip Switch 1-P |
| Material | Plastic |
| Shape | Linear |
| Item Package Quantity | 1 |
| Special Features | Operate up to two different brands of garage door openers |
| Batteries Included? | Yes |
| Batteries Required? | Yes |
| Battery Cell Type | Lithium Metal |
| Description Pile | 12V Lithium Metal |
B**N
This keypad is working great for me!
This numeric keypad works very well for my 30+ year old Craftsman garage door opener with 9 dip switch code setting and 390MHz transceiver. I was a bit dubious about purchasing it because it looked just like one I purchased previously from a different supplier that went into a "buzzing" mode frequently when I tried to use it, after pressing a key, and then became completely unresponsive. This even occurred when I was initially setting it up! I found that taking the battery out for a few hours would generally get it working again for a while, but the lack of dependability was unacceptable so I returned it for a refund. This new one has consistently worked fine, no buzzing at all. It was easy to set up. I wonder if the previous one was just plain defective, or if this new one has different/improved electronics and/or programming. I did find it a bit odd that when I initially took it out of the box, the battery was already in it and connected! Anyway, it works! I like this one very much, even better than the OEM keypad I have on a newer opener. The lighted keypad and audio feedback for key presses are very helpful. It is also good to have the keypad information inside the keypad cover. The next question is... how long will this keypad last? I have only been using it for about a week. I will do an update to this review if it fails after an unreasonably short time. Right now, I am very happy with it!
J**.
Great for older model garage door openers
This is the second one of these we have purchased so we now have one in each vehicle. It fits a wide variety of older model garage door openers. I believe ours is a Craftsman from the 90s and this works superb!Overall, it’s a smart, no-nonsense gadget that checks all the right boxes. If you want a dependable, universally compatible garage door remote that actually works as promised—this one’s a solid winner.
S**S
Works well but very cheap construction
I have two garages that over the years ended up with different brands of opener. This "universal" opener is compatible with both of them and works well once I could get the buttons paired.The pairing process is laid out in the instruction manual clearly enough, but depending on your opener it can be fiddly to get working. In order to set a button you have to put it in pair mode, then press the button a number of times to tell it which brand/frequency to use. There is a table in the instruction pamphlet that lays out the different combinations. For my genie opener, the process was easy and straightforward. For my chamberlain opener it took some trial and error to figure out the correct version, and when I found the correct one, it took 19 button presses to set the mode. I had to retry like 10-15 times before I could get it paired correctly.It works well once programmed, but I worry I'll to have repair once the coincell batter dies. The only other critique is the metal clip to mount on the visor is cheap and small, so instead of clipping snuggly to the visor it's instead kind of bent and sticking out.For what it is and how cheap it is, I'm plenty happy, but this isn't a super high quality product.
S**M
Great Remote
Easy to programGood rangeI used to have to use 2 remotes for the 2 different openers I had. These let me just use one. The buttons are pretty sensitive and I sometimes trigger the opener accidentally - but otherwise these are great
W**N
Easiest instructions to follow for your specific type of remote or ceiling mounted unit. Best buy!
If only I had bought THIS on instead of the Lowes product. Took me less than 10 min including re-reading small print instructions for my very very old system. Hint- go by your door opener not necessarily the unit mounted on ceiling in garage. I had apparently been using that instead of a replacement remote instructions which were totally different. Hit this button so many times after a flash blah blah thing. It worked and of I could've Ida jumped for joy. Best buy ever.
S**K
Replaces Craftsman 315 door keypad
My Craftsman 315 key pad was malfunctioning so I bought this replacement. Was a bit concerned because the price was so low and Amazon stated it was a "frequently returned item", but took a chance. I was very happy to find that it was a compatible replacement. The instructions were pretty simple. Took me less than a minute to program once I read the instructions a couple of times. It came with a 9 volt battery already installed. Once programmed, it worked perfectly. The buttons beep when pressed and have a nice feel. Only thing I wish it had was the single button close option. I used to simply press the enter key to close the door, but with this new model, I have to enter the PIN. Not a big deal and maybe I will be able to program it to do that later.
B**M
Didn't work us
Did not operate my garage door opener so returned it.
B**D
It's cheap but it works
I bought this to replace my old keypad. I was a little concerned because of the price but then I thought, as long as it works why not? It's been 6 months and it works great. The instructions were clear enough, setup was easy. My old keypad would close the door when I pressed enter. This one makes you enter the code to close the door. I read some instructions for different keypad that said to hold the 1 and 9 for a few seconds until it beeped to enable/disable one touch close. I tried it and voilà, the enter button will now close the door. 4 stars because the cover is fragile but otherwise what's not to like?
ترست بايلوت
منذ شهرين
منذ 3 أيام