🔧 Unlock flawless faucet fixes with the ultimate Moen cartridge puller!
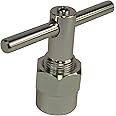
The Danco 86712 Cartridge Puller is a precision-engineered aluminum tool designed exclusively for removing Moen Posi-Temp tub and shower cartridges (models 1200, 1222, 1225). Lightweight yet durable, it effortlessly extracts frozen or stuck cartridges, making it an essential tool for plumbing professionals and DIY enthusiasts aiming for quick, reliable faucet repairs.


| Manufacturer | Danco, Inc. |
| Part Number | 86712 |
| Item Weight | 4.6 ounces |
| Product Dimensions | 1.4 x 5.1 x 7.1 inches |
| Country of Origin | China |
| Item model number | 86712 |
| Is Discontinued By Manufacturer | No |
| Size | Pack of 1 |
| Color | Silver |
| Style | Puller |
| Finish | Steel |
| Material | Aluminum |
| Item Package Quantity | 1 |
| Measurement System | Metric |
| Included Components | Cartridge Puller |
| Batteries Included? | No |
| Batteries Required? | No |
| Warranty Description | Warranty |
K**K
Great tool
Really helped with pulling the old cartridge out of the fixture. Much cheaper than the brand name one, worked really well.
I**R
Get this don't think twice.
I have worked on plumbing for about 50 years!! Yes I'm older but experienced and honestly when I first watched the videos and looked over the old cartridges I thought oh boy! Nothing worse than breaking stuff or leaking stuff or call the plumber expensive stuff. This tool is a must have especially for the price. It's simple to use. Steps....unscrew the screw in the handle out most of the way, rotate the indexed tabs on the tool up with the cartridge in the wall, start turning the screw into where the handle for the faucet used to go, turn the big nut on the Danco tool clockwise. The point here is to let the nut do the work on the tool insuring you the the long screw in the handle seated into the end of the cartridge where the old faucet handle went.As you turn the big nut on the tool you will find you will need channel locks or a crescent wrench and I cannot stress this enough don't be in a big hurry to pull it out of the valve body. Slow and steady and you should not break a thing. I have a 22 year old house and this is the first time I replaced the faucet cartridges!! I should have replaced them the minute they were getting hard to turn, pull and push. This tool will insure that you shouldn't break anything...slow and steady.Finally not getting this tool drops you back to raw muscle power and frankly so often if you have to pull something so hard that you're just about to pull the pipes out of the wall ( I saw a video where the guy was almost there with pulling stuff out of the wall but...the cartridge finally let go) you've got a problem. This tool insured the job was done right and nothing was broken and left in the wall that is part of the valve. If you want a nightmare of a plumbing job don't get this, break something off in the wall, and find a very expensive plumbers bill which probably will set you back $300 or more if your'e lucky!!!The tool is excellent and very robust, not a piece of junk but a solid piece of metal!!
B**B
Did a hard job easily, with one minor addition
Needed to extract a Moen 1222 cartridge that had been in place for almost 30 years, in a house with very hard water. I expected a battle getting it out, with this tool and a good crescent wrench it came right out. NOTE that after reading multiple reviews questioning the tool's durability, I took the precaution of putting a 1" ID steel washer in between the brass valve housing and the tool so the push nut would have a smooth surface to ride against and the brass wouldn't dig into the aluminum of the tool.
F**C
Works Well For Stuck Cartridges
I ordered this with a Moen 1222 replacement cartridge. I did not know whether my old one would be stuck but I didn't want to get into changing it out. It works pretty simply.Fit the open end of the puller over the old (and already install cartridge) by lining up the screw at the end of the puller to the screw hole at the end of the installed old cartridge. Once you have that screw attached and snug (but not too tight), you will need to turn the big nut on the puller with a large crescent wrench or medium-ish pipe wrench. Turn the wrench clockwise. As it tightens it slowly pulls out the old cartridge with each crank of the nut until it eventually pops free.I may have been able to pull my old one without it simply by attaching a large set of pliers to the end and pulling real hard but using this puller seemed safer as it was more controlled than simple yanking it out. I would have worried I would have pulled to hard and damaged the pluming within the wall or possibly the surrounding tile.
M**N
But this tool save time and money.
I’m an amateur and this cartridge remover made the job easy. Worth the investment high quality will keep it for future use.
A**R
Must have to remove the 1222 series Moen valves
So, it is not that the instructions with this product were bad, but more like good in theory, but missing some important steps in practice. I am hoping this review will save you some time by sharing my process to remove a valve that had been in there for 20+ years. So here we go:NOTE: This applies to a posi-temp 1222 series valve. I cannot speak to the 1225 moentrol, but I would guess the process would be similar.1. If you have the valve handle off, valve handle base uscrewed (phillips screw), and the plastic limiter and chrome bezel removed, then you are ready to start this process. It would also be a good idea to block your drain so you don't drop small parts down it if you haven't already done so.2. This is so important I made it its own step. Remove the retaining clip that holds the valve in place. I used lineman pliers to grab the clip tab on the top of the valve body and pull straight up and out.3. Take the tool and spin the hex part as close to the T-bar handle as you can. Place the tool over the brass valve shaft and screw it in where the valve handle was.4. Spin the hex part the tool back away from the T-bar until it hits the brass body that the valve is in.5. Take and adjustable wrench and turn it against it to begin extracting the valve. It will only be able to pull it out about 2 inches and likely it is still stuck pretty good in there.6. Pull with moderate force on the T bar to see if the valve is loose enough to come out. (it probably won't) It is imperative that you only pull straight on the valve. Do no try to rock it back and forth or pull it at an angle. You will break it off in there, and at that point you will have to get real creative to get it out.7. If you made it to this step, then the valve is about half way out but would come out any further. Now, as you pull moderately, begin to twist the T-bar as your pull out on it. (think corkscrew motion) You should feel it break free as you are twisting on it, but it is going to come out hard all the way.Note: The rubber on one side of mine split in two as I removed. I assume that is why it leaked in the first place. One the valve is out, be sure to check the valve body for any debris. (rubber pieces, etc and clean it out before installing the new valve.I am not going to go back through installing the new valve here, but I am going to give you a hint on the retaining clip. It will not fully seat easily, so there are two things to check. First, is the valve all the way in. The clip won't even go in if it isn't. Second, clip goes 3/4 the way in, so use a small flat blade screw driver and gently manipulate each side of the clip through the bottom of the valve body. This doesn't take much force, but rather a bit of finesse.I hope this information helps. It worked for me and my valve came out in one piece. I don't make any guarantees on this process.
ترست بايلوت
منذ أسبوعين
منذ شهرين