Desert Online General Trading LLC
Dubai, United Arab Emirates
Desert Online General Trading LLC
Dubai, United Arab Emirates


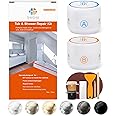
✨ Restore your tub like a pro—color matched, durable, and safe! 🛁
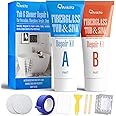
The HomeTinker Tub, Tile and Shower Repair Kit offers a 3.7oz epoxy resin gel that flawlessly matches over a dozen popular bathtub colors. Designed for fiberglass, porcelain, acrylic, and ceramic surfaces, it repairs chips, cracks, and holes with a waterproof, odorless, and non-toxic formula. Backed by a 5-year durability guarantee, this quick 10-minute fix saves costly professional repairs while ensuring a seamless, long-lasting finish safe for children and pets.


| Material | Epoxy Resin Fiberglass |
| Brand | HT HOMETINKER |
| Style | Compact |
| Item Weight | 6.87 Ounces |
| Item dimensions L x W x H | 5.12 x 2.76 x 2.36 inches |
| Water Resistance Level | Waterproof |
| Item Form | Gel |
| EU Spare Part Availability Duration | 5 Years |
| UPC | 760385381896 |
| Unit Count | 1 Count |
| Number of Items | 1 |
| Color | White Biscuit Almond Icegrey Black Dune Linen Bone |
| Surface Recommendation | porcelain tub fiberglass |
| Manufacturer | HomeTinker |
| Part Number | TUB-REPAIR-007 |
| Item Weight | 6.9 ounces |
| Product Dimensions | 5.12 x 2.76 x 2.36 inches |
| Item model number | TUB-REPAIR-007 |
| Is Discontinued By Manufacturer | No |
| Installation Method | Glue |
| Item Package Quantity | 1 |
| Number Of Pieces | 1 |
| Handle Material | Ceramic Acrylic Porcelain |
| Usage | Cured Concrete |
| Batteries Included? | No |
| Batteries Required? | No |
ترست بايلوت
منذ شهر
منذ شهرين