Desert Online General Trading LLC
Dubai, United Arab Emirates
Desert Online General Trading LLC
Dubai, United Arab Emirates


🧊 Keep it cool, keep it fresh — the silent hero your fridge deserves!
The GE Appliances Refrigerator Evaporator Fan Motor WR60X26866 delivers efficient air circulation within your fridge’s fresh food compartment, powered by a 13.6V DC motor with 0.13 horsepower. Its compact plastic design fits seamlessly as a genuine GE replacement part, restoring optimal cooling performance and helping preserve your food longer while saving you time and money.


| Brand | GE |
| Voltage | 13.6 Volts (DC) |
| Horsepower | 0.13 Horsepower |
| Product Dimensions | 7.3"W x 2.7"H |
| Material | Plastic |
| Manufacturer | Abode |
| UPC | 084691856856 |
| Brand Name | GE |
| Item Weight | 7.8 ounces |
| Is Discontinued By Manufacturer | No |
| Part Number | WR60X26866 |
| Compatible Device | Refrigerator |
| Material Type | Plastic |
| Batteries Included? | No |
| Batteries Required? | No |
M**R
Exact Duplicate of What Was In My Refrigerator
This review is for GE Appliances Refrigerator Evaporator Fan Motor WR60X26866, WR60X26033. I have a GE Café French Door Refrigerator. I started to notice that I was getting ice forming in the deli drawer, and items in the upper half of the fridge weren't cold. A quick search online showed the likely culprit to be an evaporator fan that stopped working. I found this fan's model number on an online parts diagram for my model of fridge. I was surprised to find this part here and being sold by GE. The price was fair and had Prime One-Day delivery. I receive this fan the next day, and it was exactly the same fan I had in my fridge.Here are the steps I went through to replace my evaporator fan. I watched a couple of online videos. I removed all contents, shelves, and drawers from the fridge. The deli drawer has a couple of screws and a quick-disconnect power plug. I removed it, followed by the side rails. My side rails had one screw each, and they have to slide towards the front of the fridge, as there is male/female latch. However, I had extensive ice accumulation under the rails and around the evaporator cover. So, before I could remove the rails or cover, I had to melt the ice. I did this by turning off the cooling system, then I used a heat gun on about 15% power to start melting the ice. Alternatively, a water squirt bottle or steamer could also be used. The water bottle is very messy, but very effective. If you go this route you will need a lot of towels. You will need towels in the fridge and on the floor behind the fridge. There is a water drain for the evaporator, so if water starts to go down it, eventually you will have a stream of water coming out of the back of your fridge. I would think the steamer would be the best route. I didn't want the mess of water, so I used a heat gun. It took a long time to melt the ice that was under the rails, and it took a very long time to melt enough of the ice behind the evaporator cover. In fact it took so long that you may want to fill a cooler and/or sink with ice to put your food on so that it does not spoil while doing this. My fridge had six screws holding the evaporator cover on and one quick-disconnect wiring harness. There was also a small cover that went over the evaporator fan's power plug. That small cover just popped out with a small amount of force. Just one clip held it into place. Eventually, I was able to melt enough ice that the evaporator cover started to move when I pushed in on the bottom across the entire panel. I carefully pulled the top of cover back towards me, unplugged the deli drawer fan power plug, then carefully pulled the cover towards the front of the fridge. It's a fairly snug fit around the evaporator with all of the insulation that is attached to the back of the cover. The evaporator fan's wires were run through some molded clip that had no way of me running the wires out of or back into, so I cut the old fans wires and pulled them through. I slid the fan out and could see that it was rusted and seized up. It also had a rubber sleeve around it. I removed the rubber sleeve from the old fan and put it on the new fan. I put the new fan in the exact same way the old was in. Immediately the fan powered up and ran fine. I never put the wires back through the clip, and it works fine. I still had a lot of ice in the evaporator drip tray. I melted it all and soaked up all the water. I then noticed that the drain was clogged in the tray. I used a wet-vac with a thin attachment to remove as much water as possible. Be careful around the fins of the evaporator as they are sharp and delicate. I then put a small amount of hot water into the tray. I also used an airline hose for a fish tank to push down into the drain. You can also suck water out with the hose if you are having problems thawing out the ice clogged drain. Eventually after several cycles of draining the water and putting hot water down the drain it finally cleared. Then I was able to put all the pieces back, turn cooling back on, and the fridge was working just fine again.On a side note:Make sure you take pictures of everything along the way so that you know where all the screws, wires, and covers go back to. Have all your tools and towels ready ahead of time. Plan on the potential of this taking hours, so be ready with sinks, buckets, or coolers full of ice to keep your food from spoiling while you fix the fridge. You also may want to do a full cleaning of your fridge while you are at it, since you will have everything out of it. Had I realized there was a second fan for the deli drawer, I would have replaced that at the same time since it's time consuming to pull all those pieces back out again. Also, don't forget to turn the cooling function back on again. Overall, this was a very straight forward and fairly easy repair. The biggest headache and time-consuming part was just melting the ice.Additional Side Note:I noticed that my refrigerator runs quietly again. For quite a while I was hearing a clicking sound from my fridge time to time. I thought it was just a strange vibration from the condenser motor, but now I think it was the beginning of this condenser fan failing. So, if you hear clicking sounds from your fridge, it may be time to replace the condenser fan, and per my recommendation above, I would replace both the condenser fan and deli drawer fan at the same time.
R**E
Do It Yourself Install
Easy to install in my Cafe refrigerator and works perfectly. It is very quiet. Great price compared to having a professional come in and charge $500.Don't be afraid to do it yourself. Just watch a good YouTube video. I think it took me 30 minutes start to finish to install (including taking fridge apart to get to the fan location and putting back together).
J**I
Perfect fit
Perfect fit and quiet. I purchased a non branded replacement thinking I would save some money.... I was wrong. This OEM fan is way better than expected. Fits perfectly, quiet and does the job. Installed in less than 5 minutes.
W**D
A good replacement fan. But how long will it work?
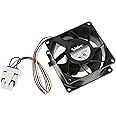
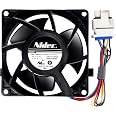
You will notice that all the positive 4- and 5-star reviews on this fan have been submitted shortly after an original fan has been replaced. There is no doubt that these replacement fans usually work, but for how long?The original fan in my GE Profile refrigerator was probably a genuine GE part, like the $80 replacement fan from AppliancePartsPro, shown in the picture on the left. My original fan lasted 7 years. I replaced the original fan with the less expensive Amazon fan, like the one shown in the picture on the right. The Amazon fan lasted 4 years. The 1-star reviews below indicate that some of these fans work for weeks and months, not years. So, why the difference?You will notice some red material (at 10-11 o’clock) near the center of the Amazon fan (on the right). There is no red material on the genuine GE part (on the left). So, unlike what the Amazon information says, it appears that the Amazon fan is a “factory second” that was rebalanced by adding the red material because it failed to operate smoothly coming out of the factory.So, you may save money with this Amazon fan, but you may be replacing the fan a lot more often. Incidentally, if you consider the time required to empty, clean, and refill your refrigerator with the food, replacing this fan will take you at least an hour.A tip: This evaporator fan is used to pull cold air up into the refrigerator from the coiling coils located at the base of the refrigerator (just above the freezer below). If this fan is not working, temperatures in the refrigerator will go into the 50’s. Occasionally, a well-balanced fan may vibrate loudly apparently because frost has accumulated on the fan blades. Before replacing a noisy fan, cut the power to the refrigerator for about 2-3 hours. This will allow any frost to melt from the fan and any ice to melt from the cooling coils. When you restore power to the refrigerator it will take several minutes for the appliance’s computer to reboot and begin operating again.
ترست بايلوت
منذ 4 أيام
منذ أسبوعين
منذ شهر
منذ شهر